5 Books About the Spiritual Aspect of Labyrinths

When you draw and make mazes and labyrinths daily you inevitably read about the history of each. I took some time to read about the spiritual aspect of Labyrinths and here are the 5 best books I read on the subject. I suggest starting with Walking a Sacred Path, the most well known book on the subject and the first book that I review below.

Walking a Sacred Path: Rediscovering the Labyrinth as a Spiritual Tool by Dr. Lauren Artress 201 pages. AMZN

Walking a Sacred Path Rediscovering the Labyrinth as a Spiritual Tool by Dr. Lauren Artress.png

What I learned in this book:

  • Walking a labyrinth is a very personal experience for anyone who does it. Often it is a meditative and spiritual journey that parallels the journey you take in life.

  • Walking the labyrinth harkens back to the former days of pilgrimage in religious traditions.

  • There are many ways to walk a labyrinth. Do what feels right to you. Chapter four includes a process you might find helpful to make the walk productive.

  • The labyrinth is seen as a metaphor for many things: the union between heaven and earth, death and rebirth, faith and doubt, the brain, intestines or birth canal, and the journey to heaven.

  • The labyrinth reinforces the use of rituals to connect us.

  • A labyrinth is a walking meditation vs. the traditional still meditation.

What this book does best: The best book about the spiritual journey of walking labyrinths there is.

Labyrinth : Your Path to Self-Discovery by Tony Christie 312 pages. AMZN

Labyrinth: Your Path to Self-Discovery by Tony Christie

What I learned in this book:

  • This book casts a wide net on the structure of the labyrinth and how it may tie in to a multitude on religions and practices including: Mithraism, Alchemy, the planets and cosmos, the Alchemical process, the 4 elements, Tarot cards, the Kabbalah tree of life, the mythical hero’s journey, Melchizedek, our death and rebirth, chakras, major arcana, the Ursa Major constellation, and the magical square of the moon. I would be shocked if came away from this book and said you learned nothing and everything spoken about was familiar.

  • There have been studies done about how people feel after walking a labyrinth and the results are 81% more centered and 87% more peaceful - John W Rhodes 2008 experiment

  • While discussing walking the labyrinth and finding your life’s purpose the author writes - “Books you buy or are given as gifts can indicate where your [life’s] purpose lies”. I found that statement to be very true in my own life. Books are great gifts, especially when they are carefully selected.

  • When walking a labyrinth you should have a threefold approach: knowledge, experience, and reflection.

What this book does best: This looks at the spiritual aspect of labyrinths from every angle and thru many lenses (see my first bullet point).

Exploring the Labyrinth: A Guide For Healing and Spiritual Growth by Melissa Gayle West 209 pages AMZN

Exploring the Labyrinth: A Guide for Healing and Spiritual Growth

What I learned in this book:

  • Walk the labyrinth with purpose. Have something in mind to mediate on/think about while you walk. And most importantly be open minded as you walk.

  • The labyrinth walk can help you deal with grief, fear and anger.

  • The book does a nice job discussing how a labyrinth can be used. Use the labyrinth for:

    • Physical Healing and Curing

    • Relaxation and Guidance

    • Re-connection to Self and Spirit

    • Illness and Pain as a teacher

    • Ritual and Celebrations

  • Has a nice guide or checklist to use when creating a labyrinth ritual for your celebration by answering a series of questions

  • Suggests that the center of a labyrinth should have an altar of some kind like a bench, tree, flowers or a statue.

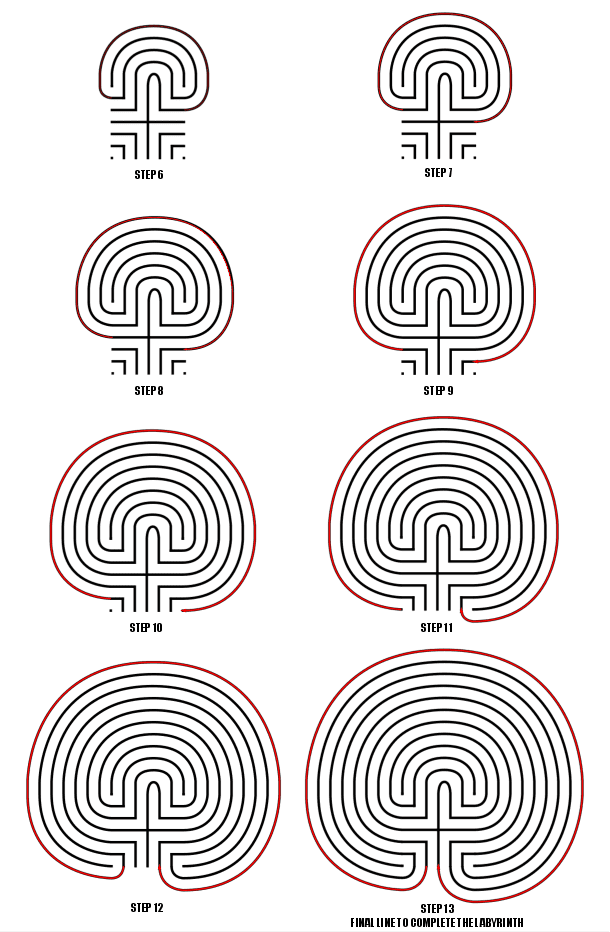
What this book does best: The entire 2nd Part of the book is dedicated to making your own labyrinth. And while it covers drawing a Cretan and making a finger labyrinth, the real value is in making physical labyrinths. Instructions are included to make a both a Cretan labyrinth and the Chartres labyrinth with tape, as well as how to make the Cretan labyrinth with rope.

Walking the Labyrinth: A Place to Pray and Seek God by Travis Scholl 240 pages AMZN

Walking the Labyrinth: A Place to Pray and Seek God

What I learned in this book:

  • The meaning of the word Liminality - roughly the time between times, or the middle stage of a ritual.

  • I had never heard the quote from the Danish Philosopher Soren Kiekegaard before '“Life can only be understood backwards, but must be lived forward”

What this book does best: This is a Christian book. The author walks a labyrinth each day during Lent with a daily Scripture from the book of Mark being used to meditate on during the walk. The book tells about the scripture and speaks to how the author feels in modern day walking the labyrinth.

Labyrinths from the Outside In: Walking to Spiritual Insight by Rev Dr Donna Schaper and Rev Dr Carole Ann Camp 187 pages AMZN

Labyrinths from the Outside In Donna Schaper Carole Ann Camp.png

What I learned in this book:

  • The meaning of the word Acedia - Being bored to death while being bombarded with stimulation

  • The origin of the word labyrinth may have come from the word labyrs which was a double headed Ax used on the island of Crete.

  • The book suggests breaking the walk of a labyrinth into the following parts, each with their own meaning and preparation: !.Preparation 2. Invocation (typically a prayer before the walk) 3. Walking in 4. Reaching the center 5. Walking out 6. Exit and Gratitude

  • The book suggests using the labyrinth to commemorate/celebrate/heal with rites of passage rituals for key moments in life. Including births, deaths, puberty, menopause, birthdays, retirement and any negative events that require healing.

What this book does best: The book ends with multiple chapters on ideas for walking the labyrinth with gratitude to celebrate holidays, religious events, the changing of the seasons, the zodiac, large life events and much more, all with a nod to the spiritual aspect of the walk.

If you are interested in more spiritual labyrinth aspects I suggest the following:

  1. Lauren Artress website - For coaching, workshops and classes.

  2. Veriditas - The nonprofit labyrinth group founded by Lauren Artress

  3. Worldwide Labyrinth Finder - Find a labyrinth to walk near you, or while on vacation

How to Draw an 11 Circuit Labyrinth

Drawing an 11 circuit labyrinth is fun once you learn the starting seed pattern and the rules of building the pathways. Follow this 13 step process and draw your own 11 circuit labyrinth. At the end of the post I have a made a quick 2 minute video showing the drawing of the labyrinth if you are a more visual learner ! The best way to both practice and create this is on a grid to help guide you on the correct spacing. Let’s get started.

Centering a drawn labyrinth on the page (Pro Tip #1)

If you are hand drawing a labyrinth and would like the completed drawing to be centered on the page there is a quick trick to help you do it. The seed you draw will end up being in the bottom half of the page slightly off center to the left. Check out the example below that compares the starting seed pattern center (in red) to the center of the finished drawn labyrinth (blue). The center of the labyrinth ends up being just above the arch of the labyrinth goal you will draw in Step 2.

Making an 11 Circuit Labyrinth tip to align to the center of the page

11 Circuit Labyrinth making tip to align to the center of the page

Step 1: Draw the starting seed pattern

The starting seed pattern based on an imaginary 6x6 box grid. Start with a centered is a plus sign. Add L shapes one grid away from the plus sign in all 4 quadrants. Now add another L shape in all four quadrants one grid away from the previous L’s. Finally add a dot to each of the four corners. Basically, copy the seed the pattern you see here:

11 circuit labyrinth seed pattern

Step 2: Connect the first arch to create the goal

Draw a curved line from the top of the plus sign to the L directly to the right using an arch that extends 1 grid high. The top of the arch should peak halfway between those two points. This line will form what will become the goal of the labyrinth. As a reminder the center of the completed labyrinth will be just above this point.

How to Draw an 11 Circuit Labyrinth, step 2

Additional information to help with your drawing (Pro Tip #2)

Let’s further explain the arching pathways you will be drawing in more detail, because from now on each path you draw will require this information. Each side of the labyrinth has different alignments that create the peak arch point for each pathway. All northern pathways (shown below in red) align above the midpoint of the goal. All eastern pathways (shown in blue) align with the original top right dot in the seeding pattern. Western pathways (shown in green) align to the top left seeding pattern dot. The southern part of the labyrinth also aligns to the corner dots, one for each side (shown as purple and orange). Keep these points in mind as you create your arches/pathways.

Making an 11 Circuit Labyrinth - Showing how peaks align correctly

11 Circuit Labyrinth making tip to align the peaks

Step 3: Connect the next endpoint to the left to the next endpoint on the right

Every step from now on will be basically the same. Move one point to your left (moving counterclockwise) and connect that to the next point on the right (moving clockwise). In this case the large backwards L on the top left of the seed pattern to the small L on the top right of the seed. The arch should peak at the same point as the goal below it in the pattern.

How to Draw an 11 Circuit Labyrinth - Part 3

Step 4: Connect the next endpoint to the left to the next endpoint on the right

The small backwards L in the top left to the dot in the top right corner. The arch should peak at the same point as the goal below it in the pattern.

How to Draw an 11 Circuit Labyrinth - Part 4

Step 5: Connect the next endpoint to the left to the next endpoint on the right

The dot in the top right corner to the end of the small L in the top right corner. The arch should peak at the same point as the goal below it in the pattern.

How to Draw an 11 Circuit Labyrinth - Part 5

Steps 6-13: Connect the next endpoint to the left to the next endpoint on the right

I assume you have the pattern down to complete making the labyrinth with only pictures with nice red lines. Follow the graphic below to complete steps 6 - 13.

How to Draw an 11 Circuit Labyrinth - Steps 6-13

Steps 6-13

11 Circuit Classical Labyrinth

11 Circuit Classical Labyrinth

That completes the drawing of an 11 circuit classical labyrinth. It happens to be the “right handed” version of the labyrinth. If you want to make the left handed version every step above would be the same but moving to the left instead of right. Just imagine following the directions while looking in a mirror. The majority of labyrinths you see will be right handed. The laeft handed versions look odd to many people:

Left Handed 11 Circuit Classical Labyrinth

Left handed 11 circuit labyrinth

If you are interested in a comparison of Classical, Square and Circular Labyrinths the linked post will show you how they compare from a design perspective.

How To Draw an 11 Circuit Classical Labyrinth Video:

Here is a quick 2 minute video to see this in action from my YouTube channel ! Notice how the grids help with the construction !

A video showing How to Digitally Draw an 11 Circuit Classical Labyrinth

How to Draw a Classical 7 Circuit Labyrinth

Drawing a classical labyrinth can be easy and fun once you learn the starting pattern and the rules of building the pathways. Follow the simple 9 step process below and draw your own 7 circuit classical labyrinth. Or, if you are more visual you can skip to the bottom and watch a quick 2 minute video of the labyrinth being made !

Step 1: Draw the starting seed pattern.

It can be seen by some people as originating from a 4x4, 16 box grid. There is a plus sign centered and dots in each of the four corners, with 4 “L” shapes between the + and the corners. See below how the starting pattern (in red) relates to the 16 grid 4x4 box. Here is that visually:

4x4 grid of blocks
Classical 7 Circuit Labyrinth Seed Pattern shown on a grid for comparison

And how the seeding pattern looks without any guidelines:

Classical 7 Circuit Labyrinth Seed Pattern

Classical 7 Circuit Labyrinth Seed Pattern

Pro tip: Do not center the initial pattern on the page or in the space you are using to build your classic labyrinth. Start it 1/3rd of the way from the bottom as the majority of the building will take place above the initial pattern. If you care about left/right centering also move slightly to the left on the page. Centering will come with practice so consider yourself lucky if you get it right the first time !! Below is a labyrinth showing the center of the initial seed pattern compared to the center of the final labyrinth.

Classical 7 Circuit Labyrinth center alignment explanation

Step 2: Create the goal of the labyrinth

Connect the top of the plus sign to the first point directly to the right using an arching pattern. This first connection will create the goal of the labyrinth. Notice that the goal of this classical labyrinth is small compared to other constructions. If you were creating this pattern for a physical labyrinth this would mean a small central gathering place.

Making a classical 7 Circuit Labyrinth Step 2

Arching connection - creating the goal

Classical 7 Circuit Labyrinth -  Step 2 - Create the Goal

Classical 7 Circuit Labyrinth - Step 2 - Create the Goal

Step 3: Connect the first pathway arch

Moving to the next point to the left, the top of the backwards “L” in this case, connect it to the next point to the right, or the dot in the far right corner, again using an arching pattern. The peak of this line will align with the peak from the goal you drew in Step 2. It also should create a pathway the same width as your seed pattern. Notice that we have moved one spot to the left and connected it to the next spot on the right. This pattern will continue for this labyrinth and most that you create ! Each new arch you draw will peak above the previous peak at the top of the labyrinth.

Making a Classical 7 Circuit Labyrinth Step 3

Drawing Arch #2

Let’s fast forward a bit to further explain the arches with more detail. Each side of the labyrinth has different alignments that create the peak arch point for each pathway. All northern pathways (shown below in red) align above the midpoint of the goal. All eastern pathways (shown in blue) align with the original top right dot in the seeding pattern. Western pathways (shown in green) align to the top left seeding pattern dot. The southern part of the labyrinth also aligns to the corner dots, one for each side (shown as purple and orange).

Peak points for each drawn pathway by side

Steps 4 - 9: Connect the next arch, moving from the left

For each step continue to move to the next point left, connecting each subsequent point to the next point on the right in an arching pattern. Step 9 will connect the final points and complete your classical labyrinth ! As you connect each point ensure you create pathways that are equal sizes (or alternatively create walls an equal distance apart from the previous wall).

Making a Classical 7 Circuit Labyrinth Steps 4 - 9

Steps 4 - 9

And that does it. You’ve drawn a classic 7 circuit labyrinth ! You get better each time you make one ! Hopefully this helped make this drawing easy and fun !!

The Left Handed 7 Circuit labyrinth

Now we have just made a right handed version of a classic labyrinth (Did you know it was right handed ?) . What you might not know is there is a left handed version of the same labyrinth. Take everything you just learned in the steps above and reverse them as if you are looking into a mirror. The seeding pattern stays the same but the first arch moves to the left followed by arches drawn to the left in each additional step.

Left handed 7 circuit classical labyrinth

Left handed 7 circuit labyrinth

If you are more visual here is a quick video review of what we did from my YouTube channel (where I show how to make mazes/labyrinths and also show the making of maze art):

About the 7 circuit labyrinth:

The 7 circuit classic labyrinth is said to represent the journey of life. The path is the journey that we all take, and the center is the goal that we are all trying to reach. The 7 circuits represent the 7 stages of life: birth, childhood, youth, adulthood, middle age, old age, and death. When found in the real world (as opposed to drawn on paper), the labyrinth can be used as a tool for meditation by walking the path slowly and mindfully. As you walk, you can focus on your breath and your thoughts. You can also use the labyrinth to reflect on your life and to set goals for the future.

Additional posts you might like:

Interested in learning how to make or draw other digital labyrinths ? You can find many different step by step instructions HERE.

I have step by step instructions on how to make over 40 different maze types HERE.

The 12 best maze/labyrinth movies of all time

The top 12 maze generation websites

How to Draw a 3 Circuit Labyrinth

Drawing a classical 3 circuit labyrinth is both easy and fun once you learn the starting pattern and the rules of building the pathways. Follow this simple 5 step process and draw your own 3 circuit classical labyrinth. If you are more visual (or you are curious to watch) there is a 1 minute video at the end showing the process.

  • Step 1: Draw the starting seed pattern.

The starting seed pattern is a plus sign with four dots in each of the four corners in the space apart from the lines to form pattern below.

3 Circuit Labyrinth starting seed pattern

3 Circuit Labyrinth starting seed pattern

PRO TIP: Start the pattern on the page in front of you slightly below center and left of center (perfecting this will come with practice). See the example showing your starting center vs. your ending center.

Labyrinth making tip - how to place the labyrinth on the page

Labyrinth making tip

  • Step 2: Connect the first arch (or draw the goal)

Draw a curved line from the top of the plus sign to the dot in the top right corner of the starting pattern. The top of the arch should peak halfway between those two points. This line will form what will become the goal of the labyrinth.

Making a 3 Circuit Labyrinth  - Step 2 - Draw the Goal

3 Circuit Labyrinth - Step 2 - Draw the Goal

  • Step 3: Connect the next arch from the left

Draw a curved line from the left corner dot to the end point on the right side of the plus sign. Space the line an equal distance from the wall to the inside as you draw the curved line. Notice that you have moved one point to the left and connected that to the next point on the right. This theme will continue for almost all labyrinths you construct.

Making a 3 Circuit Labyrinth  - Step 3 - Draw the next arch

3 Circuit Labyrinth - Step 3 - Draw the next arch

  • Step 4: Connect the next arch from the left

Draw a curved line from the end point of the left side of the plus sign around to the dot on the bottom right side of the pattern (Again, the next on the left to the next on the right). Space the line an equal distance from the wall to the inside as you draw the curved line.

Making a 3 Circuit Labyrinth - Step 4

3 Circuit Labyrinth - Step 4 - Draw the next arch

  • Step 5: Connect the next arch from the left

Draw a curved line from the last remaining dot on the bottom left of the pattern around to the bottom point of the plus sign to complete the labyrinth (see the pattern ?). Space the line an equal distance from the wall to the inside as you draw the curved line.

3 Circuit Labyrinth  - Step 5 - Draw the final arch

3 Circuit Labyrinth - Step 5 - Draw the final arch

That does it. The final 3 circuit classical labyrinth after 5 easy steps !!! If you struggle along the way I suggest you watch the video below which contains a grid structure that may help.

Additional construction option: You have just made a right-handed classical labyrinth. To make a left-handed version change step 2 and connect your first arch to the left instead of the right, then continue reversing the steps and you will create the inverse version of the labyrinth !

3 Circuit Classical Labyrinth

3 circuit classical labyrinth

Notice where the starting pattern is in relation to final labyrinth, not centered, but towards the bottom left, both left of center and south of center.

Here is the quick video showing what we just learned from my YouTube channel ! Notice how the grid structure both guides and helps the construction. If you are wondering the vector graphic program I use in the video is Inkscape, which is open source and available for free to download and use.

A quick video showing the digital drawing of a 3 Circuit Classic Labyrinth

Other posts you may like:

How to make other labyrinth types HERE.

How to make over 40 different maze types HERE.

The 12 Best Maze and Labyrinth Movies Of All Time

The 8 best books about mazes, labyrinths and their history