Today we look at how to digitally make a 7 Circuit Circular Labyrinth. This method is a draw and cut method, meaning you will be making edits that remove lines you have previously drawn as you move thru the steps. It is possible to use a drawing only method but I think it is much more complicated with many more steps. Let’s get started. I should also mention that this is an improved method which creates a 4 section labyrinth (you can make many different versions of a circular labyrinth by cutting it into slices - examples below).
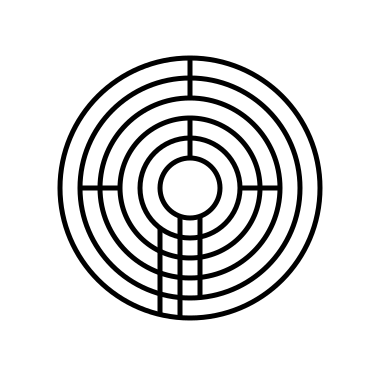
Step 1: Draw 8 Concentric Circles
Draw 8 concentric circles each an equal distance between one another and centered around the middle circle. The middle circle will become the labyrinths goal.

Step 2: Draw the 4 Inner Walls
I could break this into more steps but there are 4 straight lines that form inner walls and pathways at the turn around points. See the example. At 12 o’clock create 1 line from the center goal blocking paths but the outer one. At 3 o’clock add a line to block all but the inner pathway next to the goal. Use 2 lines to draw a pathway from the center to the bottom edge (notice neither are at 6 o’clock, but they are centered). The left line is drawn across all circles. The right line goes across all pathways but the final one. Add a line at 9 o’clock blocking all pathways except the one next to the goal.
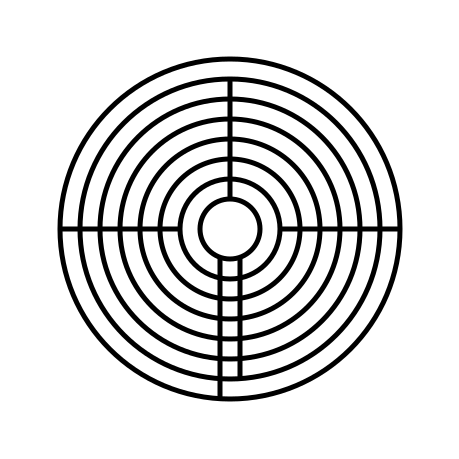
Step 3: Add Pathways Where Needed
Refer to the picture and add pathways where needed, erasing portions of the circles. There are many, and depending on how you draw/erase them the number can change. They are all at 3, 6, 9 and 12 o’ clock.

That completes the drawing of a 7 Circuit Circular Labyrinth.

7 Circuit Circular Labyrinth
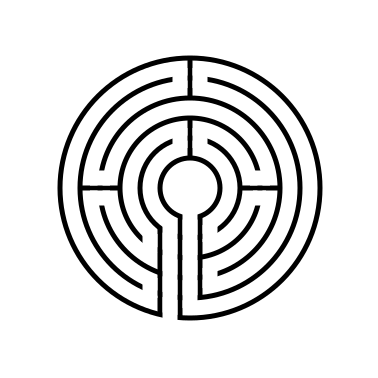
My original version of the 7 circuit circular labyrinth is below. I made it using a shortcut, which you also could use if you prefer this look better (obviously I do not, because I re-did this entire post for the new version !). Draw a 5 Circuit Circular Labyrinth, add two more concentric circles, extend the left center line to the bottom edge and create the exit. It’s easy to write in a sentence, but much more difficult to do ! Good Luck !

Alternative versions - number of labyrinth sections
Here is a look at what the labyrinth could you like if you want to make it with different sections. I am re-using the illustration I made for the 5 circuit circular labyrinth. It shows the 1, 2, 3, 12, 8, and 6 section versions which could also be created. I tend to always gravitate towards 4 sections, then 2. 1 seems a bit boring and 12 seems like too many to me. For a full look at this subject I did a blog post using the 9 circuit circular labyrinth.
If you like the mathematics of this did you notice that the 3 section is the only one where the initial entrance into the labyrinth goes to the center first before the back and forth begins. What other sectionals would require this ? A 5 section ?

How do I make this labyrinth in the physical world ?
Step by step instructions on how to make other digital labyrinths. Including:
How to draw a 5 Circuit Circular Labyrinth
A Comparison of 3 different types of 11 Circuit Labyrinths
How to draw a Classic 3 Circuit Square Labyrinth
If mazes and maze puzzles are more your style, I have step by step instructions on how to make over 40 different Maze types also.