Interested in visiting Chartres Cathedral with an expert ?

If you are a fan of labyrinths then you know all about the Chartres Cathedral Labyrinth in France. If you have ever wanted to visit it with an expert guide, I came upon a pilgrimage happening this May hosted by author and labyrinth designer Gernot Candolini.

He has written a few books you might be interested in (links are to Amazon):

Places of Light: The Gift of Cathedrals to the World (Mount Tabor Books) (Volume 1)

Labyrinths: Walking Toward the Center

The reason for this post is, if you hurry you can visit the Chartres Cathedral with him between Sunday, May 7th and Friday, May 12th 2023. It is a 6 day program with each day teaching you something new about the church and the symbolism of the artwork there. Super interesting to me…but the days don’t line up for me to attend.

Click here to download the pdf with prices and information.

How to Draw a 3 Circuit Square Labyrinth

Drawing a classical 3 circuit square labyrinth is both easy and fun once you learn the starting pattern and the rules of building the pathways. Follow this simple 5 step process and draw your own 3 circuit classical square labyrinth.

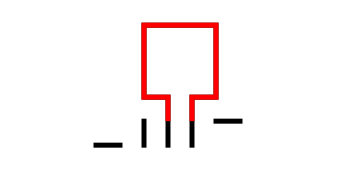
Step 1: Draw the starting seed pattern.

The starting seed pattern for this labyrinth is not the typical plus sign you may be used to. Instead it is 3 vertical lines, with 2 horizontal lines. The horizontal line on the left aligns with the bottom of the 3 vertical lines, while on the right side it aligns with the top of the vertical lines. Each line is the same length. See below:

3 Circuit Labyrinth Square starting seed pattern

3 Circuit Labyrinth Square starting seed pattern

Step 2: Draw the center goal

At the 2 rightmost vertical lines draw a line up one grid. This will become the opening to the center goal. Draw a square centered on top of this. Grid-wise this is a 3x3 square.

Making a 3 circuit Square Labyrinth step 2

3 Circuit Square Labyrinth - Step 2 - Draw the Goal

Step 3: Draw the next level

Connect the top of the remaining left vertical line to the far corner of the right horizontal line. It is an upside-down squared U shape started with a small horizontal move on the left side. See below.

Making a 3 circuit Square Labyrinth step 3

3 Circuit Labyrinth - Step 3 - Draw the next arch

Step 4: Draw the next level

Connect the left side of the horizontal line around the structure clockwise until it reaches the end of the rightmost vertical line. Again this creates an upside-down square U shape plus a horizontal connection in the last section. See below.

Making a 3 circuit Square Labyrinth step 4

3 Circuit Square Labyrinth - Step 4 - Draw the next arch

Step 5: Connect the final arch from the left

Connect the ends of the bottoms of the final 2 vertical lines around the structure to complete the labyrinth.

Making a 3 circuit Square Labyrinth step 5

3 Circuit Square Labyrinth - Step 5 - Draw the final arch

That does it. The final 3 circuit classical square labyrinth after 5 easy steps !!!

3 circuit classical square labyrinth

3 circuit classical square labyrinth

And here is the same labyrinth shown with grids so you can understand the shape better.

3 circuit classical square labyrinth shown on a grid

Alternative construction option: You have the option to use the more traditional starting seed pattern to create a 3 circuit square labyrinth, but this is not the most common construction. This version does not have a large square center and ends up not even being a perfect square. Here is the 5 step process to create it.

PRO TIP: this is the same construction and instructions as a 3 circuit classical shaped labyrinth but instead of curving the corners you draw the lines and corners at 90 degree angles !

Step 1: Draw the starting seed pattern.

The starting seed pattern is a plus sign with four dots in each of the four corners in the space apart from the lines to form pattern below.

3 circuit classical square labyrinth alternative seed pattern

Step 2: Connect the first “arch”

Draw an upside -down U shaped line from the top of the plus sign to the dot in the top right corner of the starting pattern. The top of the arch should peak halfway between those two points. This line will form what will become the goal of the labyrinth.

Square 3 circuit Labyrinth Alternative Part 2

Step 3: Connect the next “arch” from the left

Draw an upside down U shaped line from the left corner dot to the end point on the right side of the plus sign. Space the line an equal distance from the wall to the inside. Notice that you have moved one point to the left and connected that to the next point on the right.

Square 3 circuit Labyrinth Alternative Part 3

Step 4: Connect the next “arch” from the left

Draw another clockwise line from the end point of the left side of the plus sign around to the dot on the bottom right side of the pattern (Again, the next on the left to the next on the right). Space the line an equal distance from the wall to the inside as you draw the line. Again this looks like an upside-down U plus the connections to the appropriate ends.

Square 3 circuit Labyrinth Alternative Part 4

Step 5: Connect the next “arch” from the left

Same process as before but this time you connect the bottom left dot from the seed to the bottom of the plus sign.

Square 3 circuit Labyrinth Alternative Part 5

That completes the process for this alternative version.

3 circuit classical square labyrinth with small center

Long Day's Journey Into Night (2018) Movie Review

Long Day's Journey Into Night (2018) IMDB AMZN

Long Day's Journey into Night movie poster

I am a big fan of Film Noir so any movie that has that genre is on my watchlist. When I read about this movie I noticed it mentioned getting lost in a labyrinth and I knew I had to watch it. Now the scene where this happens, our main character falls asleep in a movie theater and wakes up (or is dreaming?) on a railway track in an abandoned mine that is maze-like. Eventually he finds a young boy who leads him out. A bit of a letdown, but the overall movie, mood, acting is still good.

I give it a 6/10.

Maze of the Week #63 - George Rogers Clark Memorial Maze

Maze of the week #63 takes us to a monument in Vincennes, Indiana with the George Rogers Clark Memorial maze. I liked the building and that is usually enough for me to consider a maze. GRD was a famous soldier in the early US. You can read about GRD the man, or the memorial on the Wikipedia page.

Or just watch this video to see the building and learn about it’s history:

Photo: From alan berning, flickr:

George Rogers Clark Memorial

george rogers clark memorial

The Maze: Black and white. I like the way it came out. Side view.

George Rogers Clark Memorial Maze

George Rogers Clark Memorial Maze

I hope you enjoy the maze. Maze download is available.

Coming next week:

A castle.