Maze Design Case Study - Designing a Grid Maze in Different Difficulty levels

I wanted to do a case study showing how to create a maze in a few different difficultly levels. I thought the best way to illustrate this was to design a create a maze with a variety of different branch types included then have you solve them and compare how enjoyable each was for you to solve. Let’s jump into the example and you’ll see what I mean. (Hopefully).

  • Example - Part 1. Please solve this small 10x10 grid maze. Yes this is an interactive example !

10x10 grid maze solving example

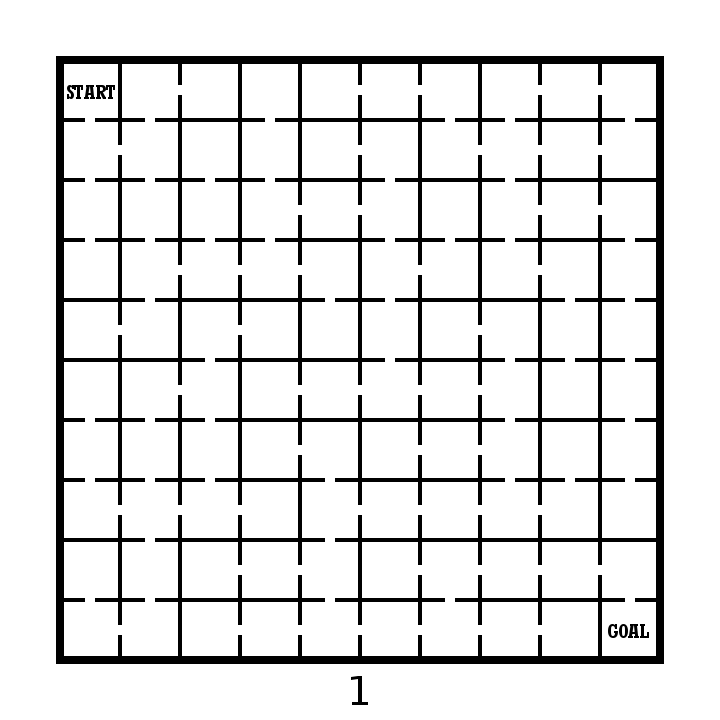
OK. Take note of how your experience was solving the maze. Did you enjoy it ? How quickly did you solve the maze ? Anything you did not like about the experience ? Did you find it to be enjoyable or frustrating ?

Now lets try this maze made on the same grid structure. We have 10x10 grid maze with the Start and Goal placed in the same locations.

  • Example - Part 2. Please solve this small 10x10 grid maze.

10x10 grid maze solving example 4

I have the same questions for you as before. How was your experience was solving the maze ? Did you enjoy it ? How quickly did you solve the maze ? Anything you did not like about the experience ? Did you find it to be enjoyable or frustrating ?

An finally in Part 3 we will group 2 additional mazes together for evaluation. Same questions will apply.

  • Example - Part 3. Please solve each of these small 10x10 grid mazes.

10x10 grid maze solving example 2
10x10 grid maze solving example 3

So what have we learned ? Before I go into some explanations on the design of each maze take a minute to hypothesize on what you think just happened. 4 similar mazes. Hopefully they gave you different experiences for you when you were solving them.

4 Maze Comparison - The Differences and Design Choices

  • First, did you notice each maze has the same exact solution ? Mazes 2 & 3 have the inverse (or flipped) solution of mazes 1 & 4. So the solutions are essentially all equal.

  • Each numbered maze should have gotten more difficult as the numbers increased (although with a small maze size this may have been somewhat less obvious)

  • Maze 1 - Short dead ends. Incorrect paths do not have branches. Pathways are wide. Some paths are “filler” and unusable.

  • Maze 2 - Longer dead ends. Incorrect paths do not have branches. Pathways normal width.

  • Maze 3 - Long dead ends with additional branches off of them. Pathways slightly smaller.

  • Maze 4 - Long dead ends with choices and branches off them. 4 way choices included. Small pathway widths.

So to summarize I used the following to change the difficulty of the 4 mazes:

  • The length of dead ends - How fast you know you have made an incorrect choice

  • Dead end branches - When you make a wrong turn are there multiple incorrect choices on that branch

  • Expanded pathway choices - Some intersections have multiple choices

  • Pathway widths - Smaller pathways are more difficult to see and navigate.

  • Unusable pathways - Filler sometimes used to fill a maze out while keeping it at the desired difficulty level.

Let’s look at the pathways coded to show what I mean. The red line is the solution. The blue line is the false pathway. The purple line is an unusable pathway (Did you know some mazes use this ?)

What you need to notice in the below deconstructed mazes:

  • Maze 1 - Thick pathways make this maze easier to solve. The purple lines to not connect to anything - essentially they are filler and unusable pathways. Most likely you did not notice them. They make the maze easier. The blue lines, the incorrect dead end paths - are short and only extend 2 levels before letting the solver know it was the wrong choice.

  • Maze 2 - Normal pathway width. No purple pathways from here on out. The blue lines are long but have no branches off of them. Longest length is 11 blocks.

  • Maze 3 - Pathways are a bit thinner. The blue dead end lines now have branches, so wrong turns have additional wrong turns. None of these, however has more than one additional dead end branch. There is also a dead end choice at the starting block.

  • Maze 4 - Pathways are very thin. There are now 3 intersections where 4 pathway choices are included (they look like a plus sign in this grid maze). Dead end branches also have multiple dead ends off of them.

four 10x10 grid maze solving example solutions

Hopefully this explanation and example shows you a small piece of how maze difficulty can be designed and changed with a few different choices. Most solvers would prefer Maze #1 because the wrong turns are not overly punishing. But a nice amount of people would prefer something a bit more challenging also, so remember the audience you are designing for when you create your mazes !

I will say that there is a balance between making a challenging maze and poor maze design. Do the pathways need to be ultra thin or are you just straining the eyes of the solver ? I think a re-design of Maze #3 with thick pathways would be both enjoyable AND challenging ! Happy maze-ing !

Additional popular posts you may like:

How To Make A Grid Maze

44 Different types of Mazes and Labyrinths

Comparison of the Top 10 Maze Generation Websites

How to Draw a 25 Circuit Circular Labyrinth

Today we look at how to digitally make a 25 Circuit Circular Labyrinth. Spoiler alert - This is the same as a 17 circuit circular labyrinth just adding a few more rings. This method is a draw and cut method, meaning you will be making edits that remove lines you have previously drawn as you move thru the steps. When I started this project I wanted to see how large I could make a circular labyrinth. For me, at more than 25 my screen and guides were too difficult to use. That’s how we got here. Let’s get started.

Step 1: Draw 26 Concentric Circles

Draw 26 concentric circles each an equal distance between one another and centered around the middle circle. The middle circle will become the labyrinths goal. As you may note, whatever the number of circuits you want is add one and that is how many circles you need.

26 Concentric Circles

Step 2: Draw the 10 Inner Walls

I could break this into more steps but there are 10 straight lines that form inner walls and pathways. See the example. All occur at 3, 9, and 12 o clock or centered around 6 o’clock. Rather than write it out, follow the example. Imagine you are riding a subway system and mind the gaps.

26 Concentric Circles broken up with lines

Step 3: Add Pathways Where Needed

Refer to the picture and add pathways where needed, erasing portions of the circles. There are many, and depending on how you draw/erase them the number can change. They are all at 3, 6, 9 and 12 o’ clock, next to where you just drew inner walls.

That completes the drawing of a 25 Circuit Circular Labyrinth.

25 Circuit Circular Labyrinth

25 Circuit Circular Labyrinth

Interested in learning how to make or draw other types of digital mazes ? I have step by step instructions on how to make over 40 different maze types.

If you prefer making labyrinths, you can find step by step labyrinth making instructions.

How to Draw a 17 Circuit Circular Labyrinth

Today we look at how to digitally make a 17 Circuit Circular Labyrinth. This method is a draw and cut method, meaning you will be making edits that remove lines you have previously drawn as you move thru the steps. It is possible to use a drawing only method but I think it is much more complicated with many more steps. Let’s get started.

Step 1: Draw 18 Concentric Circles

Draw 18 concentric circles each an equal distance between one another and centered around the middle circle. The middle circle will become the labyrinths goal.

18 Concentric Circles

Step 2: Draw the 6 Inner Walls

I could break this into more steps but there are 6 straight lines that form inner walls and pathways. See the example. At 12 o’clock create 2 lines, blocking paths between all circles except 15-16. At 3 o’clock add a pathway wall to block circles between 2 and 16. Use 2 lines to draw a pathway from the center to the bottom edge (notice neither are at 6 o’clock). The right line will stop one circle short of the outer circle. Add a line at 9 o’clock blocking the pathways between circles 2 and 16.

18 Concentric Circles broken up with lines

Step 3: Add Pathways Where Needed

Refer to the picture and add pathways where needed, erasing portions of the circles. There are many, and depending on how you draw/erase them the number can change. They are all at 3, 6, 9 and 12 o’ clock.

That completes the drawing of a 17 Circuit Circular Labyrinth.

17 Circuit  Circular Labyrinth

17 Circuit Circular Labyrinth

Interested in learning how to make or draw other digital labyrinths or mazes ?

Labyrinth step by step instructions.

Learn how to make over 40 digital mazes with step by step instructions.

How to Draw a 9 Circuit Circular Labyrinth

Today we look at how to digitally make a 9 Circuit Circular Labyrinth. This method is a draw and cut method, meaning you will be making edits that remove lines you have previously drawn as you move thru the steps. It is possible to use a drawing only method but I think it is much more complicated with many more steps. Let’s get started.

Step 1: Draw 10 Concentric Circles

Draw 10 concentric circles each an equal distance between one another and centered around the middle circle. The middle circle will become the labyrinths goal.

10 Concentric Circles

Step 2: Draw the 6 Inner Walls

I could break this into more steps but there are 6 straight lines that form inner walls and pathways. See the example. At 12 o’clock create 2 lines, blocking paths between all circles except 7-8. At 3 o’clock add a pathway wall to block circles between 2 and 8. Use 2 lines to draw a pathway from the center to the bottom edge (notice neither are at 6 o’clock). The right line will stop one circle short of the outer circle. Add a line at 9 o’clock blocking the pathways between circles 2 and 8.

10 Concentric Circles with lines to break it up

Step 3: Add Pathways Where Needed

Refer to the picture and add pathways where needed, erasing portions of the circles. There are many, and depending on how you draw/erase them the number can change. They are all at 3, 6, 9 and 12 o’ clock.

9 Circuit Circular Labyrinth

That completes the drawing of a 9 Circuit Circular Labyrinth. Now I have some news you may find interesting. This is only one possible way of many to build this labyrinth. Check out this post to see how other constructions look and compare.

Other posts that may interest you:

The Top 12 Maze Generation Websites

The Largest Arrow Maze in the world (probably)

The 12 Best Maze / Labyrinth Movies of All Time