Drawing a classical 3 circuit labyrinth is both easy and fun once you learn the starting pattern and the rules of building the pathways. Follow this simple 5 step process and draw your own 3 circuit classical labyrinth. I also added a version that shows the process against a grid, which is often helps with the construction. If you are more visual (or you are curious to watch) there is a 1 minute video at the end showing the process. Finally I give you some links to see a few labyrinths int he real world.
Part 1: Step by step instructions
Part 2: Gallery showing the labyrinth making with grids visible
Part 3: Video showing the making of the labyrinth
Part 4: Data and real world labyrinth examples
Part 1: STEP BY STEP LABYRINTH MAKING INSTRUCTIONS
Step 1: Draw the starting seed pattern.
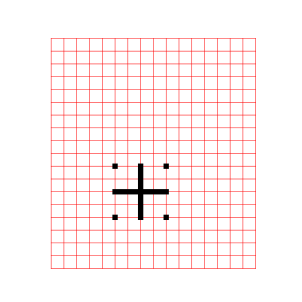
The starting seed pattern is a plus sign with four dots in each of the four corners to form pattern below.
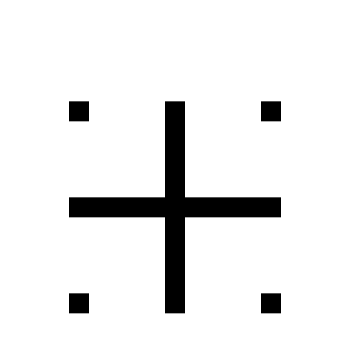
3 Circuit Labyrinth starting seed pattern
PRO TIP: Start the pattern on the page in front of you slightly below center and left of center (perfecting this will come with practice). See the example showing your starting center vs. your ending center.

Labyrinth making tip
Step 2: Connect the first arch (or draw the goal)
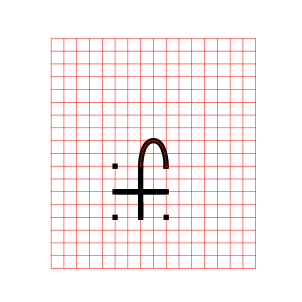
Draw a curved line from the top of the plus sign to the dot in the top right corner of the starting pattern. The top of the arch should peak halfway between those two points. This line will form what will become the goal of the labyrinth.
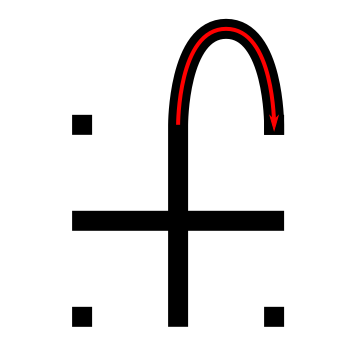
3 Circuit Labyrinth - Step 2 - Draw the Goal
Step 3: Connect the next arch from the left
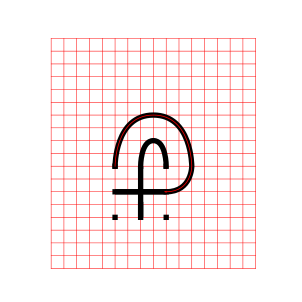
Draw a curved line from the left corner dot to the end point on the right side of the plus sign. Space the line an equal distance from the wall to the inside as you draw the curved line. Notice that you have moved one point to the left and connected that to the next point on the right. This theme will continue for almost all labyrinths you construct.

3 Circuit Labyrinth - Step 3 - Draw the next arch
Step 4: Connect the next arch from the left
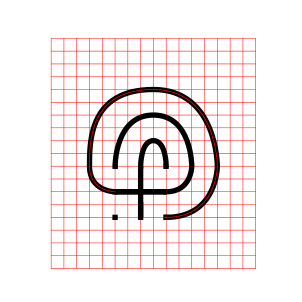
Draw a curved line from the end point of the left side of the plus sign around to the dot on the bottom right side of the pattern (Again, the next on the left to the next on the right). Space the line an equal distance from the wall to the inside as you draw the curved line.

3 Circuit Labyrinth - Step 4 - Draw the next arch
Step 5: Connect the next arch from the left
Draw a curved line from the last remaining dot on the bottom left of the pattern around to the bottom point of the plus sign to complete the labyrinth (see the pattern ?). Space the line an equal distance from the wall to the inside as you draw the curved line.

3 Circuit Labyrinth - Step 5 - Draw the final arch
That does it. The final 3 circuit classical labyrinth after 5 easy steps !!! If you struggle along the way I suggest you watch the video below which contains a grid structure that may help, or watch it step by step in the gallery at your own pace.
Additional construction option: You have just made a left-handed classical labyrinth. To make a right-handed version change step 2 and connect your first arch to the left instead of the right, then continue reversing the steps and you will create the inverse version of the labyrinth ! The left and right handed are determined by which way you turn first after entering the labyrinth.

3 circuit classical labyrinth
Notice where the starting pattern is in relation to final labyrinth, not centered, but towards the bottom left, both left of center and south of center.
Part 2: MAKING THE LABYRINTH WITH A GRID:
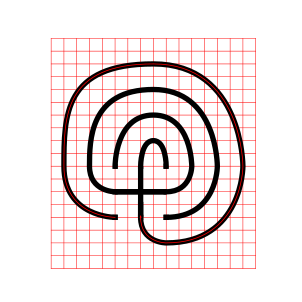
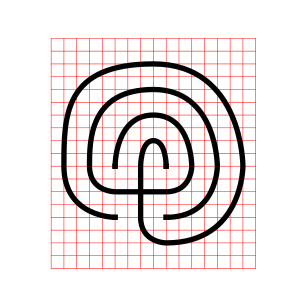
Here is the step by step grid gallery. I will mention that the entire reason for the grids being this size is to show the peak location for the arches. If you can judge the arch location midpoint, there could be half as many grids shown. As you saw above, notice where the seed pattern is located on the total grid !

PART 3: VIDEO SHOWING THE LABYRINTH BEING MADE:
Here is the quick video showing what we just learned from my YouTube channel ! Notice how the grid structure both guides and helps the construction. If you are wondering the vector graphic program I use in the video is Inkscape, which is open source and available for free to download and use.
PART 4: LABYRINTH DATA AND REAL WORLD EXAMPLES
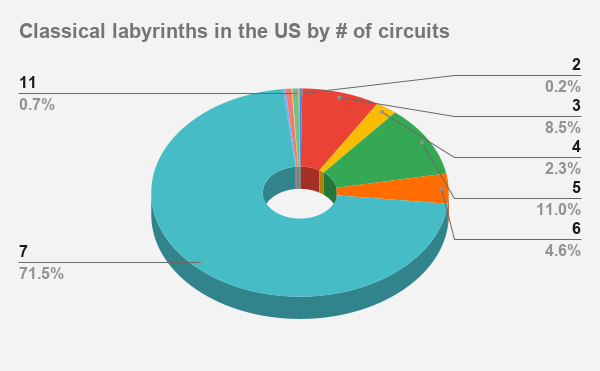
I did a large project where I analyzed the labyrinths in the USA and here is what I found about Classical labyrinths. You are most likely to find one with 7 circuits in the US, with 71% of all classical labyrinths being that size. 3 circuits classical labyrinths like the one you just learned to draw make up 8.5% of classical labyrinths in the US.
Here are some locations you can see in real life:
The Guadalupe Gardens – Rotary PlayGarden Labyrinth in San Jose, CA is located in a public park. You can see it well on the Google Maps satellite view.
The St. Bonaventure Church Labyrinth in Paterson, NJ is a small, with a 16 foot diameter. It appears to no longer be maintained but you can still find a nice photo of it from the link.
The Centering Path Labyrinth at White Bear Lake, MN has an 11 foot diameter and is located in a garden.
Other posts you may like:
How to make other labyrinth types HERE.
10 of the Most Frequently asked Questions about Labyrinths, with Answers