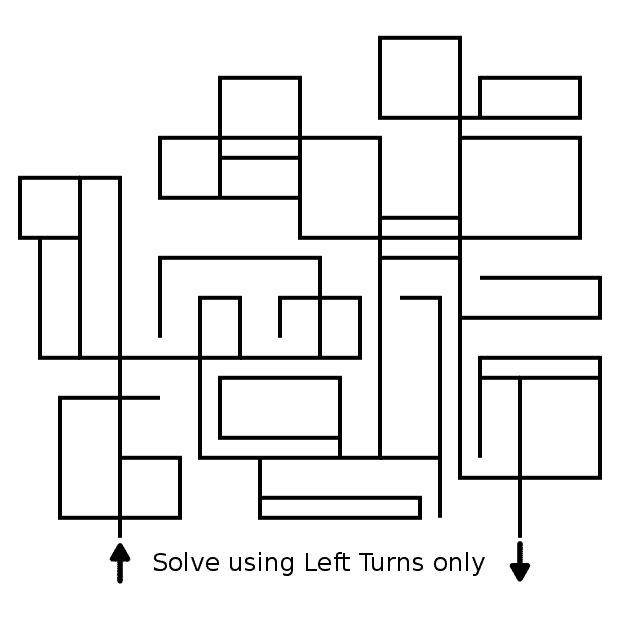
I took the time to evaluate mazes and see why they did not work and try to determine - could they be salvaged ? Today I present my 5th case study for improving one of those mazes, Severance Hall. You may recognize this maze. It was featured as Maze of the Week #79 in July. I realized I should have done a post showing the transformation previously. If you want to read the previous 4 case studies:
Case Study#1 - How to Improve a Bad Maze - Tiki Totem Maze
Case Study#2 - How to Improve a Bad Maze - Danzante Conchero Chichimeca Maze
Case Study#3 - How to Improve a Bad Maze - Red Rocks Amphitheatre Maze
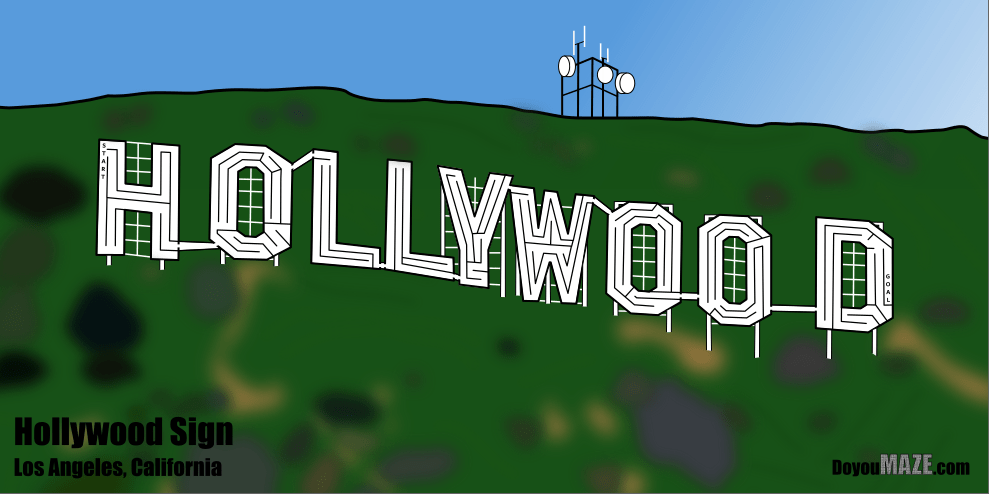
Case Study#4 - How to Improve a Bad Maze - The Hollywood Sign
Here is what I wrote about the maze in the previous post on why it was abandoned:
“Abandoned Maze #3 - Severance Hall Maze
This almost maze was done before I started using perspective for just about every maze, that’s why it looks so boxy. I was in-between wanting to start from scratch or moving forward with the maze. I never made a decision and it got lost until I found it for this post. It also appears to be floating and a nondescript building. Mistake made: Using a poor method to start with. Indecision on how to move forward.”
And let’s look at that maze, also known as the ‘before’. There was no color, no maze, and it was very boxy, with the building floating on the page.

Here are the enhancements I made to improve and finish the maze:
1. Color added - I added color throughout the maze. I did some minor shadowing in the front of the building behind the columns. Changed the color of the window frames from black to grey to better reflect actual building.
2. Trees, bushes and grass added - I added the setting of the building (no more floating !). That meant large trees on each side of the building and a long row of bushes in front with a lawn. There is also a small pathway on the right side.
3. Sky and clouds added - I usually avoid clouds but this is Cleveland and clouds are a fact of life.
4. Added some details - The spotlight on the right side was previously missing. The year on the building “MCMXXX”. Added the name to the building.
5. Added bricks and the maze - Key to actually making this into a maze. The bricks enabled me to add the maze as their structure was used for the walls of the pathways. There are also some larger sections of concrete on the sides. Overall this changed the look of the building a lot. For the Start and Gal I went with internal but made them blue to make them a bit easier to find.
6. Letter and branding added - Added the name of the maze and added my branding in the corner.
FINAL THOUGHTS
I could have spent more time on the trees and bushes, but I think this is ok from what I started with. I think it represents the building well.
And now the “After”.

I think this is an improvement. What do you think ?