
So you want to make some maze art. I’m here to help. I will take you through some things to think about and give you tips to make the best possible mazes. I can’t construct a maze for you, and while maze art, like all art is subjective, my goal is to help you make your mazes more interesting. Ideally, you will layer on your own particular style and make beautiful mazes. My goal is to help you Unlock the Secrets of Maze Art.
Before we get started:
I assume you understand how to make a maze and just want advanced and specific instruction and tips. If not start with the blog post how to make a standard maze. On this website I have a section on how to make a maze includes over 40 different maze types (and there are even more types not shown made by others) if you want - browse around for some inspiration and ideas.
Maze Construction:
I also have done a series of blog posts that pull together different aspects of maze making, like starting and ending a maze that will help you see the different options and come up with a style you like. Personally I like to experiment often, but build off of 2 things: the first is making more of what I like while the second is making mazes similar to what is successful on the site ! Tip #1 - Make lots of experimental mazes. When I initially made mazes on this website, and I used to make daily mazes, I did a large variety of maze types and constructions. I also did monthly voting where people could vote for their favorite mazes. This feedback was essential to help me find my lane. Tip #2 - Get feedback. Some options: Voting, posting mazes online in the reddit mazes forum, looking at traffic on your site by maze. I prefer to ask strangers vs. friends and family, because friends and family tend to only give uncritical, positive feedback. They also do not have a passion for mazes while anyone on the maze forum does.
Here are the 3 blog posts that deal with Maze Construction:
Part 1 - Options for Starting and Ending a Maze
Part 3 - Conditional Pathway options
And some case studies:
Using Color for Maze Pathways - A Case Study
Maze Design Case Study - Designing a Grid Maze in Different Difficulty levels
A Case Study - The Free Stamp Maze
My first attempt at a how-to for making maze art is my project that made Maze of the Week #46 - The Free Stamp, located in Cleveland, Ohio. I turned this into a case study that includes step by step instructions. Let’s look at those 6 steps, each of which has a few tips in the how-to. Here I will add some additional tips specifically suggested to elevate the quality of your maze.
STEP 1 - CHOOSE YOUR MAZE SUBJECT
While your neighbor’s shed may make a nice maze…will anyone really care ? Tip #3 - Famous landmarks/locations/objects get more interest. 5 of my top 6 voted mazes from last year were of famous buildings. Here are some examples: The Louvre, Sydney Opera House, Rock N Rock Hall of Fame. This is my way of saying the subject matter matters (usually). If you are making a cool geometric maze, or a colorful puzzle maze, then then the subject is generic, and then it does not matter.
I specialize in making mazes of buildings and signs. I like them as subjects and make them well. Other maze artists specialize in cityscapes, comics, map mazes, or colorful landscapes. One thing I am terrible at is drawing faces. Human faces are difficult to draw and if you have that skill you should use it. Making a human face that is recognizable as a specific person is even more impressive, so if you have that very difficult skill - leverage it ! Tip #4 - Leverage your unique skills. This could also be Specialize in the maze types you do best.
STEP 2 - TAKE A PHOTOGRAPH OF THE SUBJECT (OPTIONAL)
Tip #5 - Take lots of detailed pictures of your subject. I will explain this later with an example !
STEP 3 - DRAW THE MAIN OUTLINE OF THE SUBJECT
When I first started making mazes I tried to have each maze fit on a standard size piece of paper. This made me leave out details I wanted to include and not optimize the shape of the artwork. Now, I make mazes that fit the subject matter- tall, short, boxy. Tip #6 - Don’t worry about “fitting” the maze into a particular size. If a maze needs more room, take it !
STEP 4 - BEGIN THE DESIGN OF THE MAZE
My best mazes all took the longest amount of time to make. It is not a perfect correlation but it is definitely there. For me, the juice is worth the squeeze. Tip #7 - Slow down and take your time. Don’t rush. Take your time. Get it the way you want it.
STEP 5 - DRAW THE MAZE
STEP 6 - MAKE ANY AESTHETIC CHANGES TO COMPLETE THE MAZE - COLOR, SIZE, BORDER, TITLE
Not sure if this tip becomes part of step 6 or a new Step 7. Tip #8 - Add as many small details in the maze as possible. Even if they are not relevant to the solving of the maze. In my ‘how - to’ I give this example of a maze of The Alamo - and I repeat it here:
Example 1 - The Alamo
Part 1. I think a lot of people would recognize this maze without a label or title. This maze was done quickly and was made for kids.
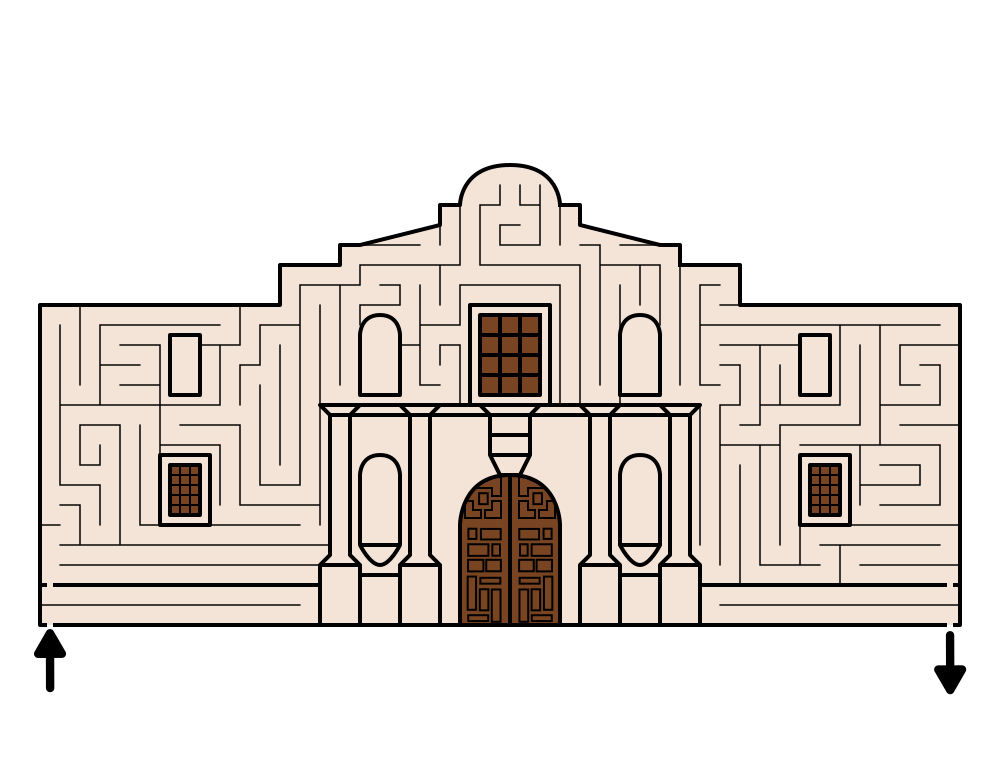
Part 2. - Here is the detailed maze of The Alamo Mission which I remade.

Do I even need to comment on which maze has been more popular ? Both are recognizable as the Alamo Mission. What did I do to improve the maze ? I added a lot more detail. I spent more time. And this was not my last version.
Part 3. Even more detail. I added textures, and extended the illustrations to the corners of the paper. Added sky, ground, grass.

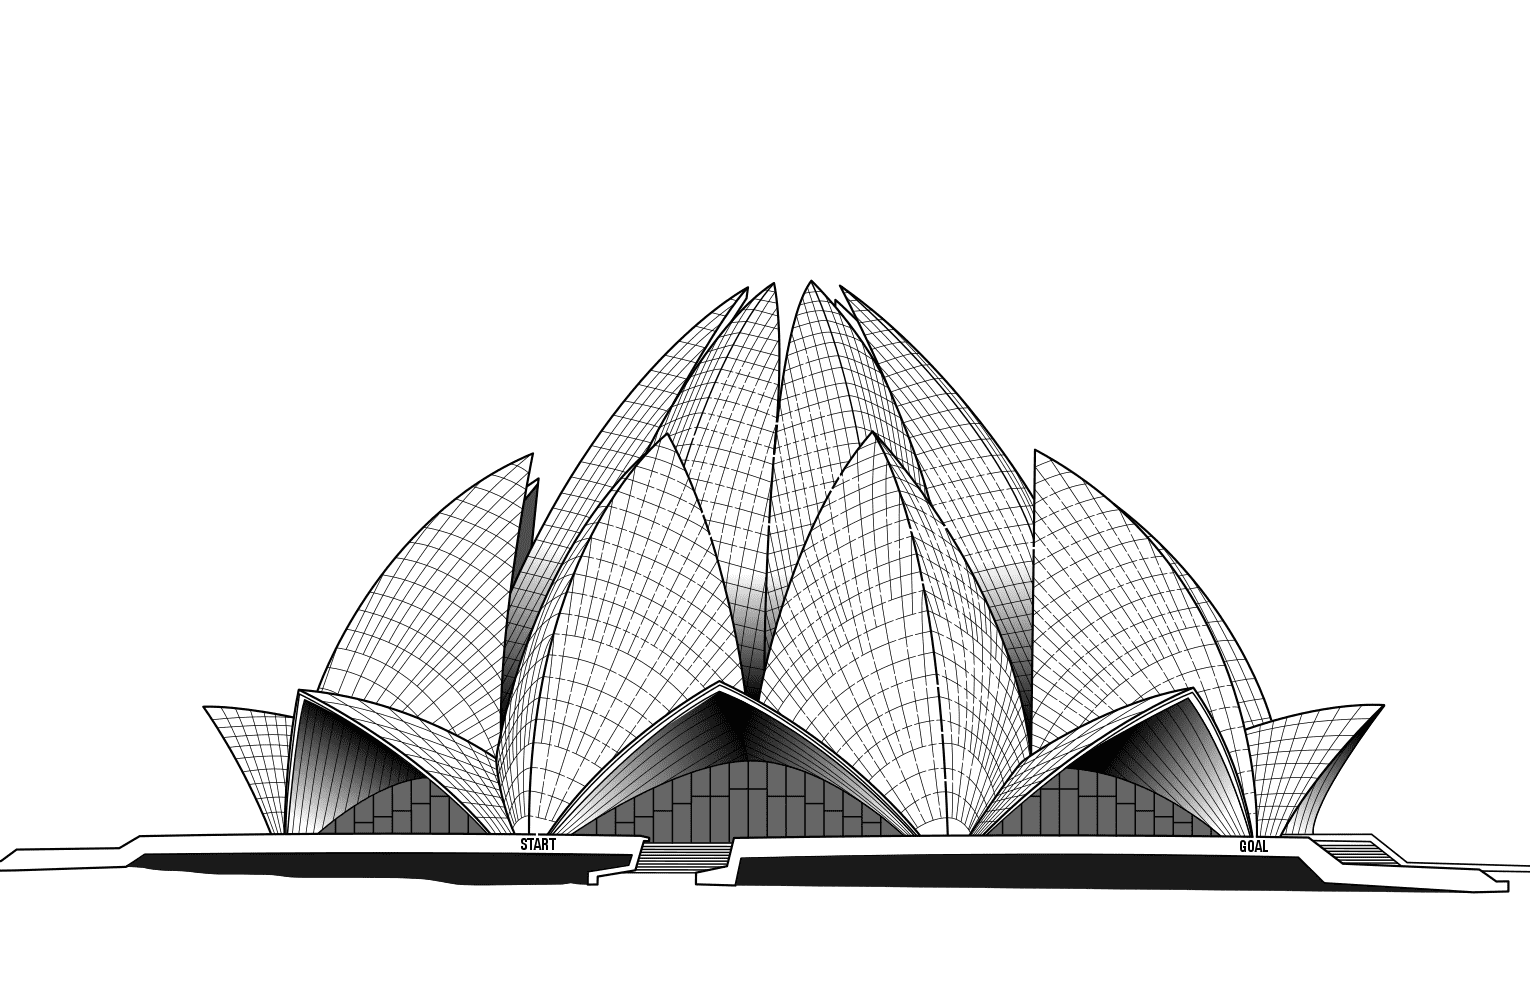
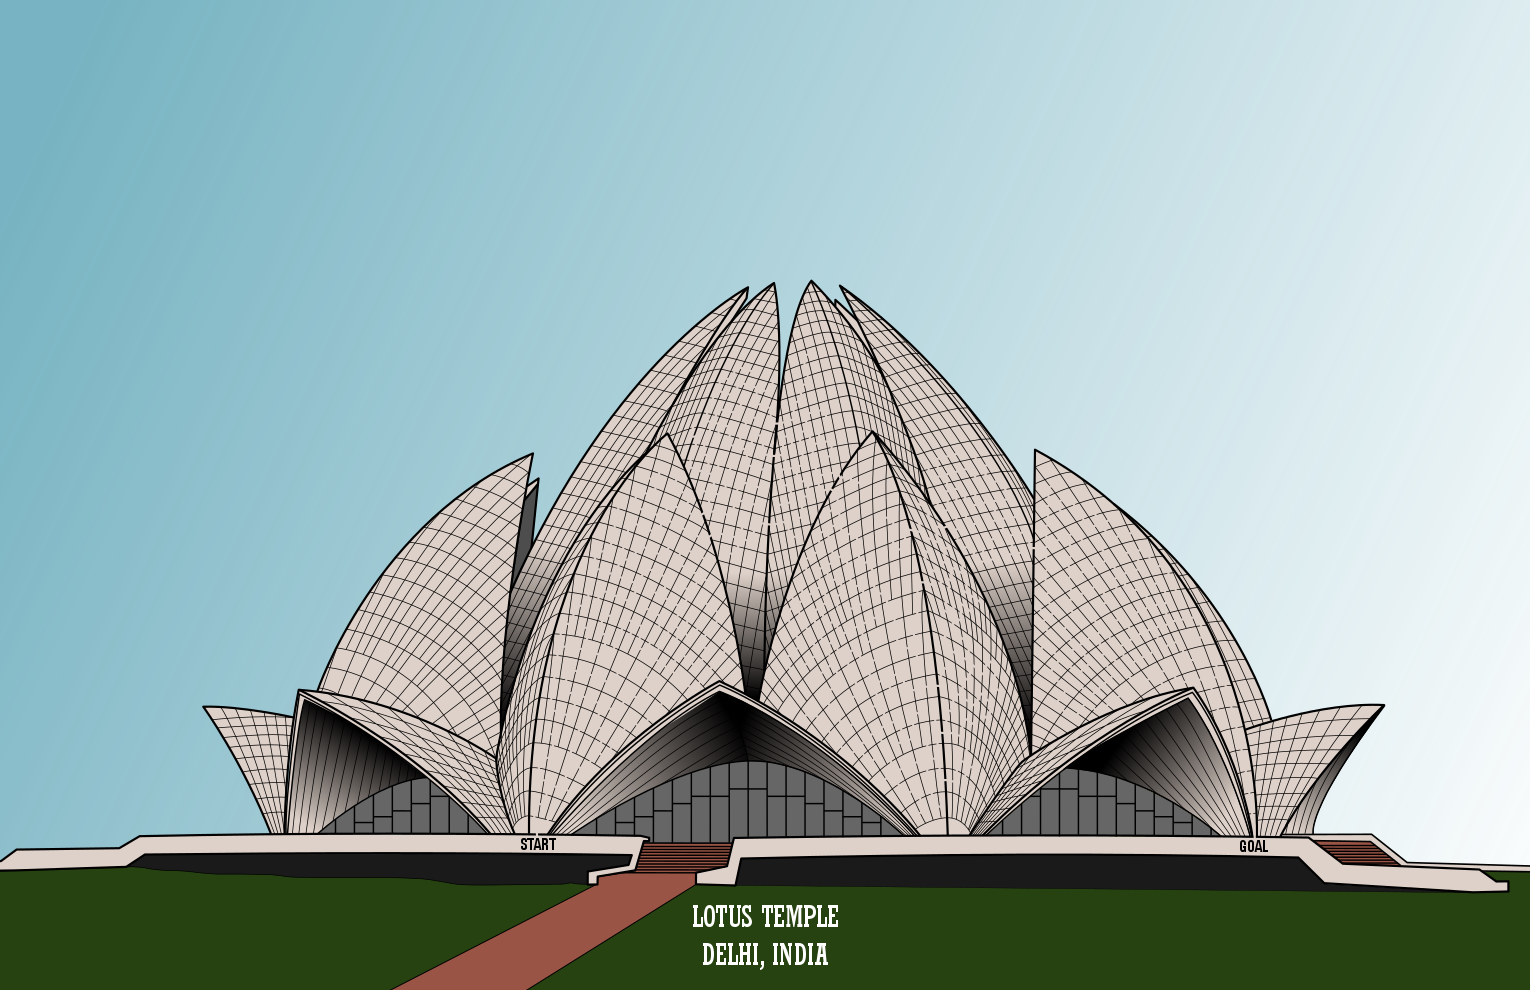
Example 2 - The Lotus Temple Maze
This maze is all about shadowing. Depending on your subject matter this could become it’s own tip (Consider adding shadows) It is the #1 thing I struggle with adding or not adding to a maze…here is an example where the use improved the finished product, the Lotus Temple Maze.
This gallery shows 3 versions of the same maze. The first is in black and white. The second with shadows, and the third fully colored. In my opinion the shadows add a lot to the illustration.

Example 3 - Templo de Sangre de Cristo Photos
I decided to make a maze of a church near my house. I went to the church and took a picture from an angle that I thought would look good. I went through the steps of making the maze…and when I got about 80% done I went back to the church and took more pictures (close-up this time) of items on the church and the surrounding area that could be included in the maze. Here is a collage of some of the details I added ! Similar to the Alamo example, without these details the maze is still good, but adding details enhances the interest in the maze. I will repeat the top again: Tip #5 - Take lots of detailed pictures of your subject.

Can you find the details from the photos above of in the final maze ? Each photo in the above collage can be found below !

Example 4 - The Louvre
This is one of my most popular mazes. A world famous building that everyone knows. But look at it closely. The maze is completely housed in the pyramid. This part of the maze was easy to make. The details of the other buildings of the Louvre in the background have nothing to do with the maze, but without them this maze is completely different. Those buildings took more time to create and really change the illustration. Let’s compare them:

Compare to this version without the background buildings:

Nio background buildings
A few of you might prefer the 2nd cleaner version….but without the label do you know that is the Louvre Museum ? You know it is a pyramid, and a modern one because of the straight lines/edges, but that’s about it.
Tip #9 - Know what you are drawing. This sounds obvious but it is not. I realized this myself while making some of my own mazes. The best example to illustrate this is if I asked you to draw a brick wall. Let’s look at the most common way this would be done below. Looks like a brick wall.

Brick Wall
What did I draw ? I did not draw bricks. I drew the mortar. Maybe it is not important, but maybe it could be. And what did I draw below ? Bricks in a brick wall. Know what you are drawing !

Tip #10 - Make the maze solving fun. This applies for all mazes, but with maze art this will keep people coming back to your work. Tip #11 - Know who you are designing for. These tips go together. If you make a maze for kids do not make it really difficult. If you make a maze for maze enthusiasts, make it more difficult. Mazes for the masses should be medium difficulty. How do you make a maze more enjoyable to solve ? By making the difficulty level equal to the solvers ability. I have written 2 blog posts about how to design a maze with many difficulty levels if you want a deep dive on the subject.
Case Study - Making Maze Art in 3 Different Difficulties
Maze Design Case Study - Designing a Grid Maze in Different Difficulty levels
Here is a summary of all of the maze making tips:
Tip #1 - Make lots of experimental mazes.
Tip #2 - Get feedback.
Tip #3 - Famous landmarks/locations/objects get more interest.
Tip #4 - Leverage your unique skills. Specialize in the maze types you do best.
Tip #5 - Take lots of detailed pictures of your subject.
Tip #6 - Don’t worry about “fitting” the maze into a particular size.
Tip #7 - Slow down and take your time.
Tip #8 - Add as many small details in the maze as possible.
Tip #9 - Know what you are drawing.
Tip #10 - Make the maze solving fun.
Tip #11 - Know who you are designing for.
I hope my 11 tips help you make your own masterpiece ! I think you would also enjoy my blog about Francesco Segala - The world's first maze artist !