Arrow Maze Design Case Study - Part 3 - Intersections

Welcome to Part 3 of our Arrow Maze Design Case study. We will look at the use of Intersection Arrows. Of all the arrows used these are the key arrows that create choice in an Arrow maze. Without them an Arrow maze would be more like an Arrow labyrinth.

Here is an overview of what we will be covering in the 14 part series:

Arrow Maze Construction and Design:

Arrow Maze Components:

Extreme Arrow Maze examples:

Arrow Maze Design Case Study - Part 3- Intersections

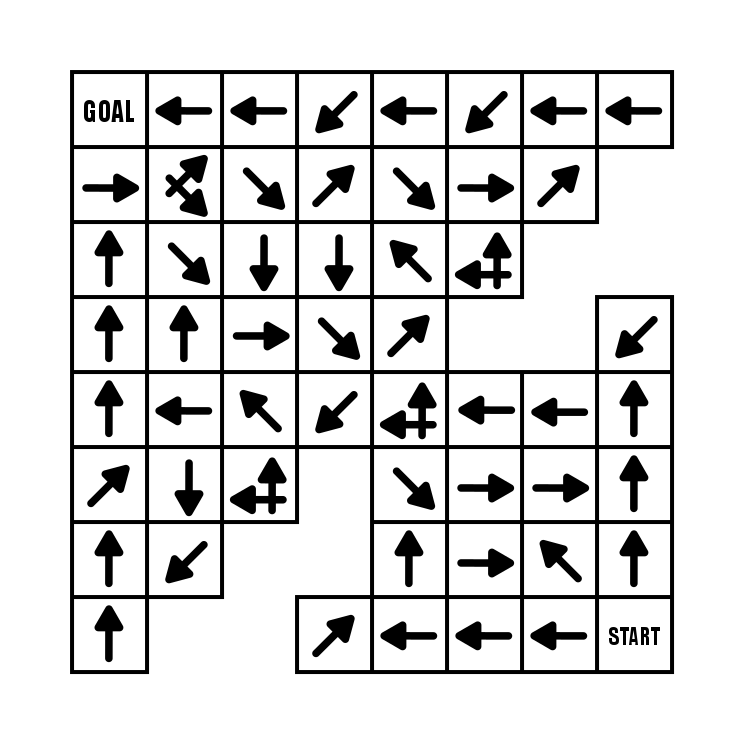
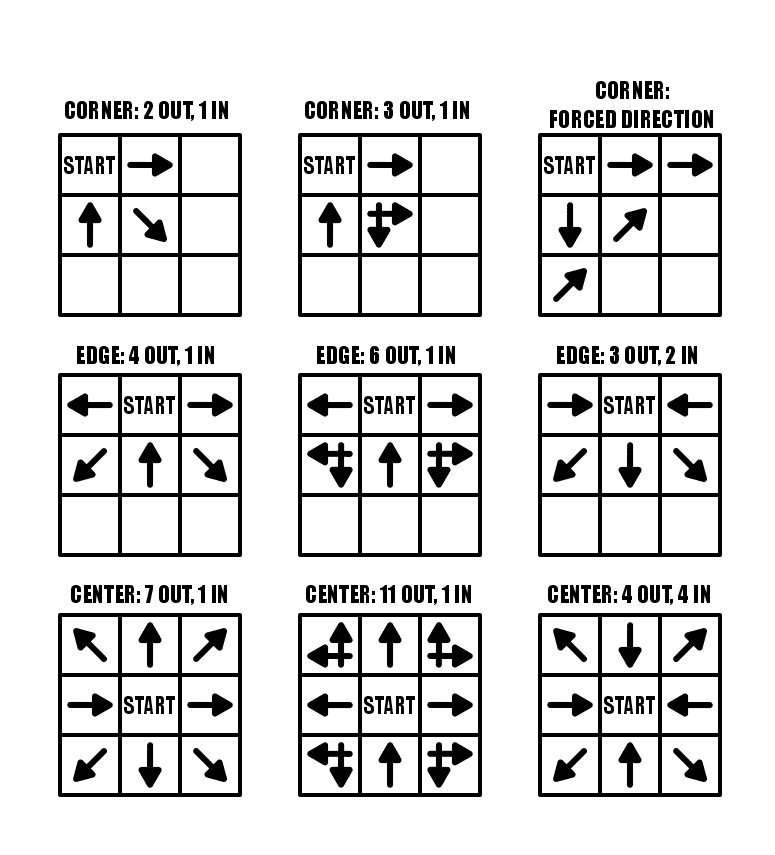
For our first example we will use a 9 x 13 landscape Arrow Maze, and fill it with a total of 13 L shaped Intersections. These intersections are the standard way in an arrow maze to give the solver a decision to make on what direction they would like to continue in. The more choices (intersections) the more difficult the maze, since only one pathway will lead to the GOAL.
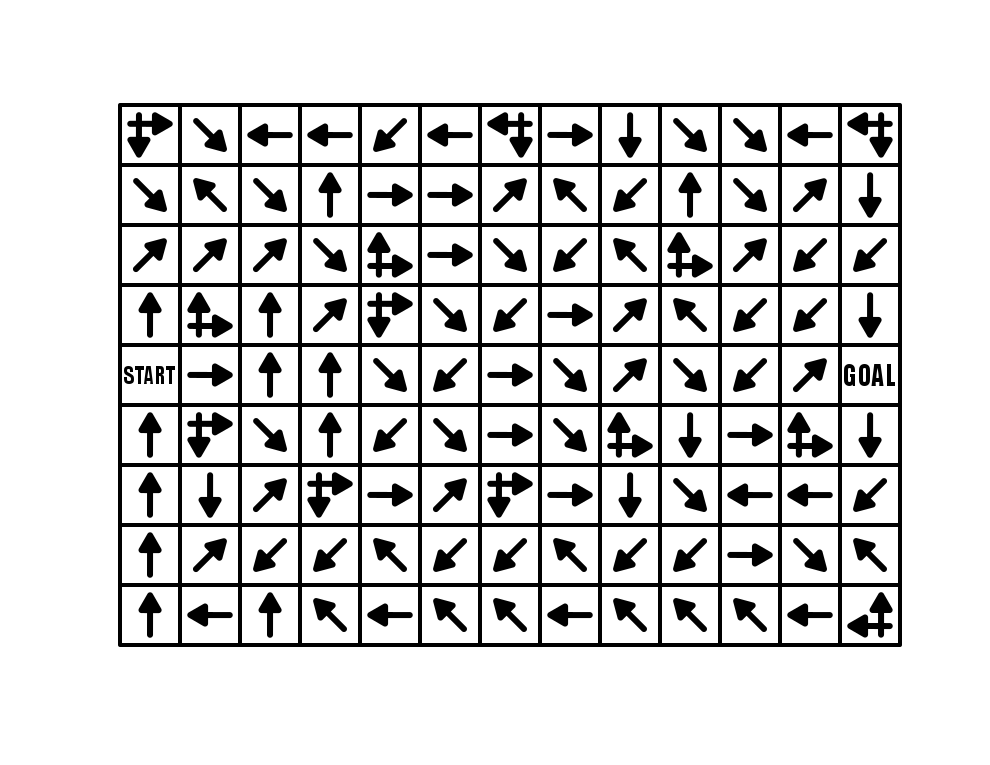
13 x 9 Arrow Maze

Arrow Maze

Arrow Maze Intersections shown

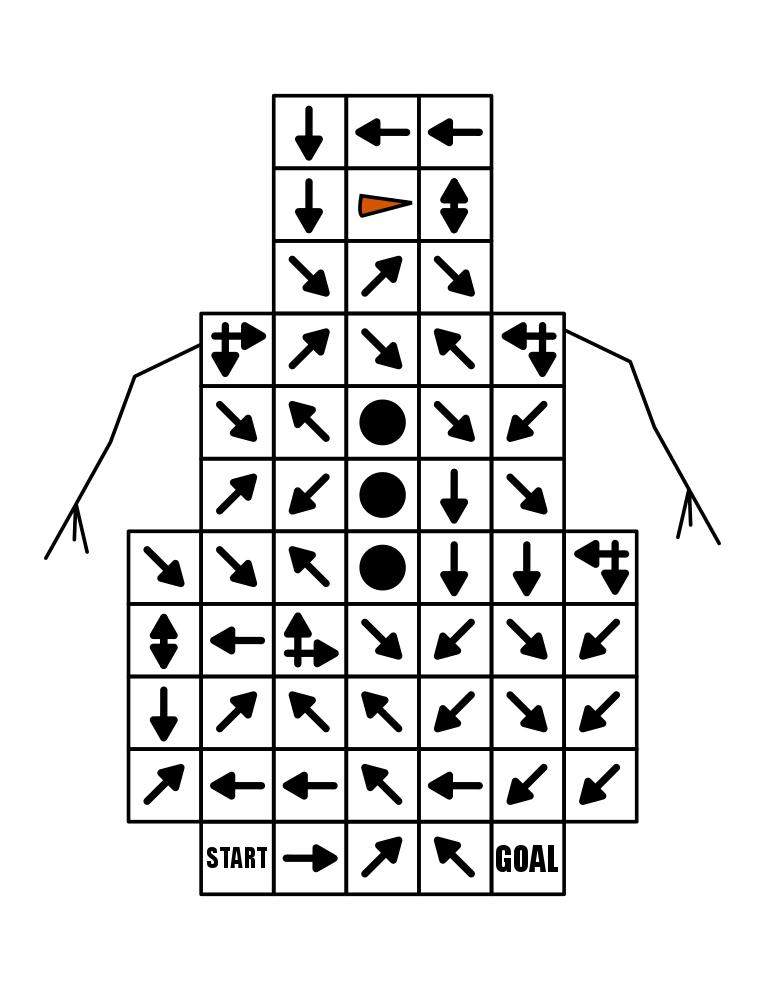
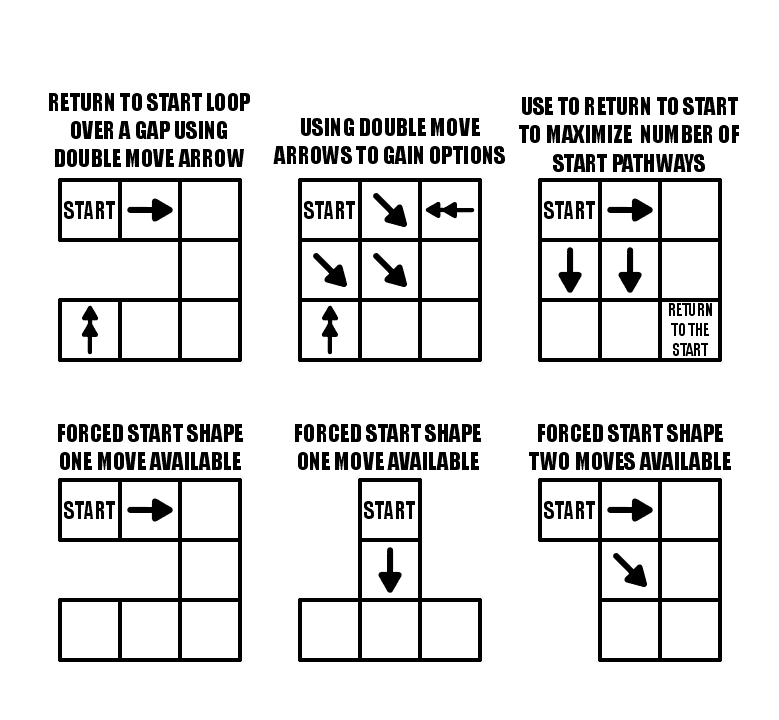
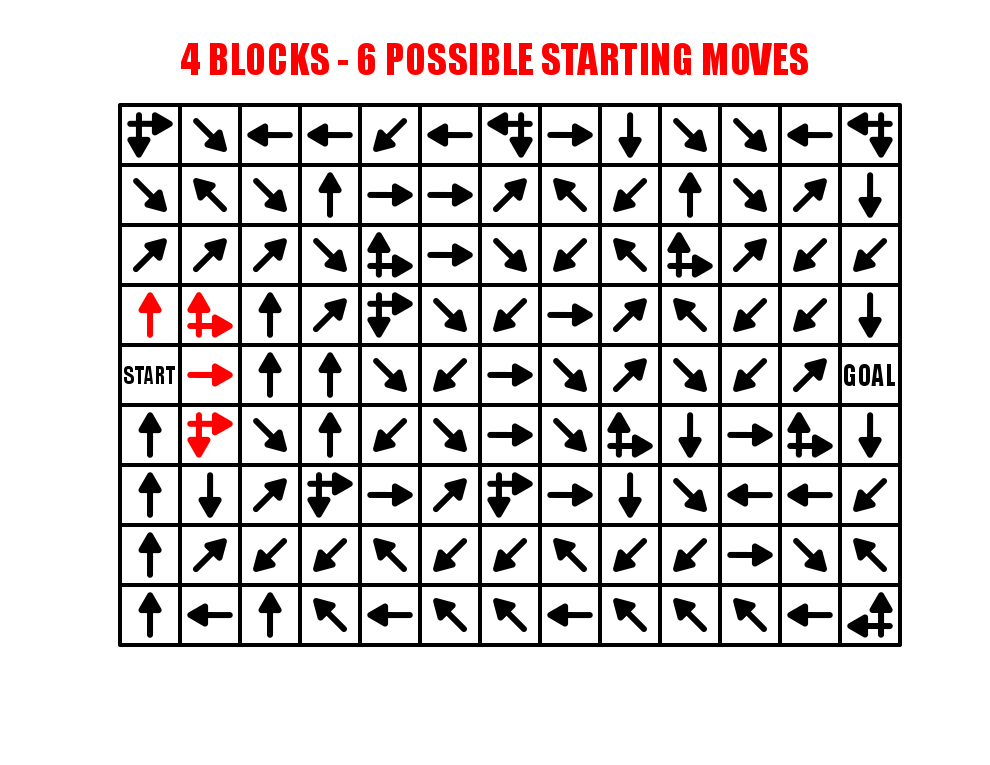
One of the great ways to use these intersection arrows is next to the START block, which will naturally expand the initial options of the solver. As shown in RED below, the 4 starting moves actually work like 6 possible starting moves/paths to choose since 2 intersections are possible from the START. If you are starting an Arrow maze from a tight space (say a corner), consider adding intersections right off the bat !

Arrow Maze possible starting moves shown

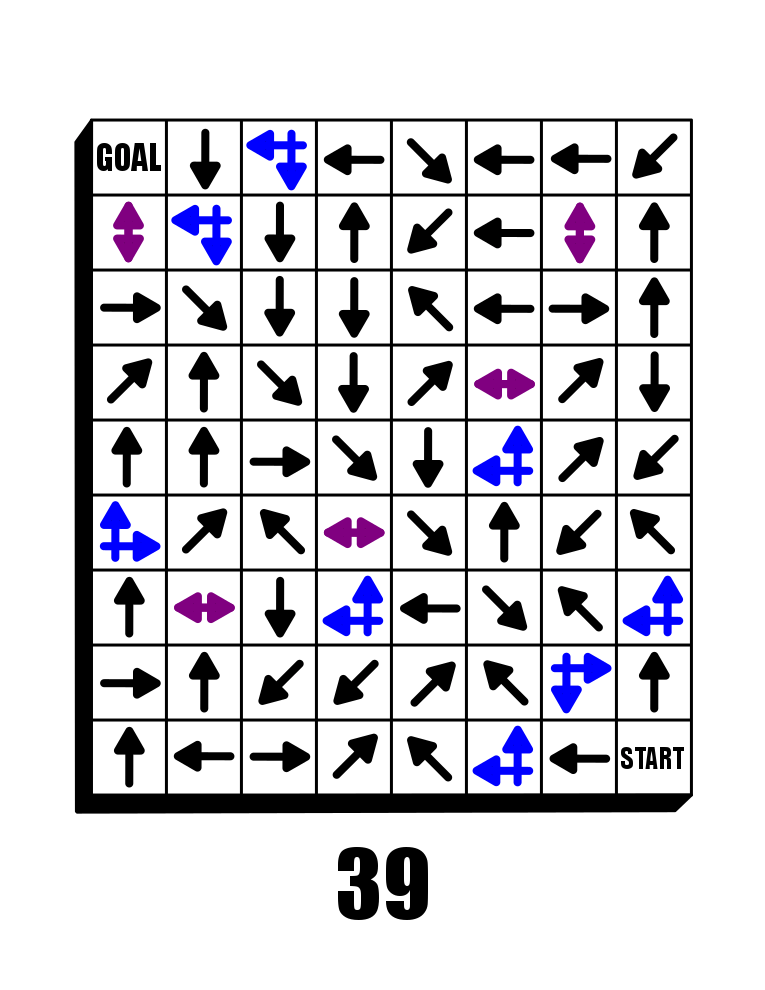
While this Arrow Maze used only L shaped intersections, you can also have an opposite direction decision arrow that works in the same way. Here is an example from my book (page 39). Take some time and try to solve this one. I used an extensive Looping system while constructing it that is intended to send the solver back near the start multiple times (unless you are lucky !!). It is actually a good example of that construction that we will cover in a future post.

8x9 Arrow Maze #39

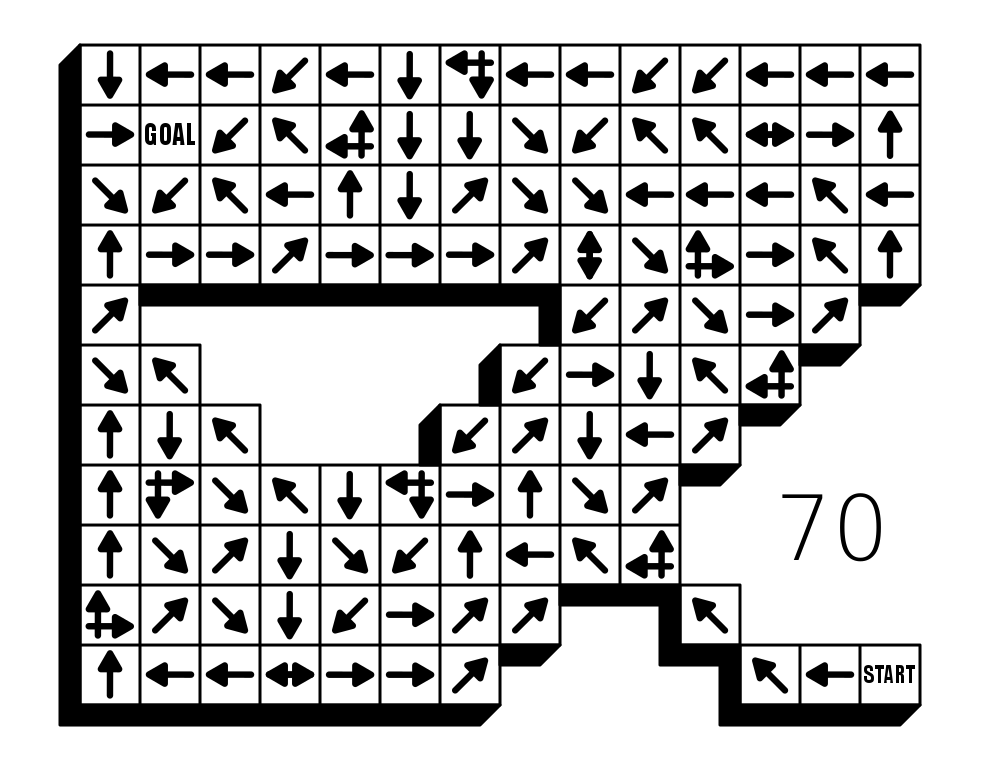
This 8x9 Arrow Maze contains 70 solving blocks (72 minus START and GOAL) and 13 decisions, or roughly one every 18.5% of blocks (vs my first example 13/115 =11% of blocks). So despite being a smaller maze by 37% you are much more likely to get lost in it (in theory).

Arrow Maze decisions highlighted

The summary of intersections - the more you use the more difficult the arrow maze.

In Part 4 I will look at the use of loops in a maze construction, a must for any arrow maze designer !

Arrow Maze Design Case Study - Part 2 Using Creative Shapes

Welcome to Part 2 of our Arrow Maze Design Case study. In this section of the case study we will look at the shape of the overall arrow maze. I call it using creative shapes, but it can just as easily be simple shapes.

Here is an overview of what we will be covering in the 14 part series:

Arrow Maze Construction and Design:

Arrow Maze Components:

Extreme Arrow Maze examples:

Arrow Maze Design Case Study - Part 2 - Using Creative Shapes

The shape and size of the Arrow Maze will help determine the difficulty level and funability which is apparently not a word. Well, I say it is.

Funability - a measure how much fun an event or item contains

Now that we have that out of the way let’s begin with some obvious statements.

  1. The larger the Arrow Maze (as measured by the number of blocks) the more difficult the potential maze

  2. Interesting shapes, including those with notches and gaps creates a more interesting solving experience and allows for more ‘visually hidden’ moves.

Let’s look at a few examples: Simple 9x9 maze (81 blocks). Nothing to write home about. The maze complexity in completely dependent on how the blocks are filled.

9x9 Arrow Maze

9x9 arrow maze

Here is a shape that is based off an 8x8 but has cutouts that give it a pinch point in the center. This means the loops do not return you to start, but return you to the midpoint intersection block. The shape essentially splits the maze into two sections.

Arrow Maze in an interesting shape

Based off on an 8 x 9 grid, this maze has a cutout to give it an O shape. In this maze the flow of the pathways is counterclockwise around the center space.

O shaped Arrow Maze

My next example uses floating blocks that can only be reached by using double arrows. It also includes lots of gaps that can be jumped. Overall the shape helps make a more interesting solve. It includes a forced START move and a double move is needed to reach the GOAL.

Arrow Maze in a bug shape

I have made a few dozen 45 degree angle Arrow Mazes. This particular maze comes from my maze book (page 49!). While this maze looks interesting and is a nice change of pace from a regular shaped maze, the actual maze design is not really affected. Everything is at a 45 degree angle. I like to mix these in for a change of pace. The shape, however, does have many nocks and crannies to move in and out of !

Arrow Maze 45 degree sprawled shape

And let’s look at 3 more shapes that are large scale landscape mazes that I made with interesting shapes to force certain moves. I like all three. Take some time to solve them, I think they are enjoyable mazes.

Arrow Maze #70
Arrow Maze #69
Arrow Maze #66

The moral of this portion of the case study - Be creative with your shapes !

Snowman Arrow Maze

Our next topic in Part 3 - Intersections

Arrow Maze Design Case Study - Part 1 Start Locations and Options

One of my favorite types of mazes to make is the Arrow Maze. I have a book on Amazon of 100 Arrow Mazes, and it is one of the few ,and possibly only? maze book that is available on Kindle. This is because an Arrow Maze can be solved WITHOUT a writing utensil. In fact most people use their eyes or a hovering finger to solve an Arrow Maze. In a series of 14 posts I will be going through some of the design decisions that go into making a successful and fun Arrow Maze. I will be going to extremes in many of these to make the point more impactful.

The 14 part series has 3 major themes we will delve into; Arrow Maze Construction and Design, Arrow Maze Components and Extreme Arrow Maze examples.

Here is an overview of what we will be covering in the 14 part series:

Arrow Maze Construction and Design:

Arrow Maze Components:

Extreme Arrow Maze examples:

Arrow Maze Design Case Study - Part 1 - Start Locations and Options

Making an Arrow Maze start with where you place the START block in the maze. Seems like an easy decision, but there are a few things for you to consider. We will look at a total of 15 different examples, using mini grids to represent larger mazes. Beginning in the top left and moving left to right using our example below:

Corner Starts: you have 3 blocks to work with which can have pathways either in, or out (left). You can use an intersection arrow to create an additional pathway out (center). You can also force a direction for your solver as in the top right example where all 3 initial options lead to the same arrow eventually (right).

Edge Starts: moving away from a corner with the START block gives you an additional 2 blocks for pathways either in or out. You have 5 blocks to work with using any combination of pathways in/out (left, right). You may maximize your out pathways again by using intersection arrows, jumping your pathways to 7 (middle example).

Center Starts: For maximum pathway options you can use a center placed block. This will give you 8 pathways full of regular arrows (left, right). Again using intersection arrows you can maximize your pathways at 12 (center).

Arrow Maze starting options explained

Arrow Maze START options

The summary for these options is that the farther from a corner/edge you place the START. the more options you have.

Let’s look at 6 additional examples with some more complicated STARTs.

Double Arrows: Our first example uses a forced start (there is only 1 choice), but if you want to lead a solver back to the START you can use a Double Arrow to get there (in this case over a gap). The second example uses all 3 blocks as OUT pathways, but uses 2 double arrows to get the solver back to START if they take an incorrect choice. Another way to achieve this, meaning using every block as an OUT pathway from START is to use a RETURN TO START block somewhere in the maze.

Forced Starts: You can use the shape of the maze to create forced moves. The first two examples in row 2 below only allow 1 move, while the third example gives you 2 options. Basically you are placing the START in a position that limits the choices.

Arrow Maze starting options - forced start explanations

You have a lot of options with the START block. Consider the difficulty you want with your maze when you place your START block.

And now a Special case…..the Slide Arrow, which will be a part of a future case study. A slide arrow allows you to slide to any block that it is pointing towards (but not over any gaps)….so using a slide arrow really gives you many additional options. Check how quickly the numbers get large…basically however wide or tall the maze is !!

Slide Arrow Maze starting options explanation

Coming up next in Part 2 - Using Creative Shapes, where we will examine what shapes can be used to create an Arrow Maze !

Maze Design Case Study - Designing a Grid Maze in Different Difficulty levels

I wanted to do a case study showing how to create a maze in a few different difficultly levels. I thought the best way to illustrate this was to design a create a maze with a variety of different branch types included then have you solve them and compare how enjoyable each was for you to solve. Let’s jump into the example and you’ll see what I mean. (Hopefully).

  • Example - Part 1. Please solve this small 10x10 grid maze. Yes this is an interactive example !

10x10 grid maze solving example

OK. Take note of how your experience was solving the maze. Did you enjoy it ? How quickly did you solve the maze ? Anything you did not like about the experience ? Did you find it to be enjoyable or frustrating ?

Now lets try this maze made on the same grid structure. We have 10x10 grid maze with the Start and Goal placed in the same locations.

  • Example - Part 2. Please solve this small 10x10 grid maze.

10x10 grid maze solving example 4

I have the same questions for you as before. How was your experience was solving the maze ? Did you enjoy it ? How quickly did you solve the maze ? Anything you did not like about the experience ? Did you find it to be enjoyable or frustrating ?

An finally in Part 3 we will group 2 additional mazes together for evaluation. Same questions will apply.

  • Example - Part 3. Please solve each of these small 10x10 grid mazes.

10x10 grid maze solving example 2
10x10 grid maze solving example 3

So what have we learned ? Before I go into some explanations on the design of each maze take a minute to hypothesize on what you think just happened. 4 similar mazes. Hopefully they gave you different experiences for you when you were solving them.

4 Maze Comparison - The Differences and Design Choices

  • First, did you notice each maze has the same exact solution ? Mazes 2 & 3 have the inverse (or flipped) solution of mazes 1 & 4. So the solutions are essentially all equal.

  • Each numbered maze should have gotten more difficult as the numbers increased (although with a small maze size this may have been somewhat less obvious)

  • Maze 1 - Short dead ends. Incorrect paths do not have branches. Pathways are wide. Some paths are “filler” and unusable.

  • Maze 2 - Longer dead ends. Incorrect paths do not have branches. Pathways normal width.

  • Maze 3 - Long dead ends with additional branches off of them. Pathways slightly smaller.

  • Maze 4 - Long dead ends with choices and branches off them. 4 way choices included. Small pathway widths.

So to summarize I used the following to change the difficulty of the 4 mazes:

  • The length of dead ends - How fast you know you have made an incorrect choice

  • Dead end branches - When you make a wrong turn are there multiple incorrect choices on that branch

  • Expanded pathway choices - Some intersections have multiple choices

  • Pathway widths - Smaller pathways are more difficult to see and navigate.

  • Unusable pathways - Filler sometimes used to fill a maze out while keeping it at the desired difficulty level.

Let’s look at the pathways coded to show what I mean. The red line is the solution. The blue line is the false pathway. The purple line is an unusable pathway (Did you know some mazes use this ?)

What you need to notice in the below deconstructed mazes:

  • Maze 1 - Thick pathways make this maze easier to solve. The purple lines to not connect to anything - essentially they are filler and unusable pathways. Most likely you did not notice them. They make the maze easier. The blue lines, the incorrect dead end paths - are short and only extend 2 levels before letting the solver know it was the wrong choice.

  • Maze 2 - Normal pathway width. No purple pathways from here on out. The blue lines are long but have no branches off of them. Longest length is 11 blocks.

  • Maze 3 - Pathways are a bit thinner. The blue dead end lines now have branches, so wrong turns have additional wrong turns. None of these, however has more than one additional dead end branch. There is also a dead end choice at the starting block.

  • Maze 4 - Pathways are very thin. There are now 3 intersections where 4 pathway choices are included (they look like a plus sign in this grid maze). Dead end branches also have multiple dead ends off of them.

four 10x10 grid maze solving example solutions

Hopefully this explanation and example shows you a small piece of how maze difficulty can be designed and changed with a few different choices. Most solvers would prefer Maze #1 because the wrong turns are not overly punishing. But a nice amount of people would prefer something a bit more challenging also, so remember the audience you are designing for when you create your mazes !

I will say that there is a balance between making a challenging maze and poor maze design. Do the pathways need to be ultra thin or are you just straining the eyes of the solver ? I think a re-design of Maze #3 with thick pathways would be both enjoyable AND challenging ! Happy maze-ing !

Additional popular posts you may like:

How To Make A Grid Maze

44 Different types of Mazes and Labyrinths

Comparison of the Top 10 Maze Generation Websites