
One of my favorite types of mazes to make is the Arrow Maze. I have a 4 volume series of books on Amazon of 100 Arrow Mazes each, and they are some of the few, and possibly only? maze books that are available for the regular Kindle. This is because an Arrow Maze can be solved WITHOUT a writing utensil. In fact most people use their eyes or a hovering finger to solve an Arrow Maze. In a series of 14 sections I will be going through some of the design decisions that go into making a successful and fun Arrow Maze. I will be going to extremes in many of these to make the point more impactful.
The 14 part series has 3 major themes we will delve into; Arrow Maze Construction and Design, Arrow Maze Components and Extreme Arrow Maze examples.
Here is an overview of what we will be covering in the 14 part series (click to skip to a section):
Arrow Maze Construction and Design:
Arrow Maze Components:
Extreme Arrow Maze examples:
Arrow Maze Design Case Study - Part 1 - Start Locations and Options
Making an Arrow Maze starts with where you place the START block in the maze. Seems like an easy decision, but there are a few things for you to consider. We will look at a total of 15 different examples, using mini grids to represent larger mazes. Beginning in the top left and moving left to right using our example below:
Corner Starts: you have 3 blocks to work with which can have pathways either in, or out (left). You can use an intersection arrow to create an additional pathway out (center). You can also force a direction for your solver as in the top right example where all 3 initial options lead to the same arrow eventually (right).
Edge Starts: moving away from a corner with the START block gives you an additional 2 blocks for pathways either in or out. You have 5 blocks to work with using any combination of pathways in/out (left, right). You may maximize your out pathways again by using intersection arrows, jumping your pathways to 7 (middle example).
Center Starts: For maximum pathway options you can use a center placed block. This will give you 8 pathways full of regular arrows (left, right). Again using intersection arrows you can maximize your pathways at 12 (center).
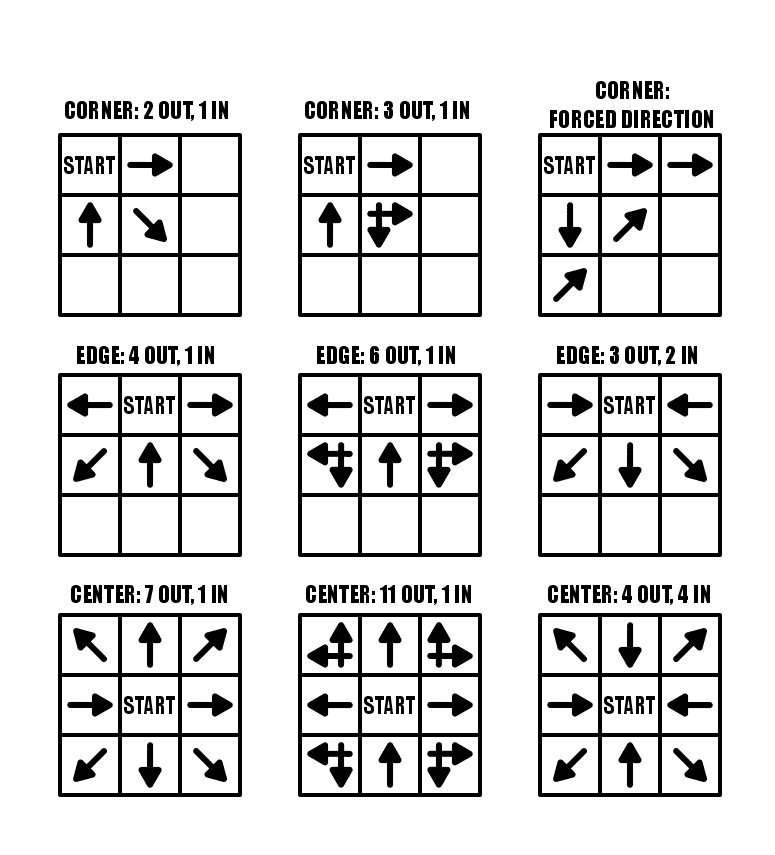
Arrow Maze START options
The summary for these options is that the farther from a corner/edge you place the START. the more options you have.
Let’s look at 6 additional examples with some more complicated STARTs.
Double Arrows: Our first example uses a forced start (there is only 1 choice), but if you want to lead a solver back to the START you can use a Double Arrow to get there (in this case over a gap). The second example uses all 3 blocks as OUT pathways, but uses 2 double arrows to get the solver back to START if they take an incorrect choice. Another way to achieve this, meaning using every block as an OUT pathway from START is to use a RETURN TO START block somewhere in the maze.
Forced Starts: You can use the shape of the maze to create forced moves. The first two examples in row 2 below only allow 1 move, while the third example gives you 2 options. Basically you are placing the START in a position that limits the choices.
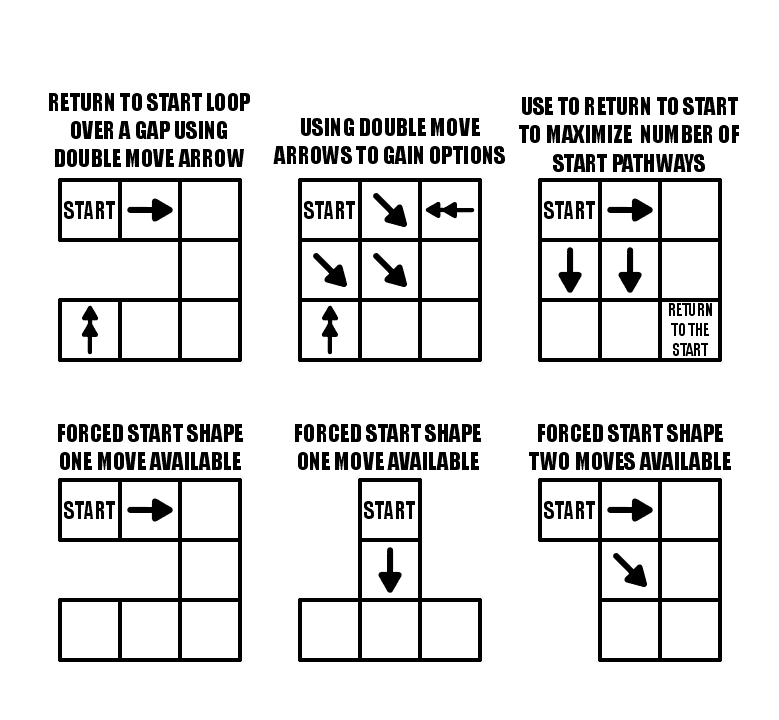
You have a lot of options with the START block. Consider the difficulty you want with your maze when you place your START block.
And now a Special case…..the Slide Arrow, which will be a part of a future case study. A slide arrow allows you to slide to any block that it is pointing towards (but not over any gaps)….so using a slide arrow really gives you many additional options. Check how quickly the numbers get large…basically however wide or tall the maze is !!

Part 2 - Using Creative Shapes
The shape and size of the Arrow Maze will help determine the difficulty level and funability which is apparently not a word. Well, I say it is.
Funability - a measure how much fun an event or item contains
Now that we have that out of the way let’s begin with some obvious statements.
The larger the Arrow Maze (as measured by the number of blocks) the more difficult the potential maze
Interesting shapes, including those with notches and gaps creates a more interesting solving experience and allows for more ‘visually hidden’ moves.
Let’s look at a few examples: Simple 9x9 maze (81 blocks). Nothing to write home about. The maze complexity in completely dependent on how the blocks are filled.
Here is a shape that is based off an 8x8 but has cutouts that give it a pinch point in the center. This means the loops do not return you to start, but return you to the midpoint intersection block. The shape essentially splits the maze into two sections.
Based off on an 8 x 9 grid, this maze has a cutout to give it an O shape. In this maze the flow of the pathways is counterclockwise around the center space.

My next example uses floating blocks that can only be reached by using double arrows. It also includes lots of gaps that can be jumped. Overall the shape helps make a more interesting solve. It includes a forced START move and a double move is needed to reach the GOAL.

I have made a few dozen 45 degree angle Arrow Mazes. This particular maze comes from my maze book (page 49!). While this maze looks interesting and is a nice change of pace from a regular shaped maze, the actual maze design is not really affected. Everything is at a 45 degree angle. I like to mix these in for a change of pace. The shape, however, does have many nocks and crannies to move in and out of !

And let’s look at 3 more shapes that are large scale landscape mazes that I made with interesting shapes to force certain moves. I like all three. Take some time to solve them, I think they are enjoyable mazes.

The moral of this portion of the case study - Be creative with your shapes !
Part 3- Intersections
For our first example we will use a 9 x 13 landscape Arrow Maze, and fill it with a total of 13 L shaped Intersections. These intersections are the standard way in an arrow maze to give the solver a decision to make on what direction they would like to continue in. The more choices (intersections) the more difficult the maze, since only one pathway will lead to the GOAL. Use the next/previous controls to flip between the clean maze the the version showing the intersections.
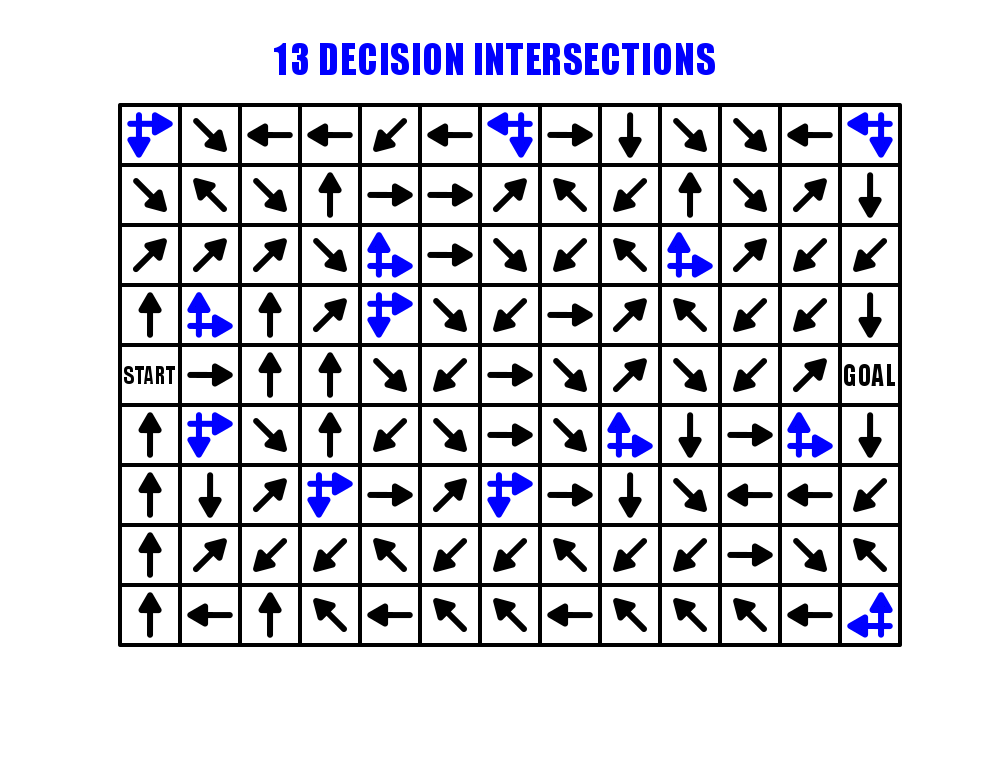
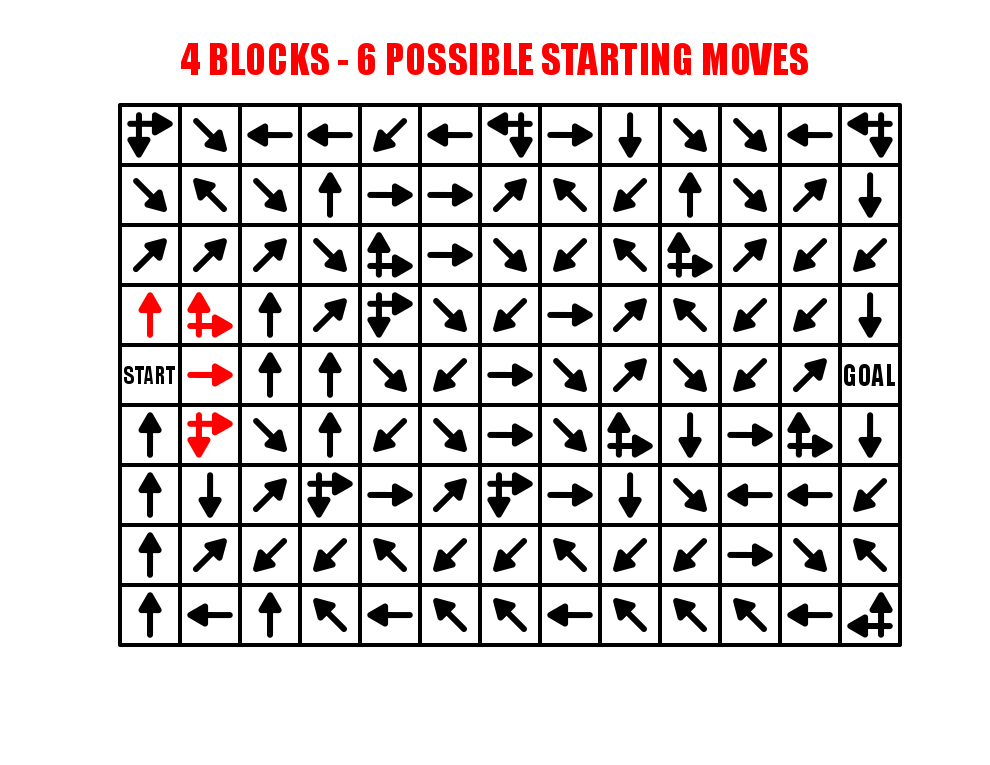
One of the great ways to use these intersection arrows is next to the START block, which will naturally expand the initial options of the solver. As shown in RED below, the 4 starting moves actually work like 6 possible starting moves/paths to choose since 2 intersections are possible from the START. If you are starting an Arrow maze from a tight space (say a corner), consider adding intersections right off the bat !
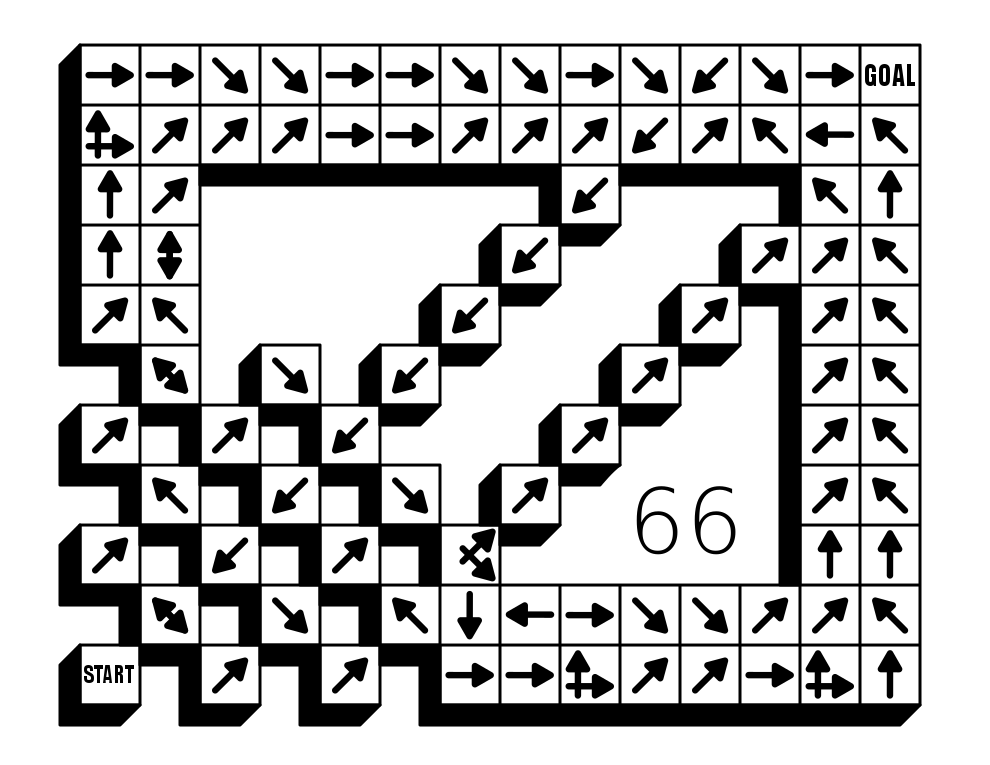
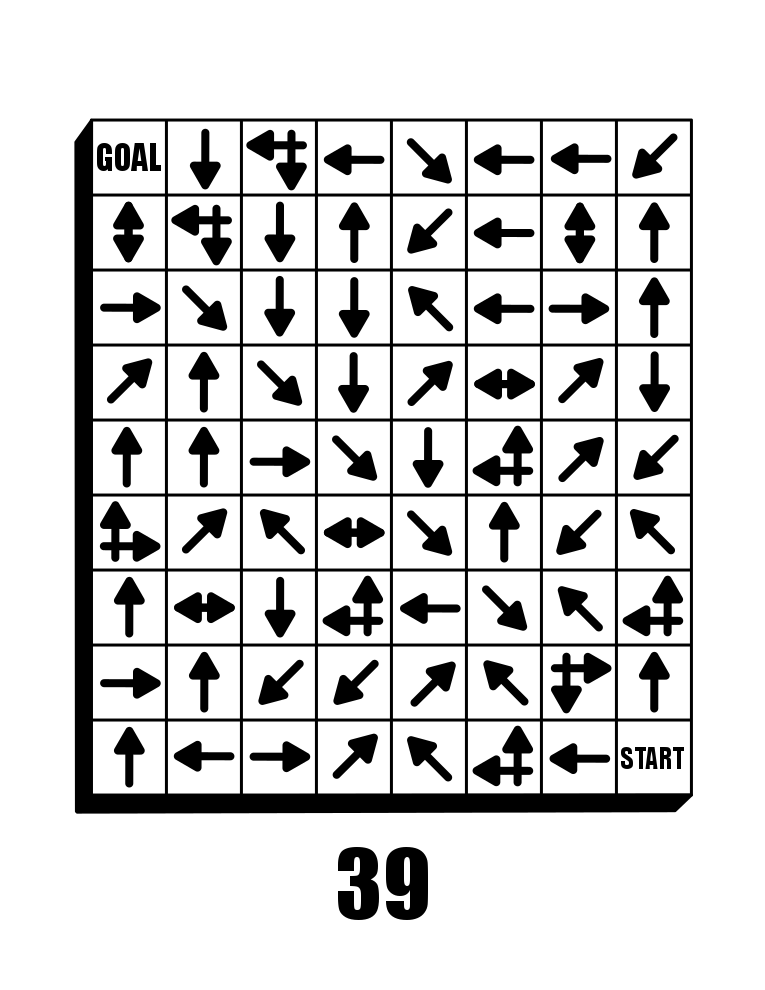
While this Arrow Maze used only L shaped intersections, you can also have an opposite direction decision arrow that works in the same way. Here is an example from my book (page 39). Take some time and try to solve this one. I used an extensive Looping system while constructing it that is intended to send the solver back near the start multiple times (unless you are lucky !!). It is actually a good example of that construction that we will cover in a future post.
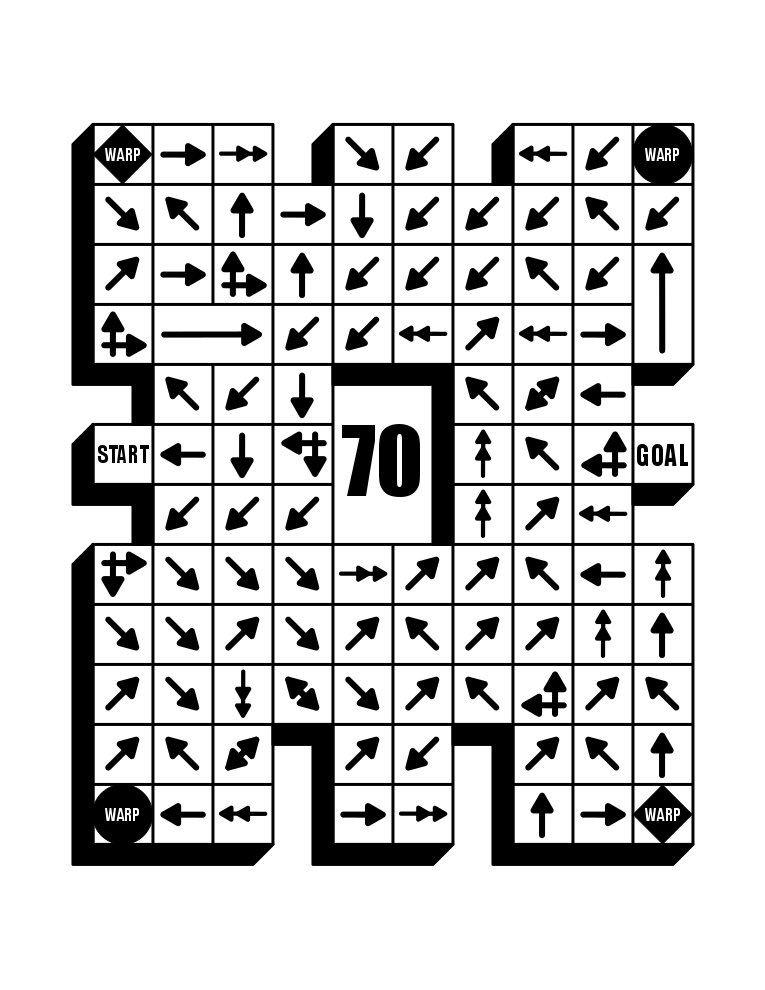
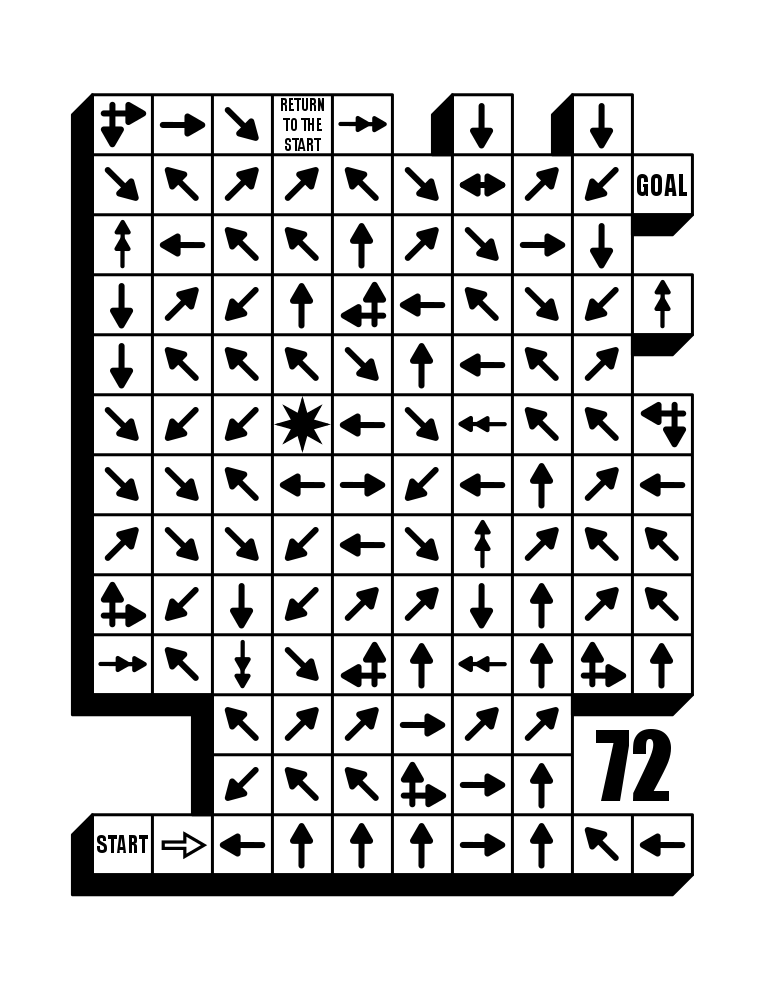
This 8x9 Arrow Maze contains 70 solving blocks (72 minus the START and GOAL) and 13 decisions, or roughly one every 18.5% of blocks (vs. my first example 13/115 =11% of blocks). So despite being a smaller maze by 37% you are much more likely to get lost in it (in theory).

The summary of arrow maze intersections - the more you use the more difficult the arrow maze.
Part 4 - Using Loops
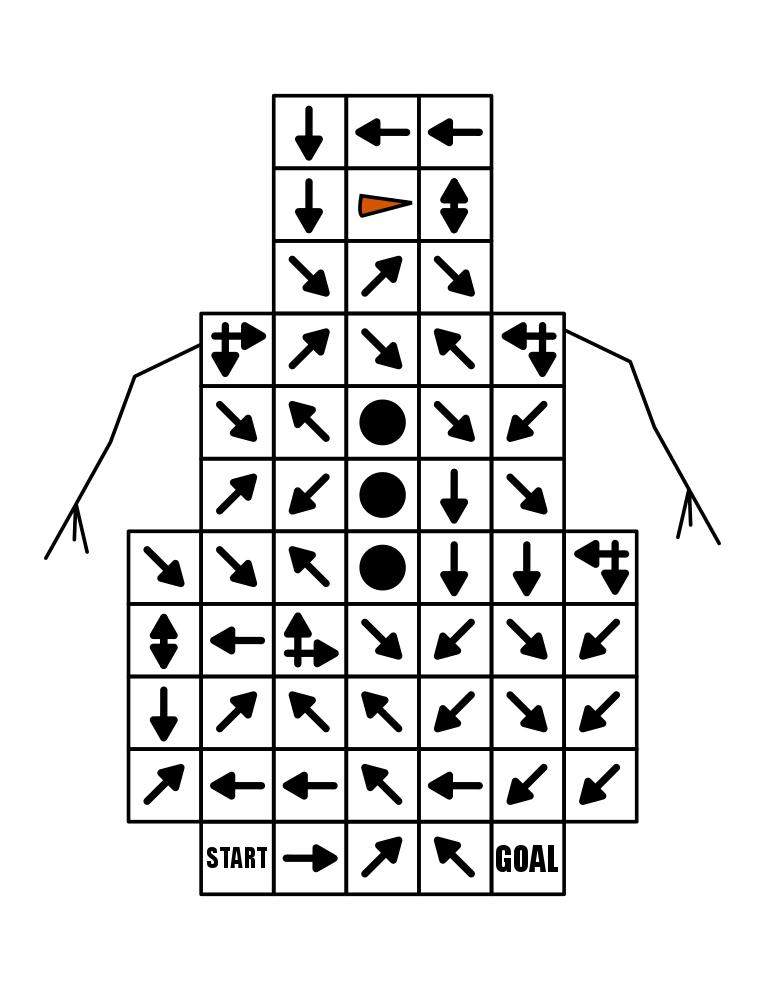
For this example I will use a 9x9 box Arrow Maze, and fill it with a lot of intersections (and make those into loops). We already discussed in Part 3 how the more intersections that are used, the more difficult the maze becomes. This example has 9 intersections. Scroll down a bit, and take some time and try to solve it.
What did you think ? Did you notice the loops in the maze ? I assume yes. I took some time to highlight the loops throughout the maze. First notice that I have a constructed START (we will speak about this in a future post). No matter which of the 3 blocks you move to from the START they all lead to the first intersection.
I added the same maze with the loops colored and shown in the gallery. You can flip between the 2 to reveal the loops.
Now let’s follow the loops. RED is first. If you take the red path it leads back to where you are OR leads you to the next loop PURPLE which then leads you back to the RED loop either way !
The next pathway is the BLUE loop, which takes you to another intersection ( the blue double arrow) which takes you back into the RED / PURPLE loop or into the GREEN loop that circles back to the BLUE intersection -> to the RED PURPLE… UGH, unless you correctly chose the down black direction.
This goes to the BRIGHT GREEN loop that leads back to the first intersection if you take it.
Next is PINK which leads to either BRIGHT GREEN or YELLOW that loops you back to BLUE.
If you take the correct pathway from PINK you have only one loop remaining, the simple GREY that loops onto itself.

Loops, and loops within loops are a great way to make the maze interesting for the solver. Use them liberally and you will not need to send the solver back to the START. If you are designing a arrow maze for kids, loops are extremely important. I consider short loops the same as short, obvious dead ends in a regular maze…if you take it, you can quickly get back on track and moving towards the goal.
The summary of arrow maze loops - using loops makes arrow mazes more fun and difficult while avoiding dead ends!
Part 5 - Regular Arrows
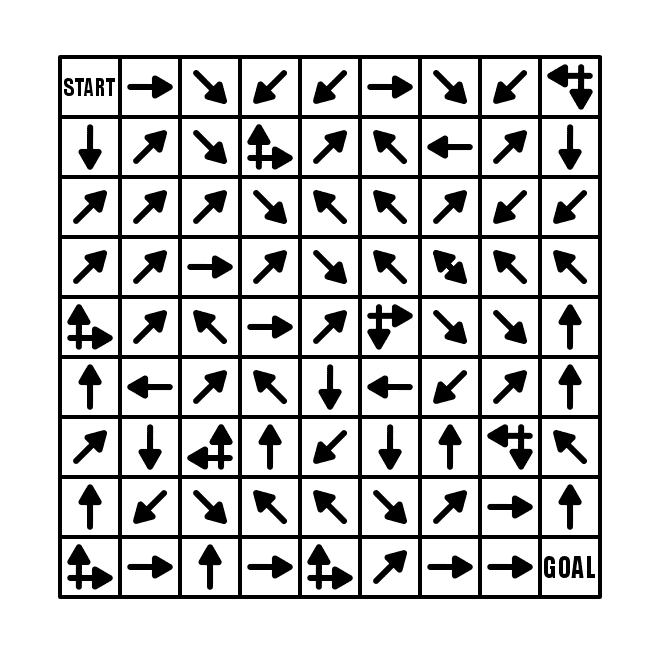
The core and most basic element of an arrow maze is the basic arrow, In fact, a beginner Arrow maze can be made using ONLY regular arrows. Let’s look at an example. Here is a 9 x 13 landscape Arrow Maze using only regular arrows. Go ahead and take some time to solve it.
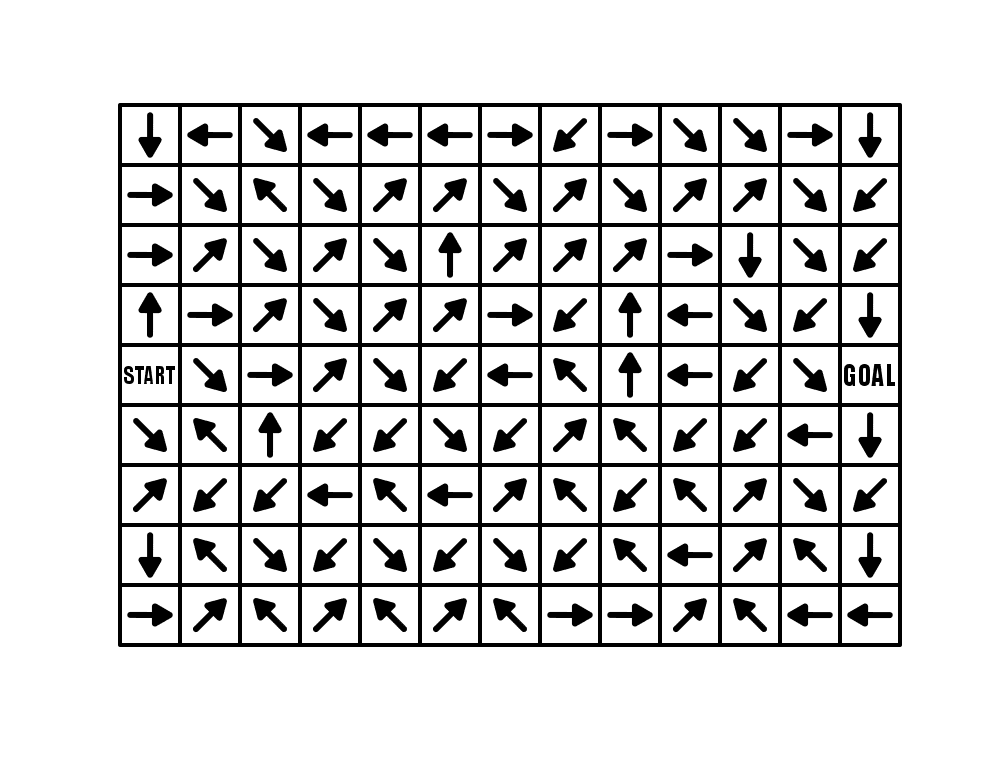
How was the experience ? If you chose the right path from the START it was a quick solve. If you did not chose correctly you eventually found this out when you returned to START after moving around the maze,
A maze with this design (regular arrows with no choices) is virtually the same in structure as a line leads maze popular in kids activity books. Let’s look at one of my Line Leads Mazes:

In both, you make an initial choice of paths, then follow it to see if you are correct. The incorrect Arrow pathways bring you back to START while the Line Leads Maze takes you back to another incorrect possible pathway. Otherwise these are very similar.
Let’s focus in on the START in our example. Highlighted in light blue, there are 4 possible pathways you may move to and one return pathway (which technically can be chosen but will immediately return you back to start). Your chance of choosing the correct path is 25%.
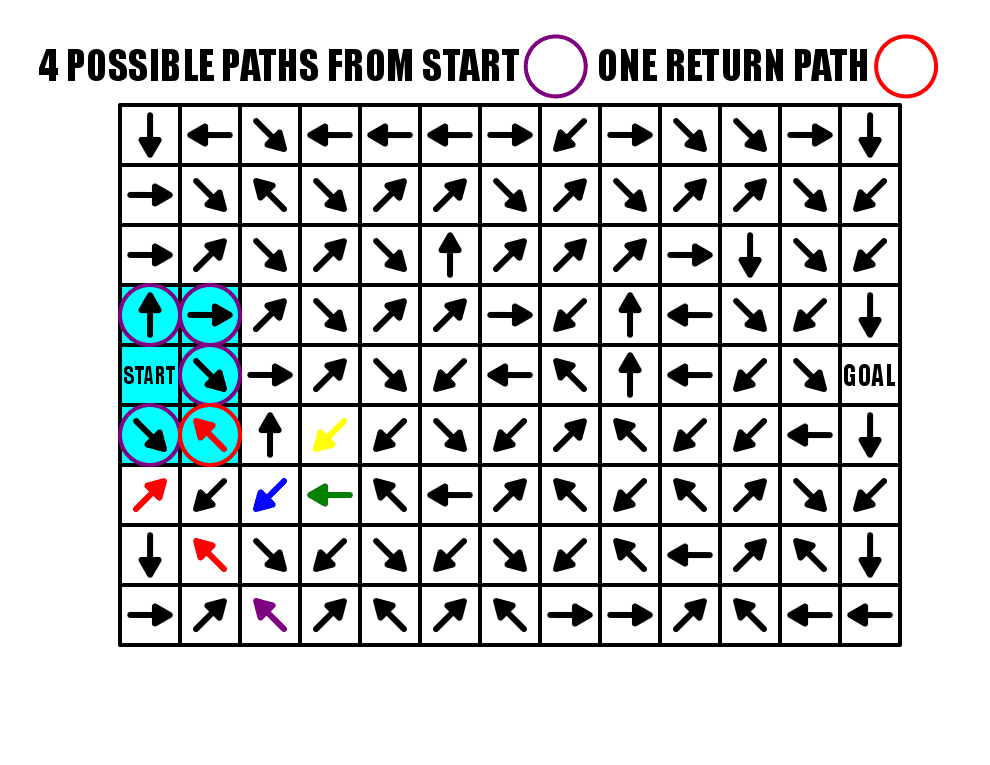
From a design standpoint you might be asking, wait, if there are 4 pathways out and only 1 is correct, leaving 3 incorrect pathways, how is there only 1 pathway back to the start ? Well, all of those incorrect pathways meet in 2 spots to form one incorrect pathway back to START. Again the highlighted section shows what we are speaking about. Incorrect pathways Yellow and Green combine at the Blue arrow which then combines with the 3rd incorrect pathway of Purple at the first Red arrow. The last 3 red arrows represent all 3 pathways (Yellow, Green, Purple) moving back to the START.
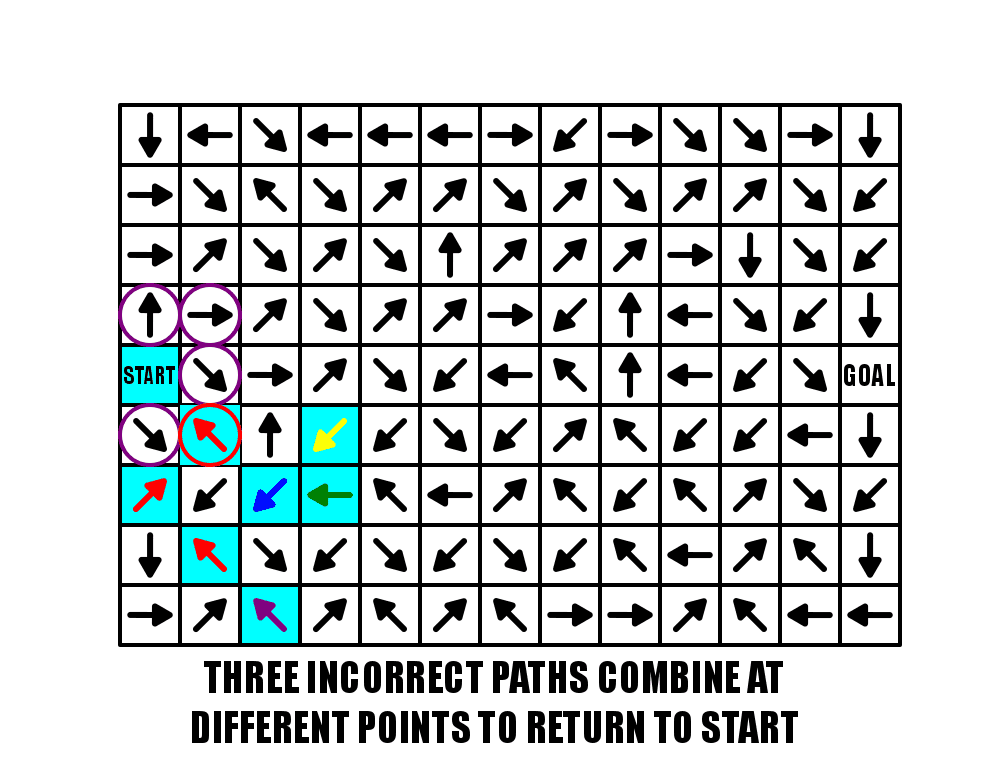
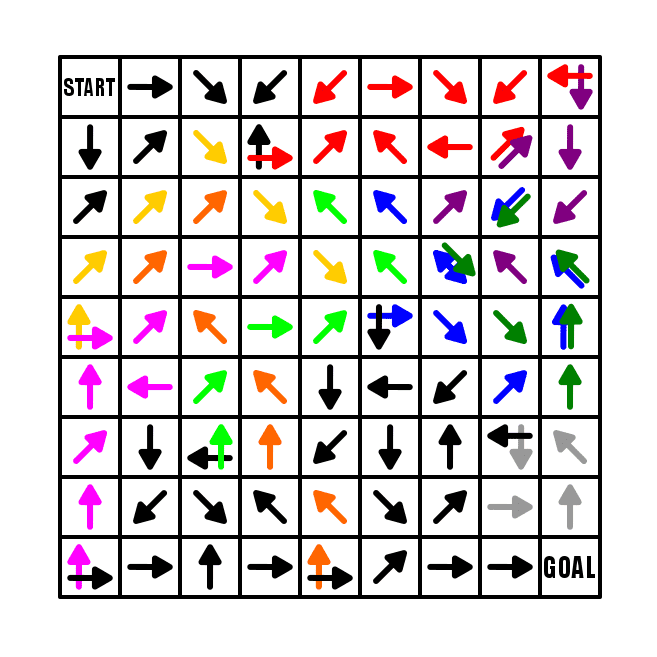
And finally, let’s look at each pathway to break down what happened in this maze. Purple, Green, and Yellow are the full false pathways (combining still to red in the end). Black arrows are the correct pathway. Two highlighted black arrows are “filler” arrows that are not actually used in any solution !!!
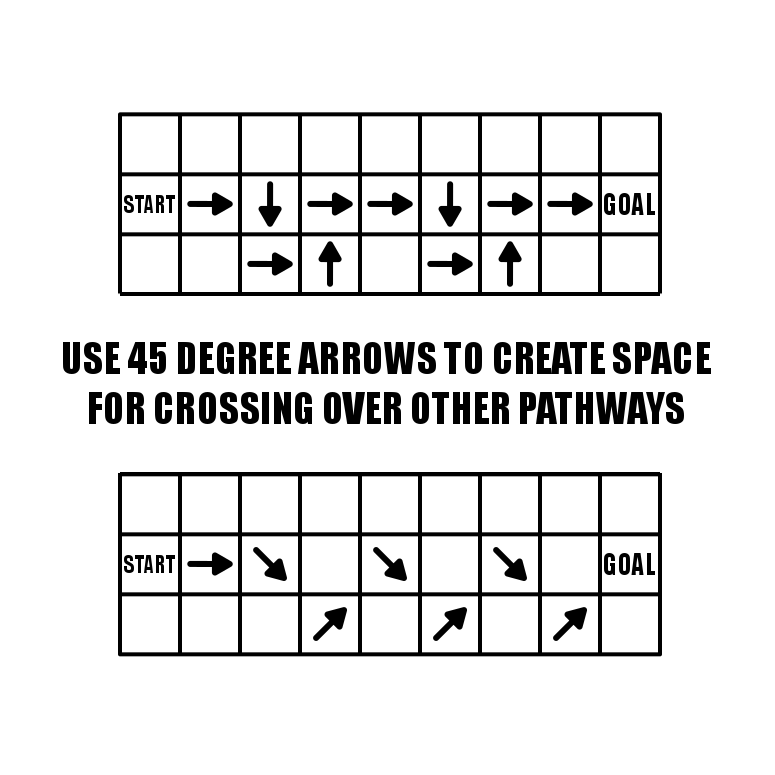
One last design technique you should be aware of when using regular arrows to design a maze. You may or may not have noticed that I usually use arrows at 45 degree angles (did you notice this before ?). I want to explain why this is the case. If you use arrows pointing in the standard NSEW directions, you will create pathways that CANNOT be crossed over. But using 45 degree angles will fix that. In the example below I have drawn one pathway using NSEW arrows and one with 45 degree arrows that travel essentially the same way. But if I continued to design each maze the NSEW version does not have much flexibility on where future pathways can go because the arrows have created a wall that cannot be crossed over.
The summary of regular arrows - learn the basics of regular arrows to create better arrow mazes.
Part 6 - Double Arrows
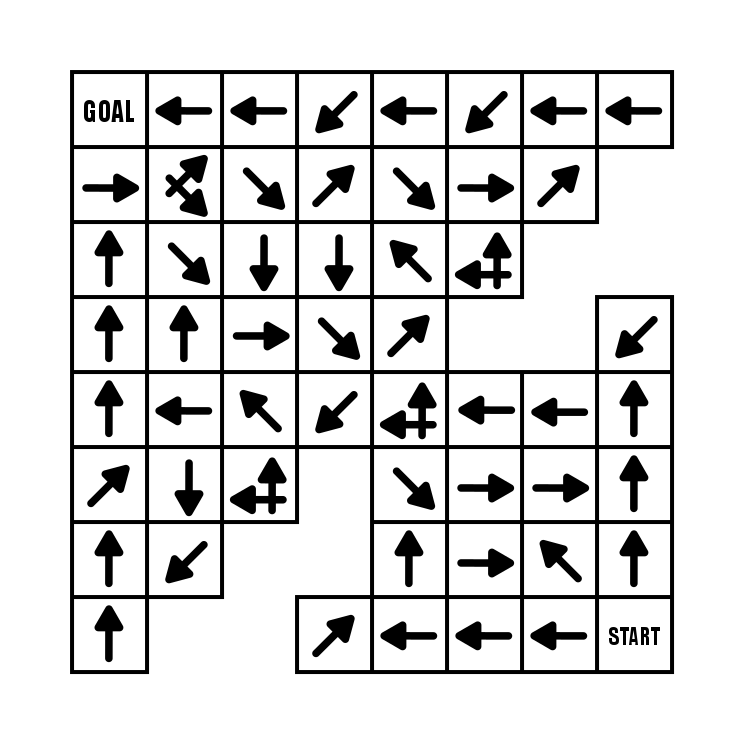
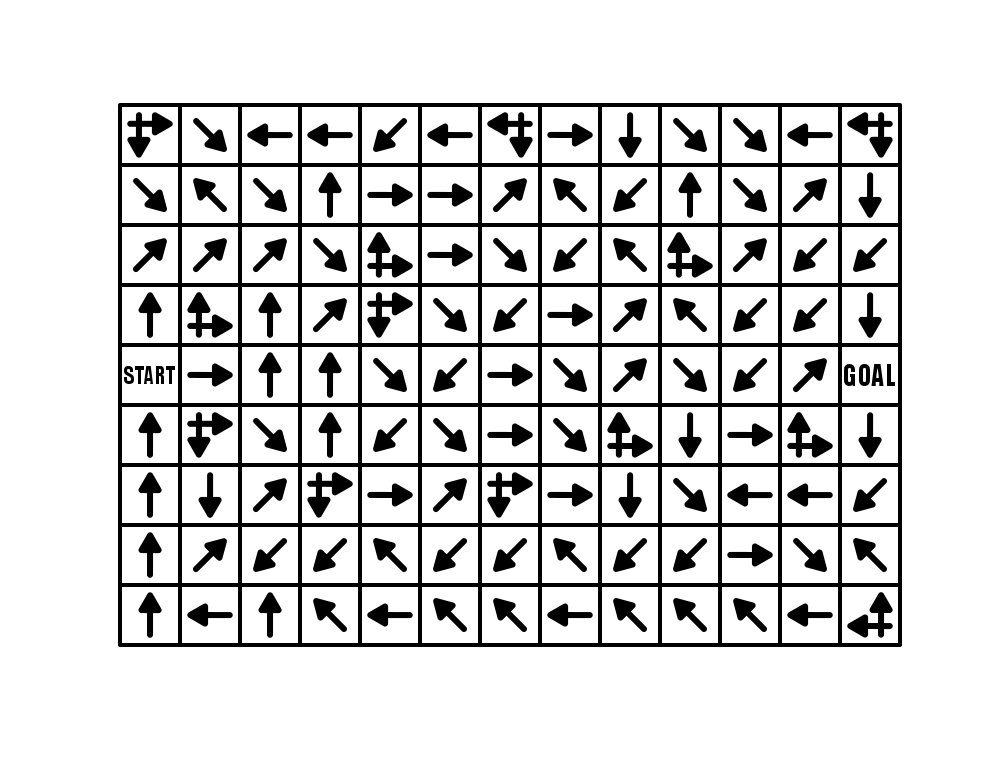
To review what a double arrow is, it is an arrow that jumps you over the block or gap in the direction the double arrow is pointed. For my first example I will use a 9 x 13 landscape Arrow Maze, with this iteration using mostly Double arrows. Take some time to solve the maze and see how you like it.

For me this is a fun solve, how about you ? I find it is easy to get lost and make a misstep when executing a correct solve. Notice that because of the use of the double arrow to return to START, while our regular arrow maze example in Part 5 had 4 possible starting pathways, this allows 5 starting pathways…so you get a 20% chance of solving this correctly by guessing.
One thing about this maze, is that because of the double arrows alignment it is very difficult (almost impossible) to use ONLY double arrows to make a complete maze. To make this maze more complicated (and fun IMO) you could easily add some choice arrows throughout the maze.
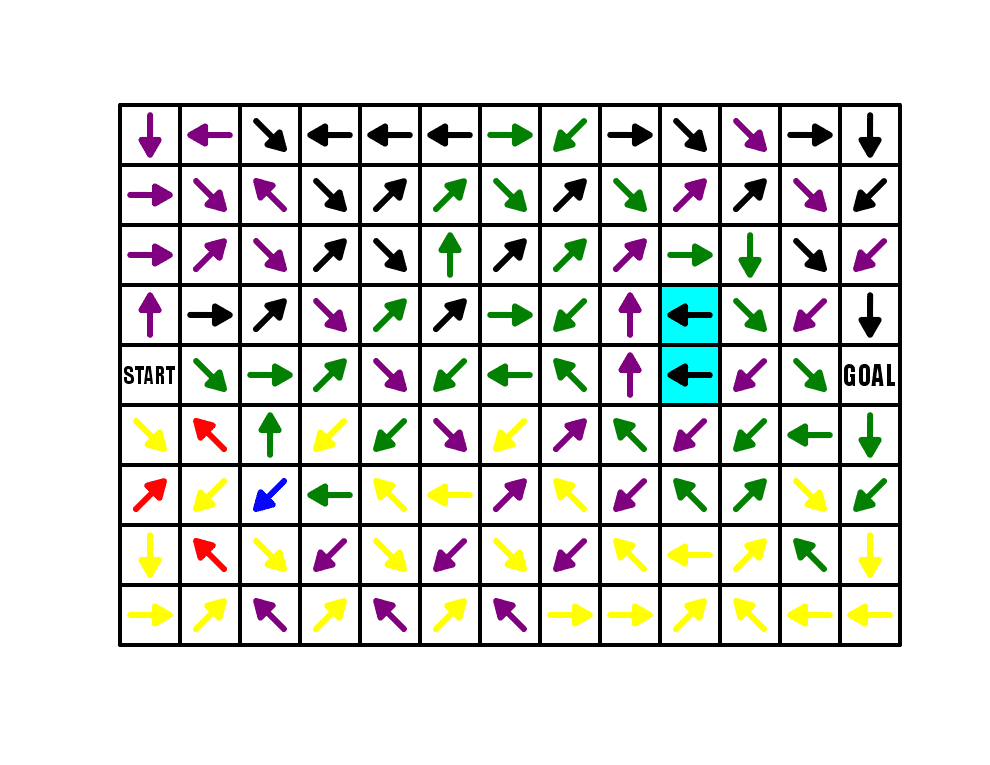
Let’s look at this maze color-coded so we can see the design elements of the pathways:
Red is the correct pathway. Green, Blue and Yellow are incorrect pathways, with Purple a short “filler” incorrect pathway. All black arrows are filler (which could have easily been used with a pathway if I had used some choice arrows). Even with the pathways color coded, the pathways can be difficult to follow (at least compared to color-coded regular arrow pathways).

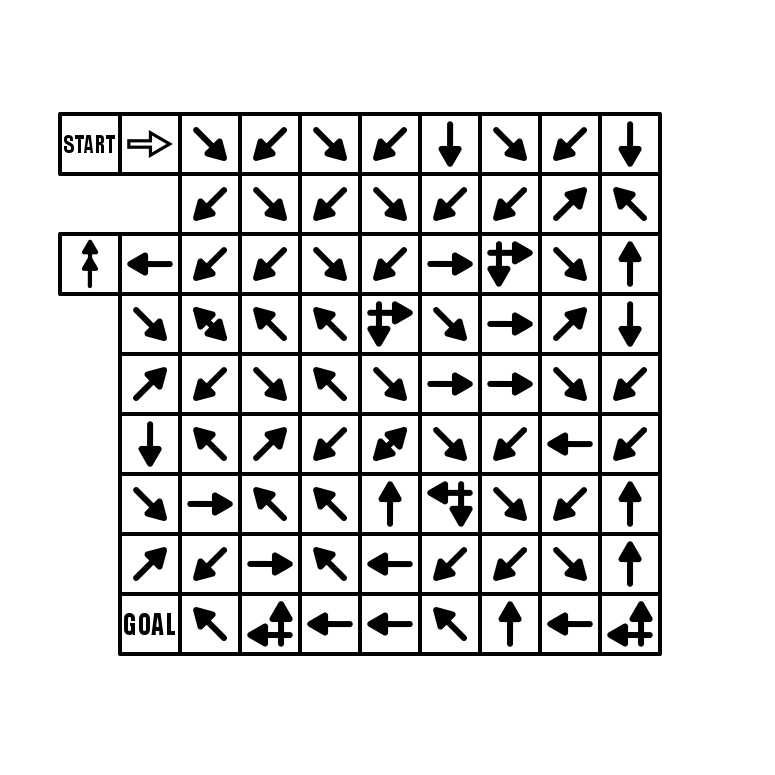
We will come back to this arrow construction in future case studies because it is so versatile. To really take advantage of this arrow I like to use it to jump across spaces. Below is an Arrow Maze from one of my books (page 53 !) where I use the double arrow 4 times as an island block and 7 times to jump gaps that otherwise be uncrossable (including the dreaded go back to START).

The summary of double arrows - The Double Arrow is a great block to use to get into and out of tight spaces and to cross over gaps in an arrow maze.
Part 7 - Using the START GOAL
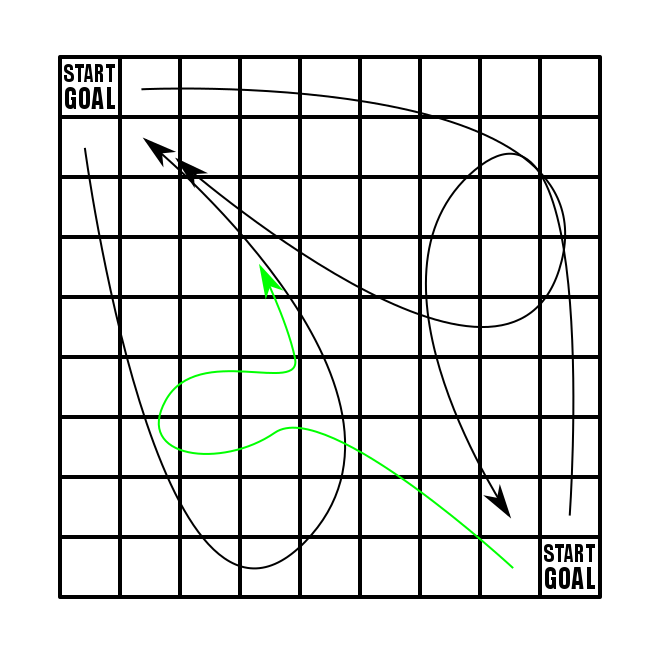
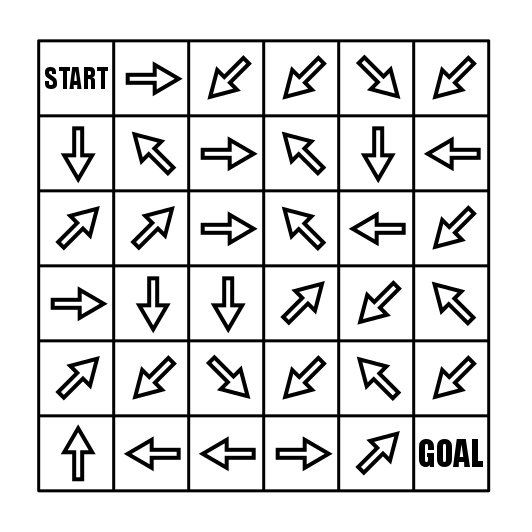
For this example I will use a 9x9 box Arrow Maze, and use 2 START GOAL blocks. If you are unfamiliar with this block it adds a new twist to solving the maze because the solver must determine which block is the START and which block is the GOAL. Incorrect pathways lead back to where they started from, with only one pathway leading between the 2 blocks. Try this small START GOAL Arrow Maze.
So how did you do ? Were you lucky enough to choose the right pathway initially ?
Because the S/G blocks are in the corners there are limited choices (to help you out a bit). The top left corner has 3 choices leading from the block while the bottom has 2 choices. 2 blocks are used, 1 for each corner S/G to bring pathways back to them.
From a construction standpoint this means that both incorrect pathways and the eventual correct answer will share a few steps along a pathway (usually at the end). Essentially a bunch of paths lead back to the start, while one pathway connects to one of the wrong pathways from the other side to create a solution. Hopefully this simple diagram shows what happens…with the green pathway becoming the answer.
One major consideration when using START GOAL blocks is that you are forced to create many pathways and they take up a lot of room in the maze. If you branch the pathways out with a lot of intersections you will create a lot of pathways to eventually close. So, using S/G blocks is best done for larger mazes.
My next example uses 2 S/G blocks very close to each other and a total of only 4 outgoing pathways from each. Should be easy, right ? Give it a try.

The summary of START GOAL blocks - If you want to add complexity, consider a START GOAL block. I find them to be a lot of fun as a solver !
Part 8 - Return to Start block
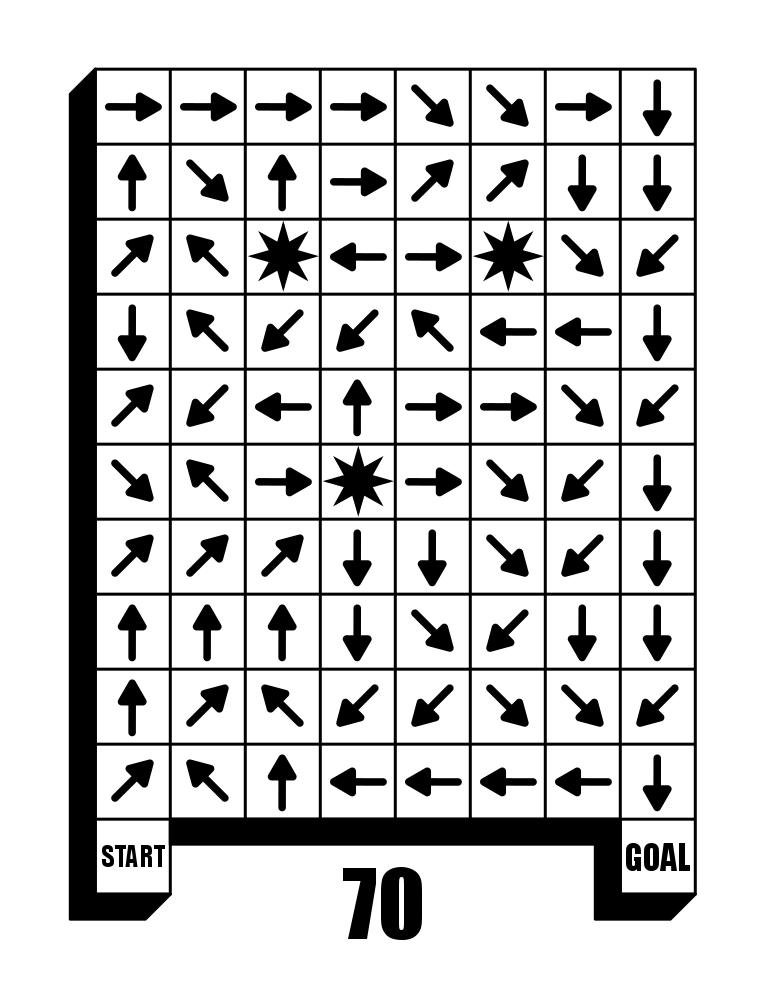
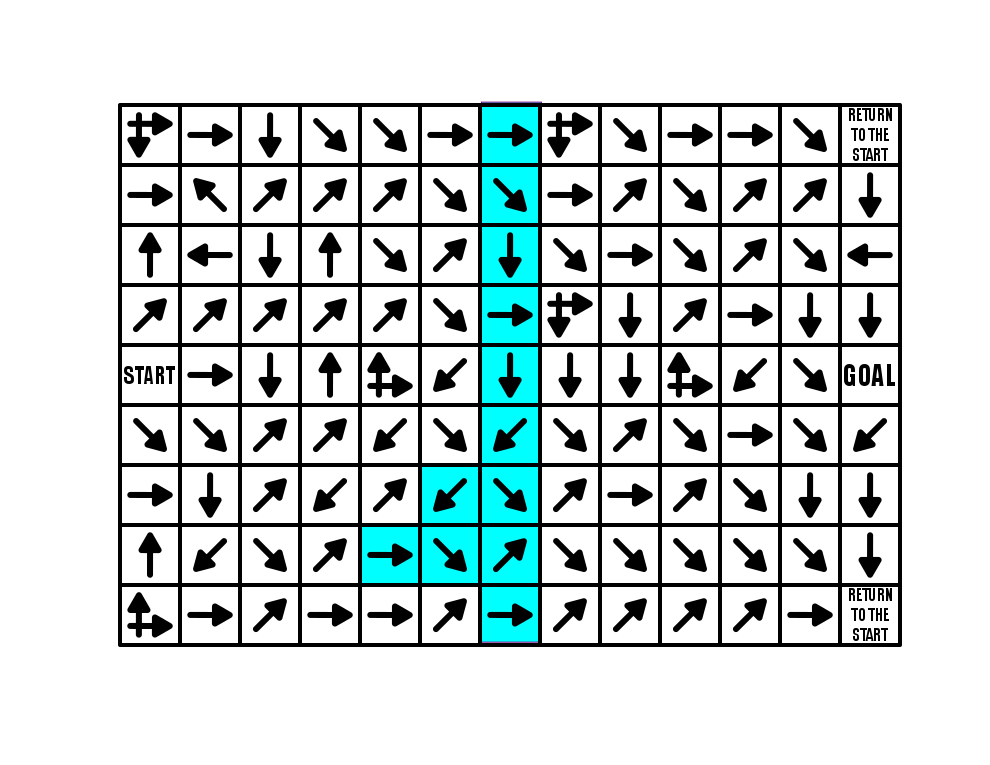
Again we will use a 9 x 13 landscape Arrow Maze, and add a few Return to Start blocks. While you can use as many of these blocks as you need…this example only uses 2. Take some time to solve the maze.

The use of this block gives the solver that feeling of dread. This is not a block you want to land on. For this maze I only used 2 and led all the incorrect pathways to those 2 points. One of the advantages of using this block is that as you design the maze you DO NOT NEED to leave a space for incorrect pathways to return to the start on their own. For this particular maze that means moving all pathways from left to right.
I highlighted the middle column of the maze to show this more clearly. Notice that ALL arrows in this column move to the right towards the GOAL of the maze…except ONE block that moves SE and returns back to the right just after…so really nothing is moving left back to the START.
So what happens when you get AGGRESSIVE with the use of Return to Start blocks ? Well here is another example from my upcoming book (page 99 of 100). It uses only regular arrows and decision arrows but a TON of RTS blocks to drive the solver crazy. There are SO MANY wrong pathways that can be taken and all of them return you back to the start of the maze !

Now that was intense and annoying.
And although it should be obvious…a RETURN TO START block may not be used in an Arrow Maze with START GOAL blocks…because where do you go back to ?
The summary of RETURN TO START blocks - Use them if you want to punish wrong moves.
Part 9 - Using Warp Zones
There is not much explanation needed for a Warp block used in an Arrow Maze despite it being an interesting twist to add to a maze. Basically, it allows you to Warp (or jump) to the same shaped Warp across the maze. There is one additional thing that must be explained. When you land on a Warp block you can warp across the maze OR you can choose not to warp. This leads to the explanation where leaving a Warp block can be moved off of just like a START block - in any direction.
In my example below I use a circular shape and a diamond shape for the Warp blocks. My third shape is typically a square. If you want to use color to differentiate Warp blocks that is also an option.

There is an additional twist I thought of that I put in this Arrow Maze for an upcoming book. With this Warp, when you land on it you may move to either of the other WARPs - 1 shape, 3 Warp choices. When you add in the fact that each of those Warps have choices leaving from them…well there are a lot of choices to make when you land on a Warp.
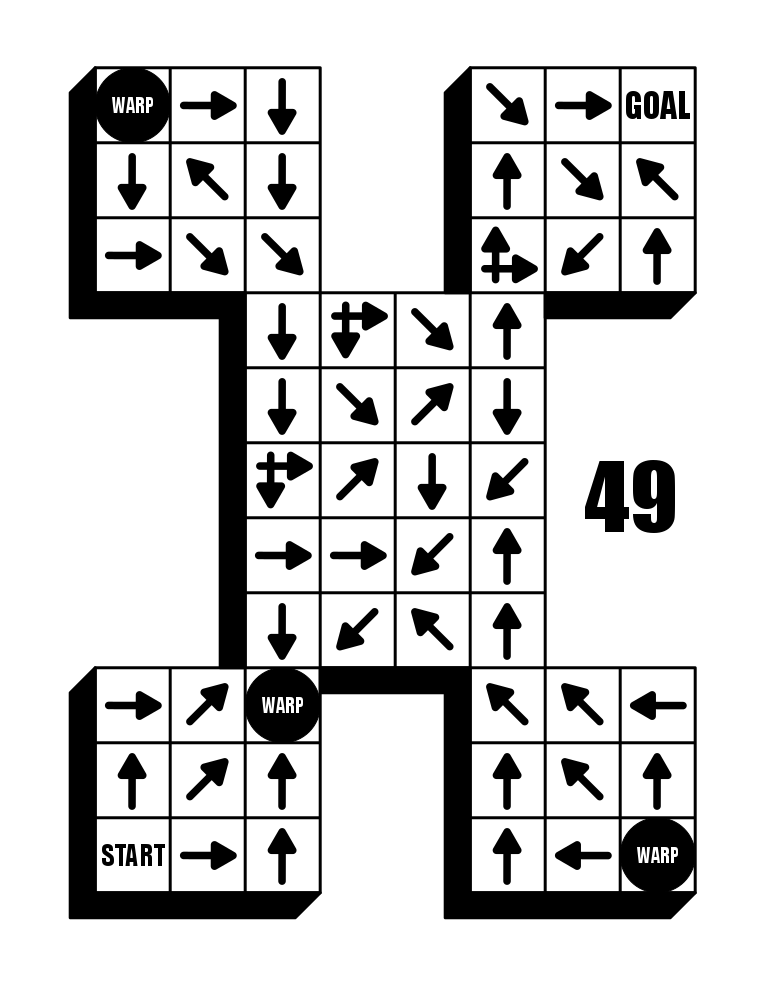
And it must be said that a great way to use Warp blocks is to travel between two disjointed sections like in the example below. Yes, I could have used double arrows to jump the gaps….but this version essentially creates an initial arrow maze (whose goal is the first Warp), and then a second Arrow Maze from the Warp to the Goal.

The summary of warp zone blocks - Use them if you want to add variety or if you want the ability for the solver to jump across the maze.
Part 10 - Slide Arrows
Yes, a Slide Arrow Maze is a completely separate type of maze IMO to an Arrow Maze. They use the same shapes…the same START and GOALS…and both are full of arrows in a block format. BUT. And, for me it is an important but. They are different types of mazes. A complete Slide Arrow Maze is MUCH MORE DIFFICULT to solve than an Arrow Maze. It is not even close. It is also much harder to design and create. I did the below comparison for my How To Draw a Maze posts:

So landing on a Slide Arrow means you can slide to ANY block it is pointing to (but you can not jump gaps). So in an Arrow Maze you make choices at the START, and at intersections…but in a Slide Arrow Maze each move is a choice…and typically MANY choices. So the move possibilities get much higher, much faster. You can also solve a Slide Arrow Maze from a point very far away from the GOAL.
Here is a Slide Arrow Maze example. It is a simple 6x6 with no notches in the shape. Should be easy…right ?
But that is not why we are here. If you are interested in trying a full book of Slide Arrow Mazes I made a free downloadable book you can find here. I like to use a slide arrow every once in awhile to give the solvers some options within a regular arrow maze. The first example below uses the slide in a very specific way. From the START you have a forced move onto a slide arrow. The move from the slide arrow gives the solver 8 possible blocks to move to. So, I have used the slide arrow to manufacture a very difficult start !!
Ok, let’s look at a maze with multiple slide arrows. Check out this hourglass shaped maze (page 65 in one of my books). Give it a try.

Did you notice that in order to cross from the top portion of the hourglass to the bottom part you must use the slide arrow - both regular arrows direct you back to the top portion of the maze ! A little bit of nuance that can make the design and solve more fun ! You can even imagine a maze where all the arrows are pointing one direction but a slide arrow cuts through them to the other side.
The summary of slide arrow blocks - use these to give the maze complexity.
Part 11 - All Ways Arrow
The All Ways Arrow for me is an idea that seems much better than it actually is in practice. The idea being that when you land on this type of arrow, you may move off of it in any direction. That makes it similar to a START block that is away from the edge of a maze. So, landing on this allows you move in 8 directions (although the true number is most likely 7 since you most likely got to the All Ways Arrow from an adjacent move).
Let’s speak about 3 things you need to know about using this type of arrow:
The placement of the Arrow must be away from the edge of the maze to utilize every direction that may be moved in.
The All Ways Arrow has some “gravity” to it. I do not know a better way to describe this, maybe a black hole ? When this arrow type is used a large section of the maze will be dedicated to either reaching or leaving this point,
Because it needs so many pathways to/from it’s location in the maze, it is best to use it in a large arrow maze, as the pathways will invariably take up a lot of space.
Here is a small maze that uses an All Ways Arrow:

My next example uses a total of 3 All Ways Arrows which adds a unique experience for the solver. After the initial choice from the START, the maze uses only regular arrows, so your only choices happen when you land on an All Ways Arrow. So you go from no choice to many choices (six, six and seven choices by my count). Try it and see what you think.
So add this arrow to your toolkit, but my guess is you will use it sparingly.
The summary of slide arrow blocks - use these to add complexity using only 1 block.
Part 12 - Long Arrow Use
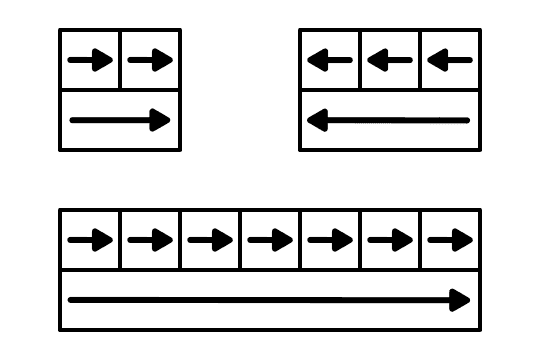
The Long Arrow is the name of an infinite number of arrows that are 2 or more blocks long. Instead of having 2 arrows in 2 blocks back to back moving the same direction…why not use 1 long arrow in one large rectangular block ? It makes the design of the grid more important (it is done last instead of first) and adds some visual interest to the maze. Check out this illustration:
One thing to note is that this can only be used in the standard NSEW directions. 45 degree long arrows do not work. These arrows are also most common on the edges of the maze since once you include them in the center they can only be crossed with a Double Arrow or Warp (or moved around at the end).
Here is an example from my upcoming book that includes many long arrows.

The summary of long arrow blocks - use these to add visual interest to an arrow maze and replace sequential regular arrows.
Part 13 - Kitchen Sink
This post is all about kitchen sink examples. I have included a gallery of 4 different Arrow Mazes that mix all of the things we have learned to create interesting and fun mazes. Click on a maze to see a larger version of it.


Each of these mazes mixed a few different components to create a kitchen sink maze. You may have noticed that these mazes all include numbers on them…because these are all examples of the type of mazes that I include in my books on Amazon.
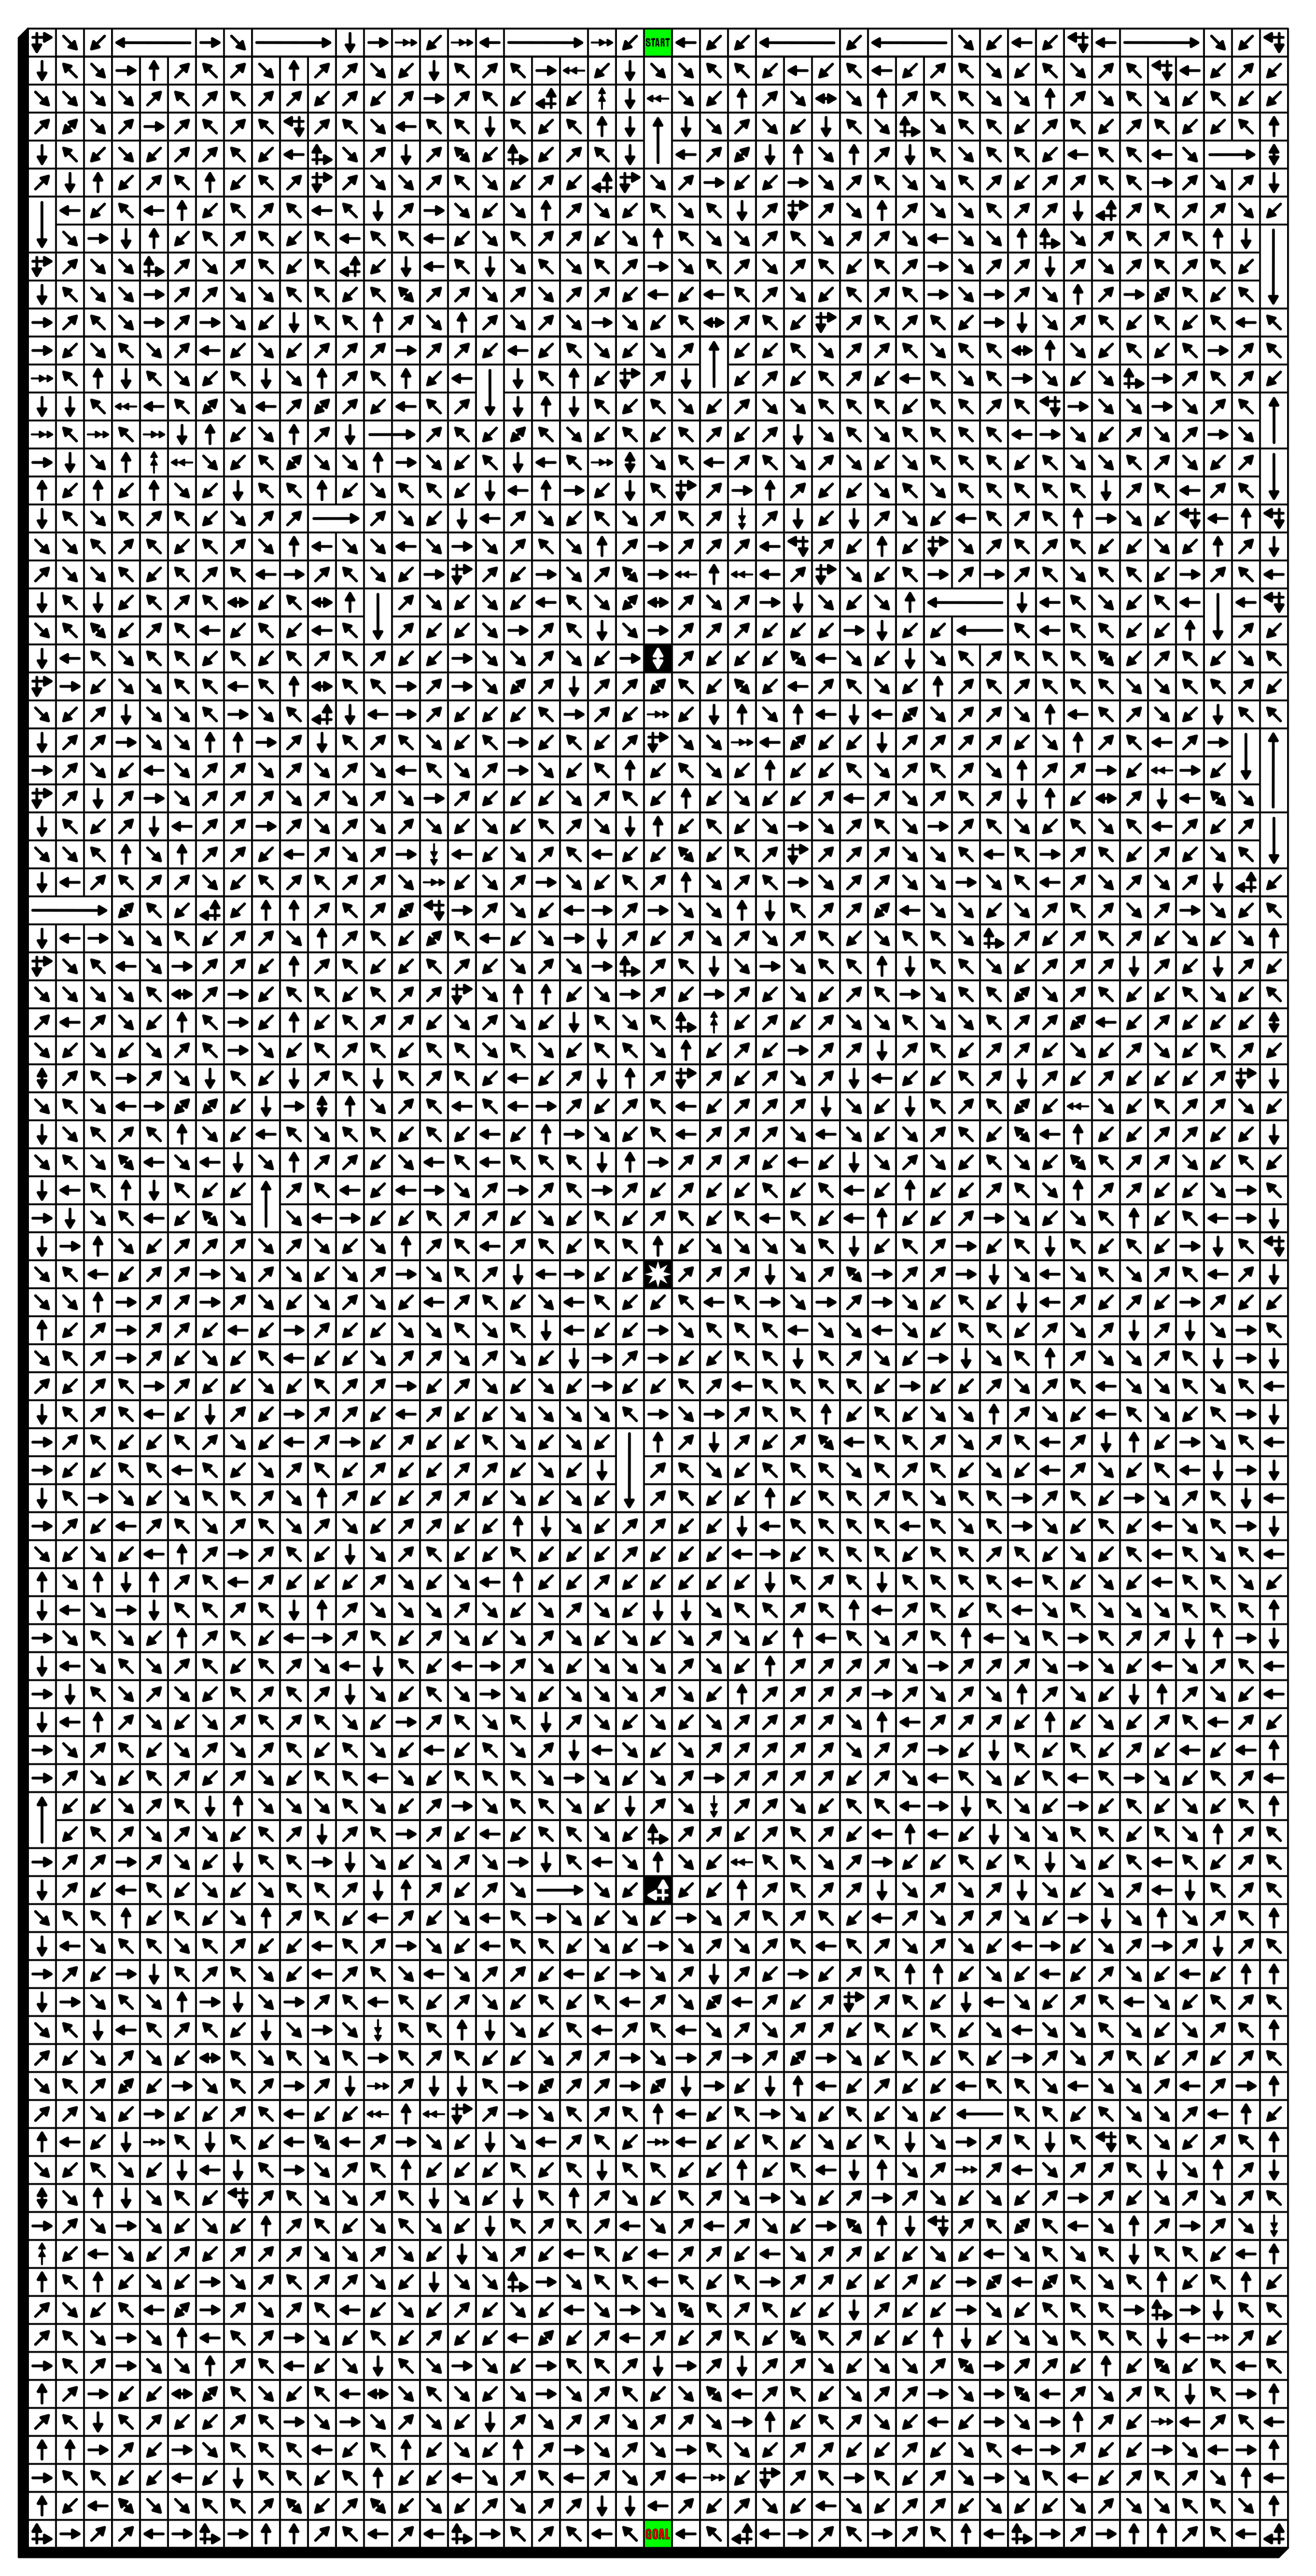
Part 14 - The Largest Arrow Maze in the World (I think)
How big is it ?
Well in terms of if you were going to print it, it is formatted at 31 inches by 61 inches.
In terms of grids, it is sized at 45 x 90, although there are less than 4,050 grid spaces because of the use of some long arrows !
You COULD print it, but it is best opened on a device and zoomed in on to solve.
Additional information:
There are no “filler” grids…all grids in the maze are reachable
Because of the size of the maze there are 3 checkpoints along the way that will help guide you towards a solve.
Between the second and third checkpoints there are NO decision arrows, only regular arrows…!
There are no dead ends
Even more Arrow Mazes: Just in case everything above was not enough, here are the 2 sections of the site where you can fins Arrow Mazes to solve: