How to Draw a Large 19 Circuit Square Labyrinth

Previously I’ve shown you how to draw an 11 circuit square labyrinth , a 7 circuit square labyrinth and a 3 circuit square labyrinth. Today we review making any large square labyrinth with the only limit to size the one you choose. Below is a 19 Circuit Square Labyrinth, but you can make one larger if you choose. Let’s get started:

Step 1: The starting seed pattern

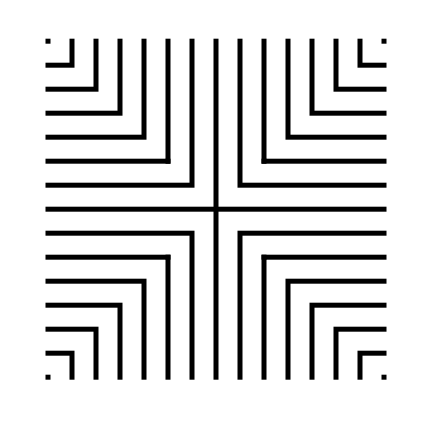
The starting seed pattern to the right is based on an imaginary 6x6 box grid. This seed can become an 11 circuit labyrinth by following the typical construction steps (and it could be both a classic or a square labyrinth). The simple way to make a larger version is to extend the lines additional blocks in all directions to create a larger seed. See below (with 2 new levels making it a 10x10 grid):

11 circuit labyrinth seed pattern -how to draw an 11 circuit labyrinth part 1
19 circuit labyrinth seed pattern

Large seed pattern

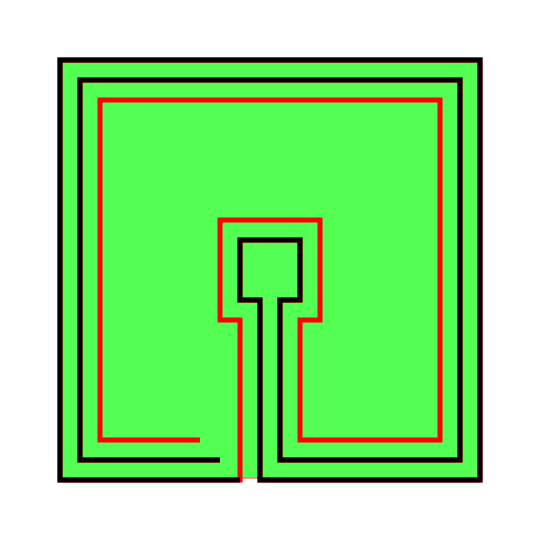
Step 2: Connect the firstline to create the goal

Draw a boxed line from the top of the plus sign to the L directly to the right using that extends 1 grid high. This line will form what will become the goal of the labyrinth.

How to Draw an 11 Circuit Labyrinth, step 2

Step 3: Connect the next endpoint to the left to the next endpoint on the right

Every step from now on will be basically the same. Move one point to your left (moving counterclockwise) and connect that to the next point on the right (moving clockwise). In this case the large backwards L on the top left of the seed pattern to the small L on the top right of the seed.

How to Draw an 11 Circuit Labyrinth - Part 3

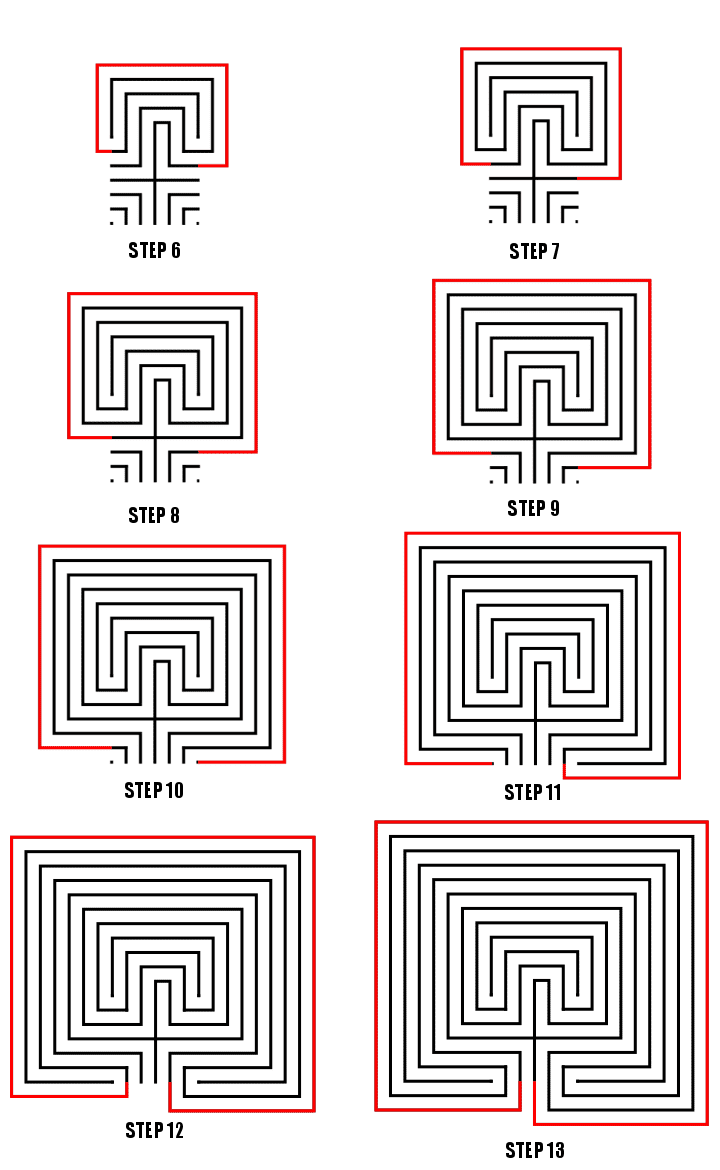
Steps 4-21: Connect the next endpoint to the left to the next endpoint on the right

I assume you have the pattern down to complete with only pictures with nice red lines. Follow the graphics to complete steps 4-20. Here is the Summary of the connections you will make starting from the seed:

11 Circuit labyrinth
how to make a 19 Circuit Square labyrinth steps 6-21

Steps 6 - 21

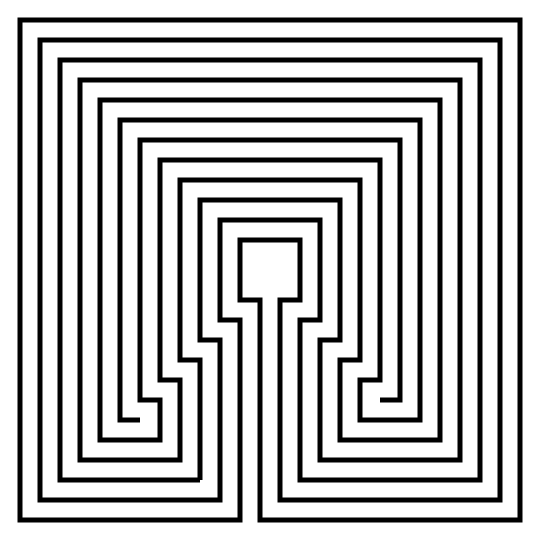
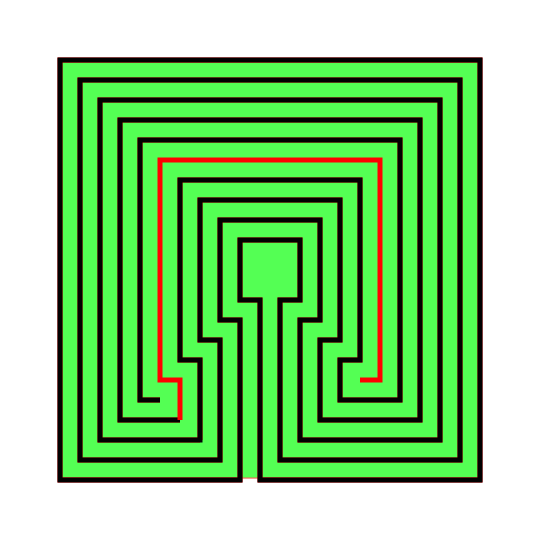
That completes the drawing of a massive 19 Circuit Square Labyrinth. And now you can go even bigger !

19 Circuit Square Labyrinth

19 Circuit Square Labyrinth

Interested in learning how to make or draw other types of digital mazes ? I have step by step instructions on how to make over 40 different maze types.

If you prefer making labyrinths, you can find step by step labyrinth making instructions.

How to Draw an 11 Circuit Square Labyrinth

Drawing an 11 circuit square labyrinth is fun once you learn the starting seed pattern and the rules of building the pathways. Follow this 13 step process and draw your own 11 circuit square labyrinth. You’ll notice that the square version is extremely similar to the regular (classical) version of the labyrinth in terms of making it. Before we get to the method here is a similar post you may want to read after this one:

I also want to show you an alternative 11 Circuit Square Labyrinth I made using a different construction method. This version has a large center goal (shown on the left below). If you prefer this version of the 11 Circuit Square Labyrinth these directions can be adapted to make any size circuit. Simply read through step 2 and adjust based on your desired size ! Today I will be showing you how to make the version on the right !

11 Circuit Square labyrinth variant center.

Alternative Method - large center

11 circuit square labyrinth

Small goal - learn how to make here !


Step 1: Draw the starting seed pattern

The starting seed pattern based on an imaginary 6x6 box grid. Start with a centered is a plus sign. Add L shapes one grid away from the plus sign in all 4 quadrants. Now add another L shape in all four quadrants one grid away from the previous L’s. Finally add a dot to each of the four corners. Basically, copy the seed the pattern you see here (notice this is the same as the regular version):

11 circuit square labyrinth seed pattern

Step 2: Connect the first connection to create the goal

Draw a boxed line from the top of the plus sign to the L directly to the right using that extends 1 grid high. This line will form what will become the goal of the labyrinth.

How to Draw an 11 Circuit Square Labyrinth, step 2

Step 3: Connect the next endpoint to the left to the next endpoint on the right

Every step from now on will be basically the same. Move one point to your left (moving counterclockwise) and connect that to the next point on the right (moving clockwise). In this case the large backwards L on the top left of the seed pattern to the small L on the top right of the seed.

How to Draw an 11 Circuit Square  Labyrinth - Part 3

Step 4: Connect the next endpoint to the left to the next endpoint on the right

The small backwards L in the top left to the dot in the top right corner.

How to Draw an 11 Circuit Square Labyrinth - Part 4

Step 5: Connect the next endpoint to the left to the next endpoint on the right

The dot in the top right corner to the end of the small L in the top right corner.

How to Draw an 11 Circuit Square Labyrinth - Part 5

Steps 6 - 13: Connect the next endpoint to the left to the next endpoint on the right

I assume you have the pattern down to complete with only pictures with nice red lines. Follow the graphics to complete connections 5-12. Here is the Summary of the connections you will make starting from the seed:

Making an 11 Circuit Square labyrinth steps 6-13

Connections 5-12, Steps 6-13

That completes the drawing of an 11 circuit square labyrinth. If you are interested in a comparison of Classical, Square and Circular Labyrinths check this out.

11 circuit square labyrinth

Interested in learning how to make or draw other types of digital mazes ? I have step by step instructions on how to make over 40 different maze types.

If you prefer making labyrinths, you can find step by step labyrinth making instructions.

How to Draw a 9 Circuit Square Labyrinth

I’ve shown you how to draw square labyrinths using the same seed pattern as the classical labyrinth. Today I will take you through the steps to draw a 9 Circuit Square Labyrinth that has a large square center. In practice this could become a place for meditation or ceremony if built in the real world. Follow this 7 step process and make your own ! You also have the option to make this without the large center square. To see how to do that you can read - How to Draw an 11 Circuit Square Labyrinth and adjust the # of circuits.

Step 1: Draw the center goal

Draw a box in the center of your paper with a one unit opening at the bottom. To help guide your future lines make a box to represent the outline of the labyrinth size you would like to make. Mine is green, but note that this will be deleted at the end, so color does not matter.

Note: IF you are using a grid, and I suggest you do, the walls of the green square should allow for 9 lines between the edge and the center goal. The total size of the grid network is 21 x 21 when you include the center goal.

how to draw an 11 circuit labyrinth part 1

Pro Tip: The math on the grid size being 21 x 21 is 9 circuits on one side + 3 grids for the goal + 9 circuits on the other side = 21 grids needed. If you are making a 15 circuit square square labyrinth you can use the same method shown here the guide grid would need to be 15 + 3 + 15 = a 33 x 33 grid. Follow all the steps below and you will create the same style labyrinth but larger !

Step 2: Draw the Outer Wall

Draw a the outer wall using the left path from the center, drawing to all way down to the edge and then moving around counterclockwise. Stop when you get one unit away from the edge line as you move around the entire box.

How to Draw an 11 Circuit Labyrinth, step 2

Step 3: Make the next internal line

Repeat the same step as above using the right side of the goal, leaving one unit of distance between this and the previous line to create a pathway. End the line one unit short of the previous line just above it.

How to Draw an 11 Circuit Labyrinth - Part 3

Step 4: Make the next internal line

From here on out the process will repeat. Go back to the previous line you made and make a counterclockwise wall around the labyrinth, keeping one unit from the previous line. Notice this includes moving around the center goal.

How to Draw an 11 Circuit Labyrinth - Part 4

Step 5: Make the next internal line

Same as above with the next line.

How to Draw an 11 Circuit Labyrinth - Part 5

Step 6: Make the next internal line

Same as above with the next line.

Making a 9 Circuit Square Labyrinth step 6

Step 7: Make the next internal line

Same as above with the next line. If everything has been done correctly this is the final line.

Making a 9 Circuit Square Labyrinth step 7

Step 8: Clean it up

Delete the background guide and enjoy your new square labyrinth !

9 Circuit Square Labyrinth

That completes the drawing of a 9 Circuit Square Labyrinth.

9 Circuit Square Labyrinth

9 Circuit Square Labyrinth

Interested in learning how to make or draw other types of digital mazes ? I have step by step instructions on how to make over 40 different maze types.

If you prefer making labyrinths, you can find step by step labyrinth making instructions.

How to Draw a Massive 27 Circuit Labyrinth

Drawing a massive 27 circuit classical labyrinth feels like running a marathon. I have never run a marathon. That might be a lie. To Draw it step by step it takes a 29 step process. Writing that out and going step by step is laborious, so instead I am going to give you the cheat codes. It saves me time. If you decide to create this it probably won’t save you any. The truth hurts. Let’s get on with it.

Step 1: Draw the starting seed pattern

The starting seed pattern based on an imaginary 14 x 14 box grid. Start with a centered is a plus sign. Add L shapes one grid away from the plus sign in all 4 quadrants. Repeat until you have 6 L per quadrant. Finally add a dot to each of the four corners. Basically, copy the seed the pattern you see here:

27 circuit labyrinth seed pattern -how to draw an 11 circuit labyrinth part 1

Step 2: Connect the first arch to create the goal

Draw a curved line from the top of the plus sign to the L directly to the right using an arch that extends 1 grid high. The top of the arch should peak halfway between those two points. This line will form what will become the goal of the labyrinth.

how to draw a 27 circuit labyrinth step 2

Steps 3 - 29: Connect the next endpoint to the left to the next endpoint on the right

Every step from now on will be basically the same. Move one point to your left (moving counterclockwise) and connect that to the next point on the right (moving clockwise).On the right find the listing of connection points. We already connected points 1 to 1. TIP: the top of all the arches will all align above the same point.

How to Draw an 27 Circuit Labyrinth - endpoint explanation

If you get into any trouble refer to the directions for the Classical 7 Circuit Labyrinth. This is essentially the same, but many more steps. That completes the drawing of an 27 circuit labyrinth.

27 circuit classical labyrinth

Interested in learning how to make or draw other types of digital mazes ? I have step by step instructions on how to make over 40 different maze types.

If you prefer making labyrinths, you can find step by step labyrinth making instructions.