Maze options - Maze Path options

Welcome to Part 2 of my 3 part series on maze construction options. Previously, I gave you step by step instructions to make 40 different maze constructions. But making a maze also means making a series of different decisions, each that will change the look and difficulty of the maze. If you missed Part 1, I suggest you start there !

Part 1 - Options for Starting and Ending a Maze

Part 2 - Maze Path options

Part 3 - Conditional Pathway options

Let’s get started with Part 2: Maze Path Options

In Part 1 you figured out how you will be starting and ending your maze. Today we will explore some options for how you make your pathways. Pathways are of course where the maze solver travels as they are moving thru the maze. We start with the most common:
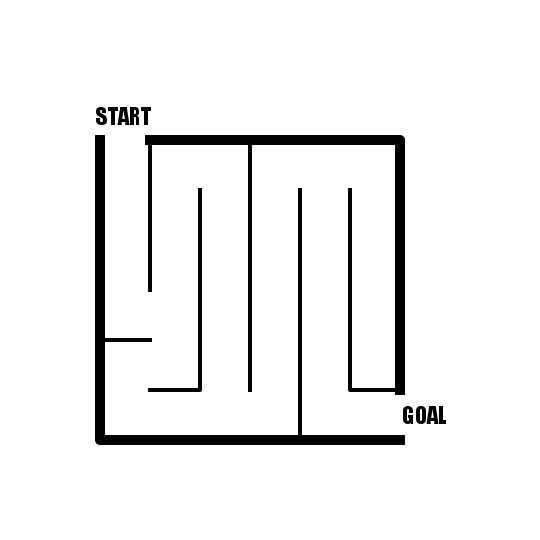
1 - Walled pathway

The most common pathway you will find. Self explanatory to anyone who has ever done a maze and most people that haven’t. The solver travels between walls made of lines. Here is what it looks like:

mini maze

2 - On Line Pathway

On line pathways are exactly as described - the solver travels on the lines and not in between them. This defines what an On Line Maze is, but can also used for Directional Mazes, which would have instructions such as - solve this maze by only turning left. Here is an example of an On Line Maze. If a solver is not paying attention, they may try to solve this maze as if it was using walls. If you use this construction I suggest adding directions explaining the “on-line” aspect.
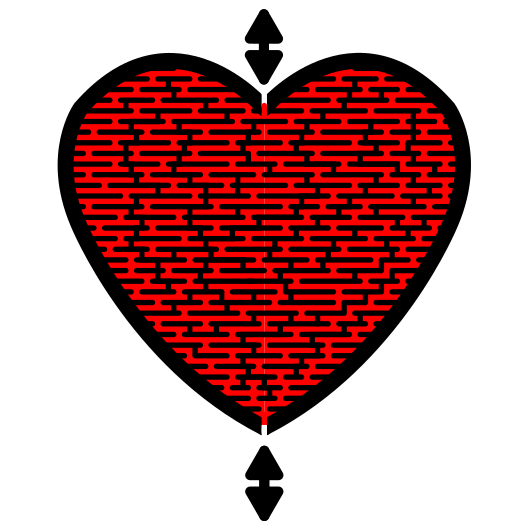
On Line Maze Example

3 - Weaving Paths

Weaving Paths are intertwined and allow the solver to travel over/under other paths within the maze. Some use shadows or arrows to better define the movement and enhance the look of the maze, but generally it looks like below:
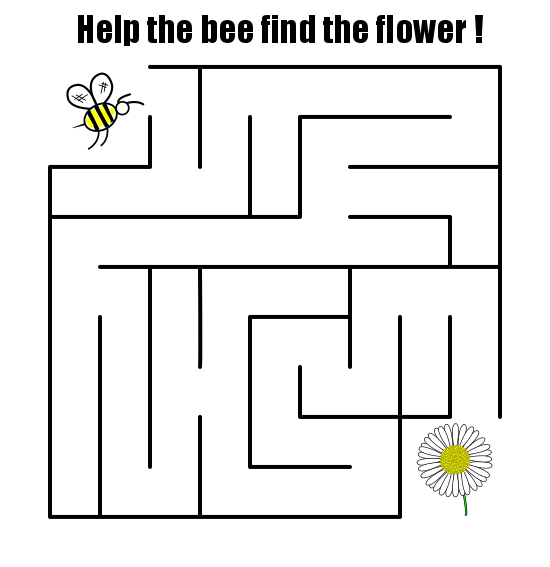
Diamond Shaped Weaving Maze

4 - Themed Pathways

This category is a catch all for a variety of themed pathways you find and become common in children’s maze and activity books. Some examples of these include Railroad tracks, a Roadway, a Subway Line, Sidewalks, and Pipes. Really places where people would naturally travel, or in the case of Pipes, water would. Here is a pipe maze example (which happens to also be a weaving pathway). Notice that I used shadows to further define the weaving aspect.

Ohio shaped Pipe Maze

5 - Grid “Pathway”

Grids can used for regular mazes, but are most commonly used in the different types of Puzzle Mazes. Puzzle Mazes, Block Move Mazes, Number Mazes, Letter Mazes, all use grids to give them structure. Below is a Standard Grid Maze and a Puzzle Maze to show 2 different variations of how grids can be used:
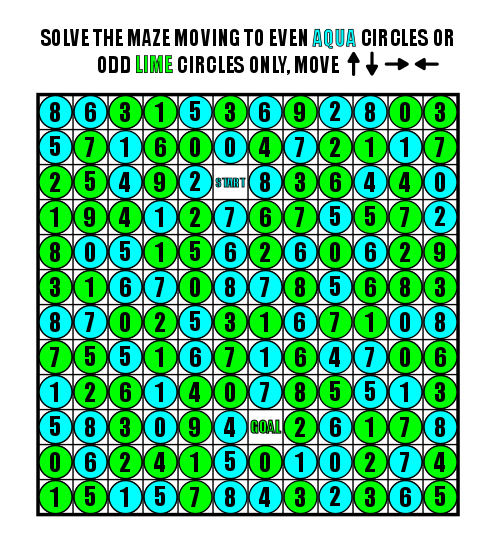
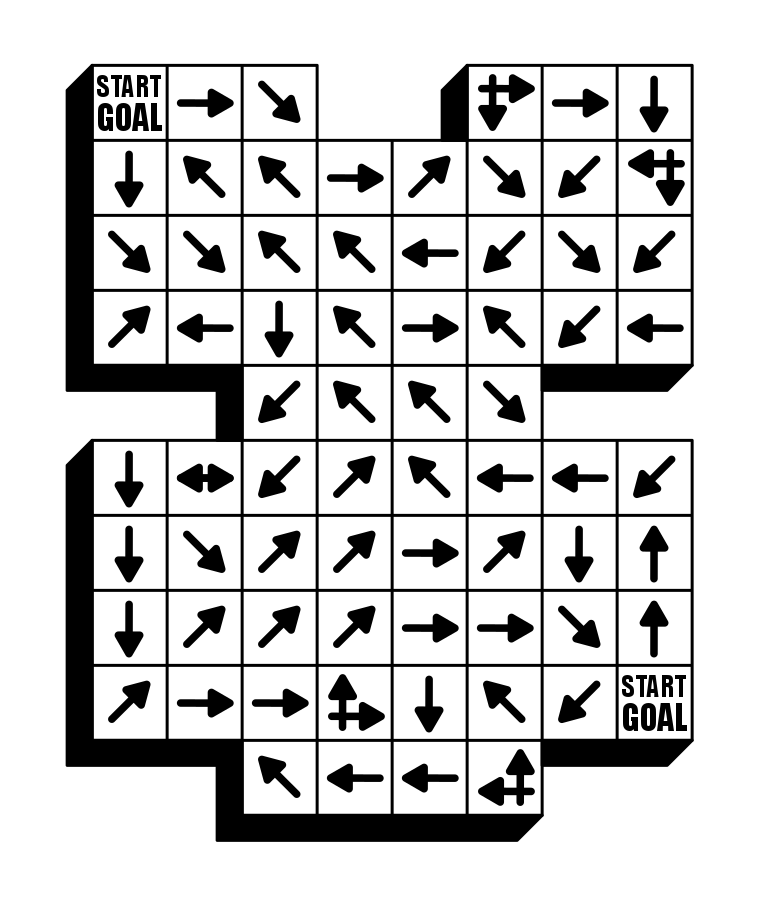
7x7 grid maze
12x12 puzzle maze

6 - Arrow Mazes

While Arrow Maze and Slide Arrow Mazes both use a grid for structure, the pathway you are following is actually determined by the arrow you land on and the direction you choose along the way. I consider this more about the arrows than the grids they are in. Here is an Arrow Maze as an example:

8x8 Easy Arrow Maze

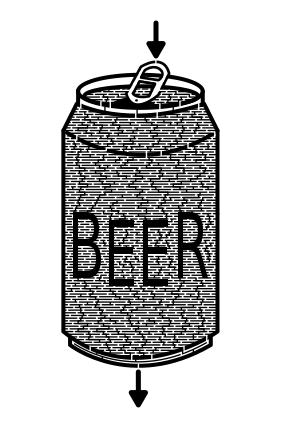
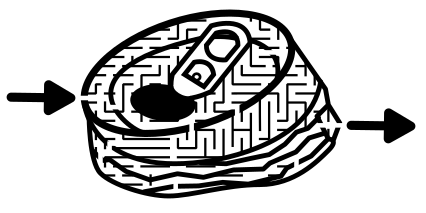
7 - Free Drawn pathways

I say free drawn pathways, but really what you are drawing by hand are the walls. You get it. This encompasses all the variations that don’t quite fit into a perfect grid or grided path system. The distance between walls varies. Here is a crushed beer can (drawn digitally) with free drawn paths:

Crushed Beer Can Maze

8 - Background Picture

Mazes can have backgrounds, some of which have nothing to do with solving the maze. Think of making a maze over a picture of something. You could use the border as the Maze, but internally the picture only helps to decorate the pathways. Here is my maze from National Book day for example:

Book Cover Maze Example

9 - Objects as Walls/Paths

Similar to what I mentioned before above, this is really about creating pathways by what you use as walls. Using objects or words for the walls creates a very interesting path for the solver. I think they are fun to make and you can be very creative with it. Here are examples of pathways that were made using circles and many small boxes:

box maze full of balls
box maze full of boxes

10 - Patterned walls

Drawing a standard maze with straight lines as walls can get boring for both the mazer and the solver. This can be made more interesting by using a pattern that repeats for the walls. Like a simple back and forth, or a curve. Notice the example below how a simple maze transforms when drawn with standard walls versus with patterned walls. Very different looks for the same maze.

Example of a maze with patterned walls

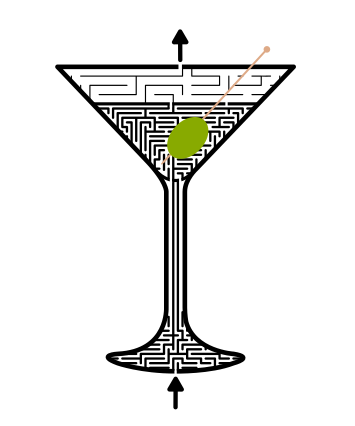
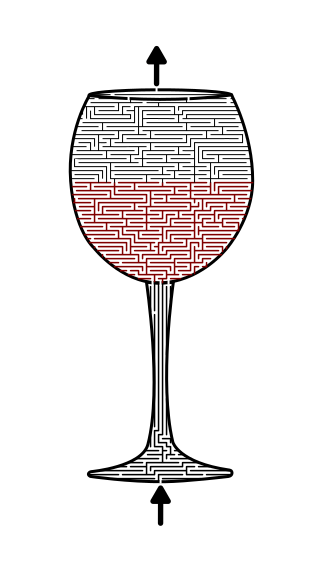
11 - Colored Paths (walls)

There is an option to enhance the maze you have made using colored walls to define sections. It is much more common to see color used as a background, but keeping this as an option can really enhance your maze making. The example shows a wine maze, specifically a red wine maze as defined by the colored walls ! You might want to read about a case study on colored pathways.
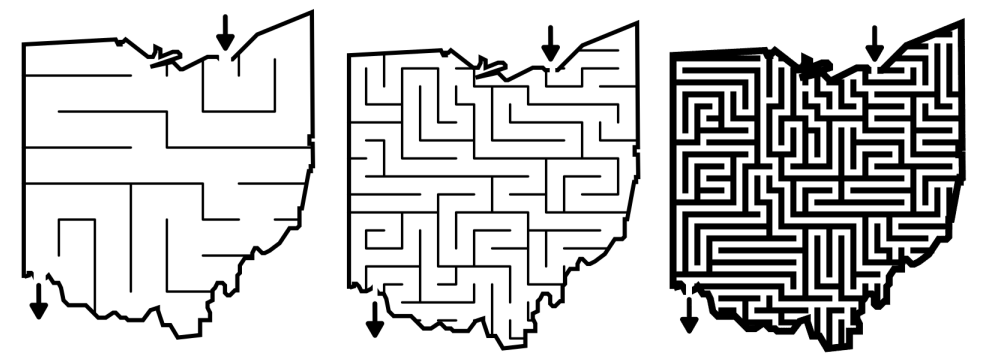
red wine maze

12 - Path Spacing

While most pathways you come across will be walled, there are different looks achieved ( and different maze types resulting from) based on how the same lines are spaced. In the examples below we have walled mazes used to maze the same object with 3 different looks. #1 is a Kids maze with highly spaced walls. #2 is a standard maze with normally spaced walls. #3 is a standard equal where the walls are pathways are of equal width.

3 mazes of Ohio with different maze path spacing

And while this is not the best example, below is a design that used different path widths for each different section of the object. I should mention that the background color is the same in every section. Notice how the bishop has a very dark colored head because of the closer pathways with a lighter core section. Line spacing is a great way to change the color and shading of an object you are mazing !

Chess Bishop Maze

13 - Use the Drawing as Walls (Natural shape of the subject)

When making maze art I find that the best looking mazes are ones where I don’t create any pathways, but where the pathways are naturally created by the object I am making a maze of. Typically this involves the draw and cut method of maze making where I draw something, then cut a maze into the structure. Almost every building maze on this site uses that method. In the example below of Museo Soumaya the panels of the building become the walls. Panels, bricks, windows, they all have become pathway makers for me !

Museo Soumya Maze in color

Maze options - Starting and Ending a Maze

There are many possible constructions of mazes you can make. I gave you step by step instructions to make 40 of them. But making a maze also means making a series of different decisions, each that will change the look and difficulty of the maze. Over the next few days I will explore the main Maze Options you need to make in a 3 Part series:

Part 1 - Starting and Ending a Maze

Part 2 - Maze Path options

Part 3 - Conditional Pathway options

Let’s get started with Part 1: Starting and Ending a Maze

A common question asked in search is “Do all mazes have a starting point ?” Yes - all mazes have a starting point. But things can get interesting (see #5 below) if there are multiple starting points !

10 MOST COMMON WAYS TO START AND END A DRAWN MAZE

Starting a maze means you have options on well…starting the maze. Let’s get the most common and simple Start out of the way first:

1 - A Start Arrow at the Maze Border (with an End Arrow at the goal)

Probably the most common start you will find. Self explanatory to anyone who has ever done a maze and most people that haven’t. Same for the goal. This start/goal option also has a big advantage from using the arrow symbol vs. any option using words - there is not translation needed ! The example maze below would work in any country ! Here is what it looks like:

Small maze with Arrows at the border

2 - The Word START at the border / GOAL at the end

Well maybe the Start arrow isn’t enough….Using the word START to start a maze makes sense and you will most commonly find it used on a maze created for kids. GOAL work the same way. Here is what it looks like:

Small maze with words as start and goal

3 - The Words START and GOAL internally

Moving the words internally gives you some freedom in the border and drawing of your maze, especially if you are making maze art. This also gives you flexibility to not use the borders/corners as the start and goal, but anywhere within the maze. This example is NOT maze art obviously:

Small maze with START and GOAL internal

4 - The Word START internally working to an external goal

Most commonly used for an Escape maze where the object is to escape the border of the maze from an internal Start. The Goal in this case can be anything, and the below example also is a preview of the next variation, unmarked Goal.

Small maze with START inside

5 - The Unmarked Goal / Start

Don’t say anything for the goal. Why would you want to do this ? Well one reason is because you want to challenge the solver with multiple possible exits. This is most common with an Escape Maze. Below is a multi exit Escape Maze. The solver must work to the outside of the maze to escape the object - - but where are they going to ?

Now take the example below and switch START to GOAL. We have an unmarked START and the solver must choose which pathway to begin with !

Patterned Escape Maze

6 - Object as Start/Goal

Common in Children’s mazes, but available for any maze is the maze that uses Objects for either the start or goal or both, like below. It is very common for these to be themed and to create a journey theme while solving the maze. Has a similar advantage as the use of arrows in #1 above in that it does not need to be translated (although my example does have writing, if it was gone or in another language the overall majority of solvers would need no explanation !)

Kids Maze - Help the Bee find the flower

7 - Start/Goal is the Same

One way to up the difficulty on a maze is to give it conditions like from the Start of the maze travel to an internal goal and then return back to Start (The Go and Return Maze) using a new path. Here is an example:

Triangle shaped go and return maze

8 - Dual Start/Goals (They are interchangeable)

You can design a maze so it is difficult to solve in both directions. Typically a maze is designed in one direction (Start to Goal), but that doesn’t need to be the case. Below you can solve in either direction !

Red Heart shaped maze

9 - Undetermined Start/Goals

The start and goal are labeled but you are not sure which is each. This is a great way to add difficulty to an Arrow Maze, and unlike in a Dual Start/Goal above, there is only one correct Start and Goal but you are not told which is which ! I experimented with using question marks…a 10th option or just a variation of #8 and #9 ?

Arrow Maze #33

10 - Find the Correct Goal

This is best used in a weaving type maze. In my below example (it was rushed) you need to follow the ball through the pipes and determine what color bucket the ball ends in. Why might you use this ? Well, if you want to make it more difficult for the solver to reverse solve the maze. With 7 options below as a possible goal, they might think twice (note again I rushed this and the added incorrect pathways are not well done).

Pipe maze with multiple exits


Those are the 10 most common ways to start and end a maze. Maybe you can come up with a few others. Drop me note with your ideas !


Additional Posts on Maze making you may like:

What I use to make my mazes

Using Color for Maze Pathways - A Case Study

Maze Design Case Study - Designing a Grid Maze in Different Difficulty levels

Check out my YouTube channel to see maze art being made !

What I Use to Make My Mazes

Today I want to give you some background on how I actually make the mazes you see on this site. I touched on this in Part 2 of my Maze conversion project, but wanted to expand upon it a bit here since it is something I am often asked about. This isn’t a How To Make Mazes post, which I have written about extensively, but rather the tools I use and my thoughts on them and mistakes I made in the past.

Some Background - What I used to use to make mazes

When I first started making mazes in high school I drew with pen or markers on paper in Mead art sketch pad books. I mixed the mazes in with other random artwork that I did, switching things up to stay interested. Eventually I decided I liked making mazes and would do many in a row. Then I got hooked and kept making mazes over the years, Eventually I wanted to make more complex and started using the computer to make them. I first used Microsoft Excel. Yes, Excel. Not ideal looking back, but it did give me a grid pattern to work from, but really NO flexibility in design. See the original Microsoft Excel maze below, “Lost in The City”.

a maze of a city skyline

“Lost in the City” Maze made in Microsoft Excel

I actually did a few more in Excel that are on this site. I wonder if you can you find them ? There is an Excel maze in the fan art section. See if you can find it ! I will say that as along as you only need right angles, Excel works better than you think, although the creating is painstakingly slow.

Eventually I got tired of making maze walls by selecting each individual cell and placing the appropriate grid outlines in them. Next I moved on to Microsoft Paint. This gave me the ability to use color and to create much more interesting mazes. I also didn’t need to fit everything into the same grid if I didn’t want to ! The mazes I made in Paint were much better than my Excel ones IMO, but because I was building these mazes a pixel at a time they took months. Yes, MONTHS to make. There is also not an ability to create any grid guidelines to help you draw a maze in Paint - and believe me this is important! Here is an example of one of my Paint mazes:

Empire State Building Maze

Empire State Building Maze Made In Microsoft Paint

So The Empire State Building Maze took months to complete as it was done to scale and created a pixel at a time. As you can see from how small the pathways are on your screen, this maze is shrunk down significantly from actual size. When printed it is 3 feet wide and 9.5 feet tall in full resolution. Yes, it is solvable. You start in the arrow below the A, reach the top point and return back to the start. Brutal. But, Paint is not a vector graphics program. And all of these mistakes I made are all to get to me saying this: To Make Digital Mazes use a Vector Graphics Program. Now, what I use today.

Why Vector Graphics ?

Vector graphics are made up of pathways that can be resized without losing resolution. Non-vector programs use Raster graphics (like png, jpeg, gifs) where the picture is made from individual pixels. That means if you resize the picture you will lose resolution. Making a Vector Maze means you can size it larger or smaller and it will still look good. That isn’t the case for Raster Mazes. The first circle below is raster (PNG) and it looks ok. Check out what happens when you increase the size by 400%. See the pixilation ? (those of you reading this on phones are saying not really)

PNG Circle Paint
PNG Circle Paint 400%

And now the direct comparison between the two types of files which clearly shows why vector is the way you want to design ! The larger I made this the more the Raster would pixelate.

Circle made in Raster vs Vector example

Raster vs Vector Example at 400%

What I Use to Make My Mazes

Inkscape. I do all of my maze making in Inkscape. Inkscape is a free open source vector graphics editor, but you can use a similar product if you already have the needed skills in that program. I found, that like most programs, Inkscape basics can be learned quickly playing around in the program. You can learn a bit more from YouTube videos, and to finally master it so you aren’t frustrated all the time (While muttering why can’t I just do XXXXX) that will just take time and practice. The Inkscape website also has a forum and the majority of the questions are under Beginner’s Questions, so you are not alone!

Time to make some mazes (or labyrinths). If you want to see step by step instructions, I have over 70 different sets to choose from !

Into the Labyrinth (2020) Movie Review

I review any movie containing a maze or labyrinth. And there are some great maze movies that have been made ! But also there are movies that are the complete opposite. Today I will review Into the Labyrinth, or L'uomo del labirinto in Italian and see which list it fits on. The good news is this movie can usually be streamed for free on variety of websites. You can check the current availability using this link to justwatch ! If you are a reader you can also check out the 464 page book from Donato Carrisi on Amazon or better yet your local bookseller / library.

Into the Labyrinth (IMDB) (Amazon)

Of all the movies I have reviewed this has the most different posters. Check out the 4 I found below: 2 with labyrinth imagery and 1 with maze imagery.

Into the Labyrinth movie posters

First, I must say that we live in a world where we are constantly multitasking and electronic devices always want our attention. This is not a multitasking movie. You need to pay attention to the storyline and could easily get confused even if you do pay attention !

Into the Labyrinth is a thriller starring Dustin Hoffman. Should be good. The storyline follows an unfolding narrative that tries to explain how a missing woman, now recovering in a hospital came to be there after escaping her kidnapper. Who is that kidnapper, and what was their motivation ? Also, is that Donnie Darko on the movie poster (poster #1 & #3) ?

The story takes place in 2 different locales with 2 different sets of actors. Dustin, playing a doctor who is a profiler working with the woman in the hospital to find out what happened to her. She seems to have lost her memory and he is helping her recall what has happened to her. All of this happens in English. The other half of the movie shows a private investigation into the same case, all taking place in Italian. As the movie progresses new clues give us a variety of possible suspects. Tension builds. There is a weird rabbit story. The occult is introduced. Tension builds. and 75% of the way into it, the thing starts to show cracks. The story falls apart. Eventually things get tied up at the end, but the great start has already fizzled out. I’m not going to spoil any plot points, but there is a lot going on at the end (something reading the book could much easier explain).

So, what is the deal with the labyrinth ? Well, while the woman was kidnapped she was trapped in a dark stone labyrinth by her captor that included many locked doors. In order to get the supplies she needs she must solve a small 3D labyrinth/maze puzzle that has been left in her cell. Basically, her captor is a big fan of labyrinths.

Overall I give this a 5.5/10, but it had much more potential that was wasted.

SPOILERS: What happened at the end

There are the main twists in the movie Into the Labyrinth (2020):

  • The true identity of the kidnapped girl. Throughout the movie, we are led to believe that the woman in the hospital is Samantha Andretti, the girl who was kidnapped 15 years ago. However, in the final act, it is revealed that the woman in the hospital is actually Mila, a police officer who has been newly abducted and drugged.

  • 2 cases. Although presented as one case during the movie, these are 2 separate cases shown side by side. There are 2 serial kidnappers (at least) on the loose. Our labyrinth lover, “Dr. Green”, played by Dustin Hoffman and a series of “bunny” kidnappers who appear to be passing down the tradition as victims become perpetrators.

After you have seen the movie and you wonder what exactly was going on I suggest you read this long and detailed explanation !