How to Make an Axonometric Maze

In a series of posts I will show you how to make a maze in a wide variety of design constructions. The 7th example with look at an Axonometric maze construction. Let’s define what I mean, then get into the example. Every example will use the sample basic outline (the state of Ohio) to better illustrate the differences between each maze type, however this maze type is best utilized for items you want to give some depth to. A cube, and other 3-dimensional objects work best for this maze type. If you are more visual, make sure to check out the video of a cube maze being made at the end of the post.

Axonometric Grid Maze - This is a maze made using an axonometric grid. Typically these grids are used to draw 3 dimensional representations of objects like a cube. But, for maze making this just means drawing walls at the angle of the axonometric grid.

How to Make an Axonometric Maze

Step 1 - Draw the Outline

The outline of the maze makes the outer wall of the maze. It can be anything from a simple shape like a square, to a complex picture. The outline should be thicker than the internal lines to give the maze definition. In the example below I chose the state of Ohio. Unique to my example is this outline is not actually made using the Axonometric grid, while 99% of creation WILL use the grid in this step.

Step 1.5 - Choose the Start and Goal

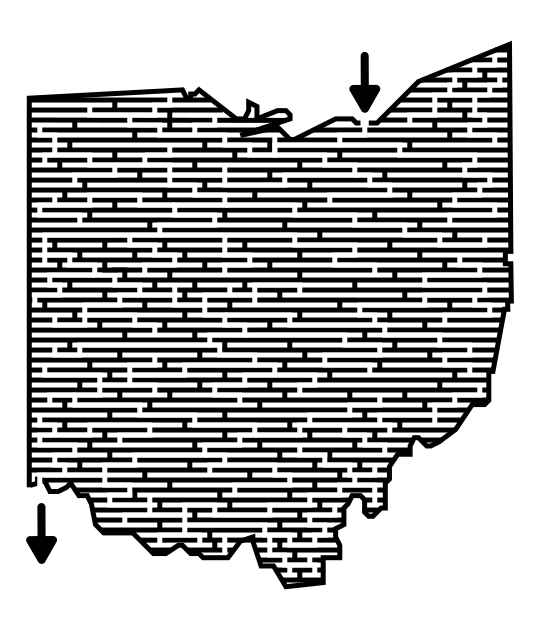
For the below example I chose the start of Cleveland and the goal of Cincinnati. I made an entrance in Cleveland but I usually wait until I am in the last stage of drawing maze lines to draw the exit point for the goal. This is in case I need to adjust the location slightly based off of my design. This works if drawing a maze digitally, but for a hand drawn maze the outline will need to have a pre-determined start and goal.

Ohio Map outline for a maze

Step 2 - Determine your grid shape

When making a regular grid maze you are choosing the size of the grid boxes you will use. So a 20x20 grid is larger than a 10x10 grid. When choosing an axonometric grid you may choose the size, but more importantly is choosing the angles of the grid you will be using see the 3 examples below. The first grid uses angles of 20 degrees, the second 30 degrees, and the last 45 degrees (making essentially regular grids tilted at a 45 degree angle). My program defaults to 30 x 30 unless I change it and seems to work well for almost everything.

20 x 20  Axonometric Grid

20 x 20 Grid

30 x 30  Axonometric Grid

30 x 30 Grid

45 x 45  Axonometric grid

45 x 45 grid

Step 3 - Start Drawing the Walls

Using the axonometric grid pattern, begin drawing the maze walls starting at the entrance of the maze. Be careful to never close all open paths so the maze can be solved. As you make the maze decide how difficult you want to make it. A low amount of path choices, and short dead end paths will make an easy maze. Longer dead ends and lots of path choices make a more difficult maze.

5 Axonmetric - Fill in grid.png

Step 4 - Keep Drawing Walls

Like most mazes the middle part of design is a lot of keep doing what you are doing a draw more walls moving possible solutions towards the goal.

5.1 Axonmetric - Fill in grid more.png
5.2 Axonmetric - Fill in grid more.png
5.3 Axonmetric - Fill in grid more.png

Step 5 - Complete the Maze

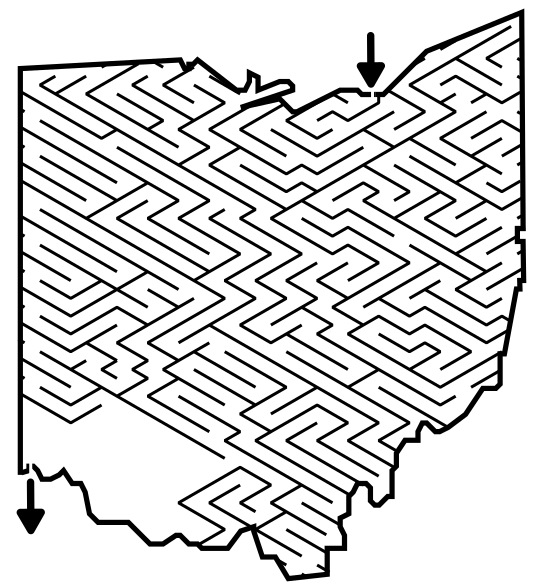
Draw the final walls and draw the exit. You have completed the drawing of an Axonometric maze !

Axonometric style Maze of Ohio

Step 6 (Optional) - Draw the Solution

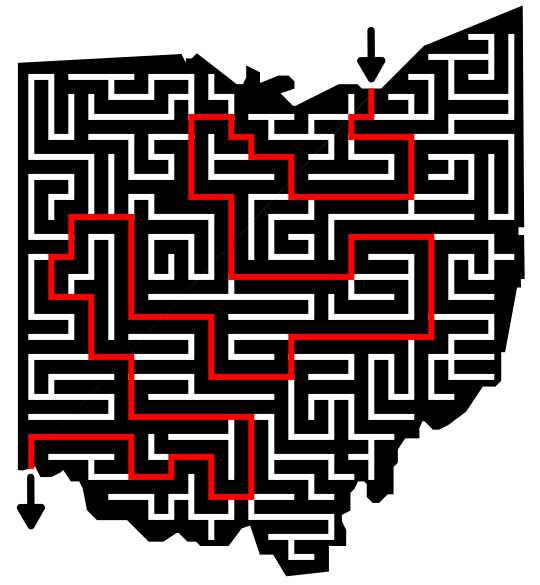
While the correct pathway is fresh in your mind, draw the solution to the maze. This is especially important with more complex mazes. It can also be a check to make sure your maze has a solution and helps you determine how difficult it is.

Axonometric  style Ohio Maze solution

Other examples of Axonometric mazes that highlight the construction:

The Stairs maze naturally works as it helps to give the maze dimension. Notice how the direction of the walls is consistent with the plane of the object to help give it the dimensional look. The Lemon Meringue Pie maze uses the construction to draw the maze at the proper angle to the picture. And of course, where the construction really shines is on the Cube Maze !

Stairs Maze

Stairs Maze

Lemon Meringue Pie Maze

Lemon Meringue Pie Maze

Cube Maze

Cube Maze

A very important design note not covered in the step by step above is to follow the direction of the object when making your pathways. This will give your object dimension and make for a better looking maze. Both of the below cubes were made using an Axo grid, but the one on the left follows the direction and flow of the object while the one on the right does not. Personally I think the example on the left is a much better maze. Imagine the Steps maze above if it did not use the objects flow to make the pathways.

Cube mazes with 2 different wall examples

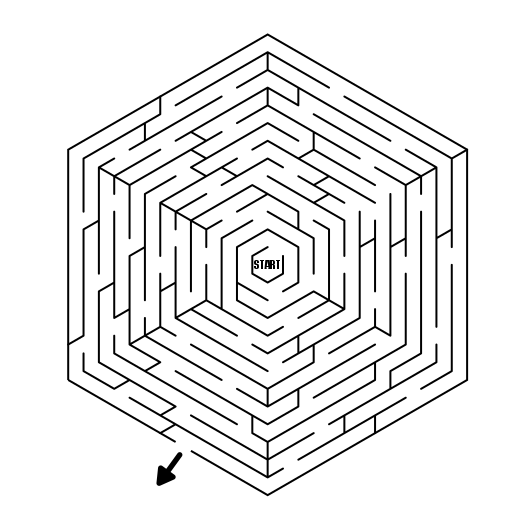
Axonometric grids also serve as the base for geometric mazes that aren’t square or rectangular, like this example of a Hexagon maze. However, I do not consider this a pure axonometric maze, but instead an Escape Maze !

Hexagonal escape maze

and this example of a triangular maze using the grid (again an Escape Maze!).

Triangle escape maze

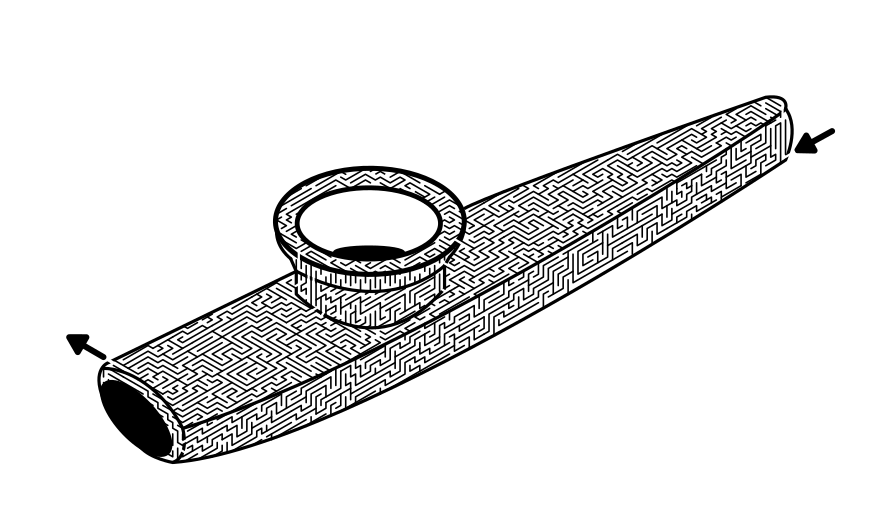
And sometimes the shape of the item lends itself to grid that is tilted at an angle. I really like this Kazoo Maze. How many kazoo mazes have you seen before ?

Kazoo Maze

Making of an Axonometric Maze Video

Watch this quick video to get a sense of how an Axonometric Cube maze is made.

Interested in learning how to make or draw other types of digital mazes ? I have step by step instructions on how to make over 40 different maze types.

If you prefer making labyrinths, you can find step by step labyrinth making instructions.

How to Make a Cut-Thru Maze

In a series of posts I will show you how to make a maze in a wide variety of design constructions. The 6th type of maze construction is the Cut-Thru maze. Let’s define what I mean, then get into the example. Every example will use the sample basic outline (the state of Ohio) to better illustrate the differences between each maze type.

Cut-thru Maze - While most maze constructions are made by building walls, a Cut-thru Maze is created by drawing the pathways, in a sense cutting thru the object you are maze-ing. The finished product can look like a standard maze where you travel on the walls instead of the pathways between the walls.

How to Make a Cut-Thru Maze

Step 1 - Draw the Object

A new first step. While most mazes start with draw an outline, this maze starts with Draw the Object. That may include an outline initially, but to get the object completed the outline should be filled in with color to create a surface to “Cut-thru”. The color can be changed later based on your preference. For my example I started used black.

Step 1.5 - Choose the Start and Goal

For the below example I chose the start of Cleveland and the goal of Cincinnati. Because this is a Cut-thru Maze you do not need to have a opening in the outline for the maze to start and end.

4 Cut Thru - Color the background.png

Step 2 - Draw the Solution

Use a contrasting color to draw the mazes solution, remembering that you are drawing a path and not a wall when creating this type of maze. I used a square grid to draw my path on but you could use other options as well.

Cut Thru Maze - Draw the Solution

Step 3 - Draw the False Paths

Starting with the solution path, draw lines to misdirect the solver to dead ends. The longer the false branches and more decisions that need to be made, and the more difficult the maze will be. Using a different color for these paths will help later when you make the solution.

4.2 Cut Thru - Draw the Dead Ends.png

Step 4 - Convert All Paths to White

Completing the maze means converting all paths you made to white (or any other single color you choose) to hide the correct solution..

Ohio Maze in a cut thru maze construction

Step 5 (Optional) - Make the Maze Solution

Highlight the correct path in the final version of the maze to create the final Maze solution. This will be very easy since that line was made earlier.

Ohio cut thru maze solution

4 Additional Cut-Thru Maze examples

Below is another example of a cut-thru maze, a Tile Maze. This maze of a black and white tile uses the contrasting color of the tile to create the pathway you solve with. THe pathway switches colors from black to white based on the background color.

Tile Maze 3x3 in black and white

A second example of a cut-thru maze is the Record Maze. The solver must travel on paths cut-thru the black record to solve the maze.

Cleveland Rocks Record Maze

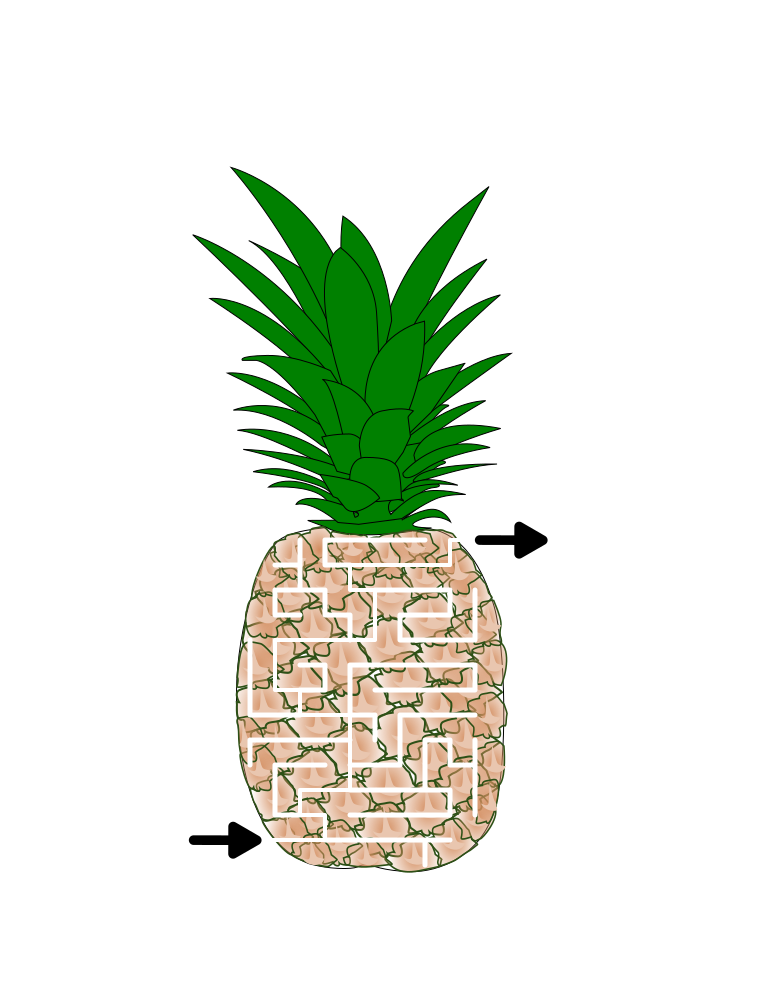
For my third example I have this Pineapple Maze, to show that the background you use does not need to be solid, or either black or white as they are above.

Cut Thru Pineapple Maze in color

Have you ever wanted to see a cut-thru Cheese Maze ? I have you covered with this next example. I wanted to show this example to illustrate that you do not need to use a standard grid to make this type of maze (although I typically use them anyway). The cheese is mazed using an Axonometric grid.

Cheese Wedge Maze

Making a Cut Thru Maze Video

Here is a quick video of a very basic cut thru maze being made if you are more visual.

You can check out a whole months worth of examples of cut thru mazes I made in June of 2020, now an archived page.

Interested in learning how to make or draw other types of digital mazes ? I have step by step instructions on how to make over 40 different maze types.

If you prefer making labyrinths, you can find step by step labyrinth making instructions.

How to Make an Arrow Maze

In a series of posts I will show you how to make a maze in a wide variety of design constructions. For the fifth example we will look at the arrow maze construction. It is one of the most enjoyable maze constructions to make. Let’s define what I mean by Arrow maze, then get into the example. Every example will use the sample basic outline (the state of Ohio) to better illustrate the differences between each maze type. If you want to watch of a video of the making of an arrow maze that is included at the end of the post.

Arrow Maze - A maze that involves following arrows in the direction shown with a few decisions along the way to create the maze solving aspect. Standard movement is one grid at a time (vs an Slide Arrow Maze that allows multiple grids per move). A well designed arrow maze has no dead ends, but rather loops that return you to an earlier part of the maze.

HOW TO MAKE AN ARROW MAZE

  • Step 1 - Draw the Outline

The outline of the maze makes the outer wall of the maze. It can be anything from a simple shape like a square, to a complex picture. The outline should be thicker than the internal lines to give the maze definition. In the example below I chose the state of Ohio. But arrow mazes are generally made of grids, so any configuration or shape you can make from grids would be suitable for an arrow maze.

  • Step 1.5 - Choose the Start and Goal

For the below example I chose the start of Cleveland and the goal of Cincinnati. Unlike most mazes the Arrow maze does NOT use arrows to indicate the start and goal, but rather colored boxes (or boxes indicated with the words START and GOAL). In the example below you start in the orange box and end in the red, this format of course will require directions to be added later. As with most mazes, you do have the option to choose your Goal at a later time as you progress thru the maze.

3 Arrow - Start and End.png
  • Step 2 - Draw the Grid Design

Draw a grid design to fill the outline with blocks that will contain the arrows. The use of Ohio does not make the best example since some outer blocks are oddly shaped, but it still works !

3.1 Arrow - Make the Grids.png
  • Step 3 - Draw the Arrows off to the side

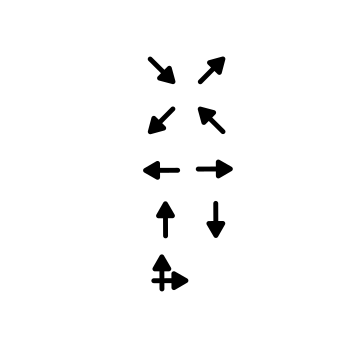
Unique for this maze is that prep-work will help with the mazes construction. An arrow maze can be moved thru in 8 main directions (N, NE, E, SE, S, SW, W, NW). I like to create an arrow and then rotate the arrow to the needed directions to make the construction of the maze more efficient. I also make one “choice” arrow with multiple directions that I can rotate as needed. For advanced Arrow mazes there are a few other options I will show in my other examples section, but these basic arrows are a good start.

3.2 Arrow - Make arrows needed.png
  • Step 4 - Start Filling in Arrows

Beginning from the starting block, add arrows to create pathways away from the block. Any block touching the starting block can be a first move. Arrows that face the starting block will return you back immediately. While constructing an Arrow maze you should have at least one path back to the starting block for false paths. Unlike most mazes, an Arrow path has no dead ends (ideally), only loops to earlier parts of the maze.

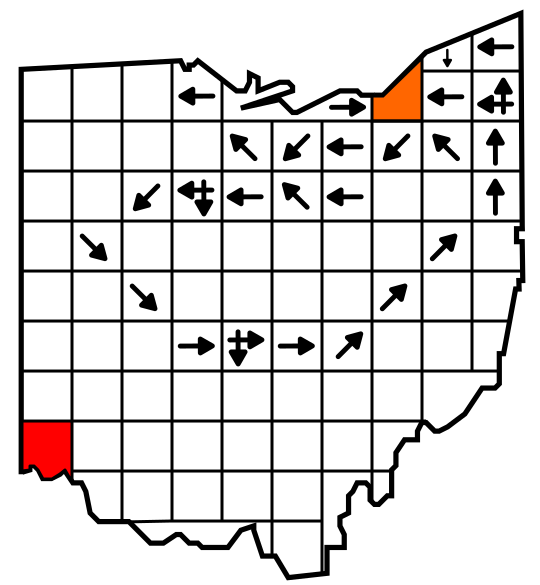
3.3 Arrow - Fill arrows to establish flow from start.png

Notice how I created false paths that bring you back to the start. I find that return loops are much more enjoyable than dead ends when solving a maze.

3.4 Arrow - Create return to start pathways.png
  • Step 5 - Complete the Arrow Maze

To complete an Arrow maze you fill in each block with an arrow. Make sure to never create a dead end or an infinite loop. In this way an Arrow maze can be solved in multiple ways (some loops return to their initial mistake), but there is always a best solution. There are also “short” loops that are less punishing to the solver if they make a wrong choice. Check the decision block in B2 (second column, second row). If you choose to move left rather than down it will bring you right back to where you are in in 4 moves.

Arrow Maze shaped like the state of Ohio
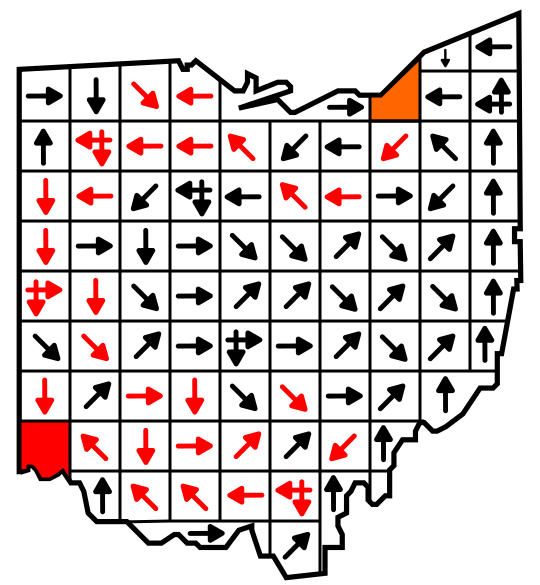
  • Step 6 (Optional) - Make the Solution

Highlight the solution for the solver that is the quickest path to the goal. For Arrow mazes I like to solve these after a few days to check how enjoyable they are. I also have changed how I show the solution since making this example. I also draw a line following the “path” and only show the correct arrow in red for the L-shaped decision arrows !

Ohio Arrow Maze solution

Additional Arrow Maze Examples

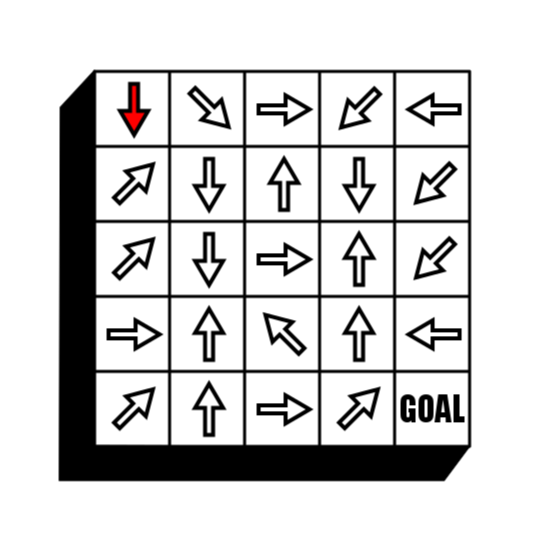
Here are a few additional examples of Arrow mazes in more traditional forms. The first is in a the most common square grid form. I included this example because it was one of my first formats which included directions and the use of colors for the Start and Goal.

9x9 Arrow Maze

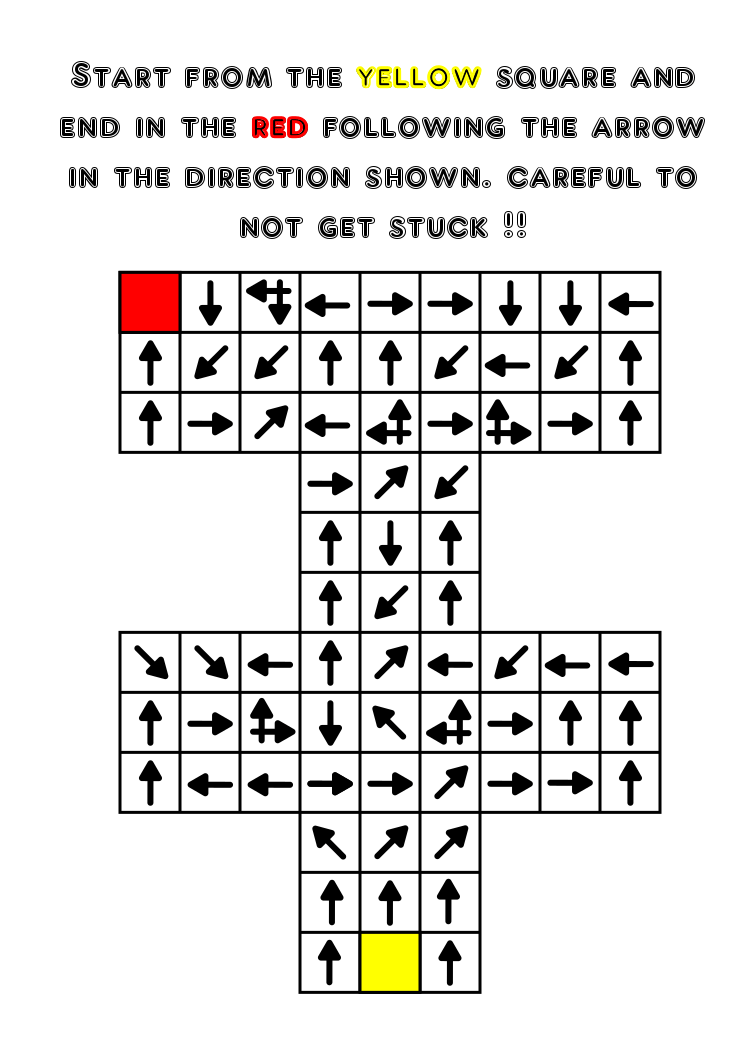
And these are two examples of Arrow mazes in different shaped grids. Any grid shape could work if it has enough options for the solver to be challenged. The maze on the left also includes a decision arrow at 45 degrees.

Arrow Maze example - odd shape
Arrow Maze example in crossed T shape

While making an Arrow Maze can be pretty basic from a movement perspective, there are many options to make it more interesting. Let’s review some the the most common ones I use to make things more challenging.

6 ADDITIONAL ARROW MAZE MOVEMENT OPTIONS

  1. The ALL WAYS ARROW allows anyone to land on it to leave the grid in ANY direction. It looks like a star.

  2. The DOUBLE MOVE ARROW allows you to jump over grids or spaces in the maze. It works well to get out of tight areas and from a design perspective makes the maze more difficult to solve.

  3. RETURN TO START is a grid that you do not want to land on.

  4. START / GOAL is my favorite grid type. Instead of telling the solver where the START and the GOAL is you only show them where the 2 possible are. It is the solvers job to find which is which by finding a path between each START/GOAL grid.

  5. The SLIDE ARROW allows you to move to any arrow the Slide Arrow is pointing at.

  6. WARP GRIDS allow the solver to jump across the maze between each Warp.

Check out my rule movement page from an upcoming book, along with a few examples that showcase the new movements. They make for much harder mazes, and are much more interesting to solve. For all of these mazes I dropped the color start/goal and went with a more traditional and intuitive use of the words “Start” and “Goal”.

How to solve an Arrow Maze Rules
Arrow Maze #80 - Invader Shape

Example of moves 1,2,3,6

Arrow Maze #96
5x5 Slide Arrow Maze example

Slide Arrow Maze

There is also an option to use ONLY Slide Arrows, creating a Slide Arrow Maze. These can be made extremely difficult to solve. Since they are both Arrow Mazes, here is a comparison of the 2 types of Arrow Mazes and their rules for solving:

List Of Arrow Maze solving rules

I did the following 14 Part series where I dive into Arrow mazes in detail. The first 12 blog posts are in order. Click the link to Part 1 and you can follow along through each part.

Arrow Maze Construction and Design:

Arrow Maze Components:

  • Part 5 - Regular Arrows

  • Part 6 - Double Arrows

  • Part 7 - Using the START GOAL

  • Part 8 - Return to Start Block

  • Part 9 - Using Warp Zones

  • Part 10 - Slide Arrows

  • Part 11 - All Ways Arrow

  • Part 12 - Long Arrow Use

Extreme Arrow Maze examples:

  • Part 13 - Kitchen Sink Examples

  • Part 14 - The Largest Arrow Maze in the World (I think)

Arrow Maze Books AVAILABLE ON AMAZON

THE ARROW MAZE BOOK VOLUME 1: AVAILABLE IN 4 LANGUAGES IN BOTH PRINT AND KINDLE EDITIONS

  • Part puzzle, part maze, all fun ! Enjoy 100 Arrow Mazes that get more challenging as you move forward. Arrow Mazes don't have walls or dead ends but that doesn't mean you won't get lost ! Perfect for both maze lovers and puzzle solvers. Later puzzles get new solving rules to keep the challenge fresh.

    • Features large size of 8.5 x 11 (Print edition)

    • 100 Arrow Mazes with solutions

    • Unlike most maze books, no pencil is needed - perfect for solving on a Kindle !

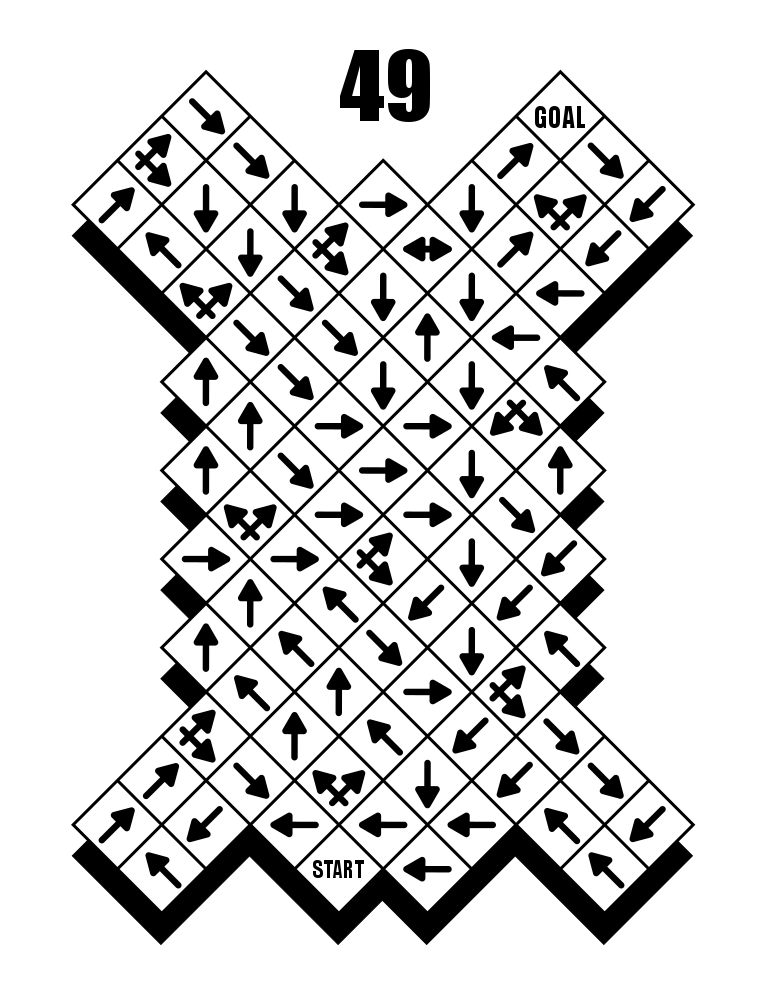
    • See Maze 49 below for an example.

Shop on amazon
Arrow Maze #49

A FREE downloadable Arrow Maze book to try

In January 2020 my daily mazes consisted of Arrow Mazes I made using my original design. This book does NOT include any of the new movements which make the mazes more fun and challenging but it is a nice introduction to Arrow Mazes. As the month went on the mazes got larger. This book collects all of the mazes from that month. (If you are wondering Volumes 1 & 2 were retired).

The Arrow Maze Book - Volume 3 Cover

THE ARROW MAZE BOOK - VOLUME 3

31 pages, 32 mazes including the cover

File Size: 715 KB

Features each daily maze from January 2020. Arrow mazes have no dead ends which means they should be easy…right ? Each Arrow maze get progressively harder.

Download Book

Making of an Arrow Maze Video

Take 2 minutes to watch an Arrow Maze being made. This shows the sped up process I described above.

Interested in learning how to make or draw other types of digital mazes ? I have step by step instructions on how to make over 40 different maze types.

If you prefer making labyrinths, you can find step by step labyrinth making instructions.

How to Make a Horizontal Maze

In a series of posts I will show you how to make a maze in a wide variety of design constructions. The 4th type of maze construction is the Horizontal maze. Let’s define what I mean, then get into the example. Every example will use the sample basic outline (the state of Ohio) to better illustrate the differences between each maze type. If you are more visual I have a video at the end of the post showing a horizontal maze being made.

Horizontal Maze - A maze whose main walls are constructed horizontally. Depending on the Start/Goal placement, the solver will be moving either back and forth while going up or back and forth while going down. The final maze will also look horizontal.

How to Make a Horizontal Maze

Step 1 - Draw the Outline

The outline of the maze makes the outer wall of the maze. It can be anything from a simple shape like a square, to a complex picture. The outline should be thicker than the internal lines to give the maze definition. In the example below I chose the state of Ohio.

Step 1.5 - Choose the Start and Goal

For the below example I chose the start of Cleveland and the goal of Cincinnati. I made an entrance in Cleveland but I usually wait until I am in the last stage of drawing maze lines to draw the exit point for the goal. This is in case I need to adjust the location slightly based off of my design. This works if drawing a maze digitally, but for a hand drawn maze the outline will need to have a pre-determined start and goal.

Ohio State Maze outline

Step 2 - Draw the Horizontal Walls

Inside the entire outline draw horizontal walls at an equal distance apart. You will make paths through the walls in a later step. Obviously this step only works for a digitally made maze. In my example I used pathways and walls similar to standard equal construction - meaning they are equal widths. While they do NOT need to be equal widths, if the spacing between lines gets to too large you the construction will occupy a grey area between a standard maze and a horizontal maze.

2 Horizontal - Draw the horizontal lines.png

Step 3 - Draw Vertical Walls

Split the horizontal lines into sections by drawing vertical lines into the current pathways. Two vertical lines between two horizontal lines would create 3 possible sections for a solution to move through. The more vertical lines, the more possible paths and the higher the difficulty. In the example below I also drew the first pathway in red. These vertical walls can be adjusted later, and most likely you will want to change a few !

2.2 Horizontal - Thicken the vertical lines.png

Step 4 - Draw the Maze Solution

Draw the solution to the maze. If you want to be precise in your solution, set your guide grid to half of what it was when you drew the initial horizontal lines (or alternatively shift the entire picture up). This will align your solution pathway with the new grid. Full disclosure, I may a mistake on this….do you see it ? If you follow the red line as it moves left I drew a path right through a vertical wall (oops). I fix it in step 6, but thought I would keep it here to illustrate a possible mistake you could make.

2.3 Horizontal - Draw a solution.png

Step 5 - Draw the Dead Ends

Make branches off the solution path to create dead end paths. The longer the paths, the more difficult the maze. In the example below the false paths are blue. A quick note - if any of these branches return back to another section of the maze with the red line you will have created an alternative solution by mistake !

2.4 Horizontal - Draw a dead ends.png

Step 6 - Convert All Maze Paths to White

Completing the maze means converting all paths you made to white. I also fixed my vertical wall mistake from earlier. As you look at this final maze does it feel horizontal to you ? It should !

2.5 Horizontal - Convert to White.png

Step 7 (Optional) - Make the Maze Solution

You have two options here - Option 1 - Change the solution line back to red to draw the solution to the maze. Option 2 - Let the maze sit for a few days and try solving it yourself. Was it the difficulty you thought as you were designing it ? Did you enjoy it or did it frustrate you in any way ? Using option 2 means you are more likely to go back and make adjustments to improve the maze. Think of it as proofreading for mazes.

Ohio horizontal Maze solution

4 Additional Horizontal Maze examples

Here is another example of a Horizontal maze construction that works well, a maze of the number 4. It doesn’t require this construction, but I think it looks good.

Maze of the number 4

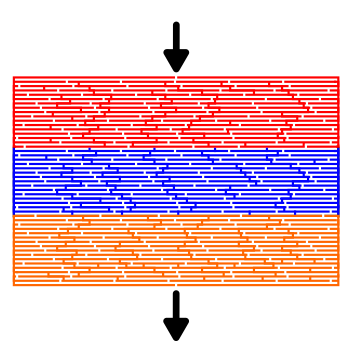
For my second and third examples I want to feature flag mazes. Because of their rectangular shape, most flags also look good with a horizontal construction, like the Armenian flag maze and Austria flag maze below. I wanted to show this maze for a second reason. Rather than use background colors with black walls I chose to color the walls and outline in the colors of the flag. If you want to explore pathway options like this more check out the highlighted post. For Austria, the white section would become saturated with the color of the maze walls (most likely black), so I needed to space light grey lines to allow the white to show through. I also considered leaving this section un-mazed - although this would mean only 1 entrance/exit on each side of the white section vs many as shown.

Armenia flag maze
austria flag maze

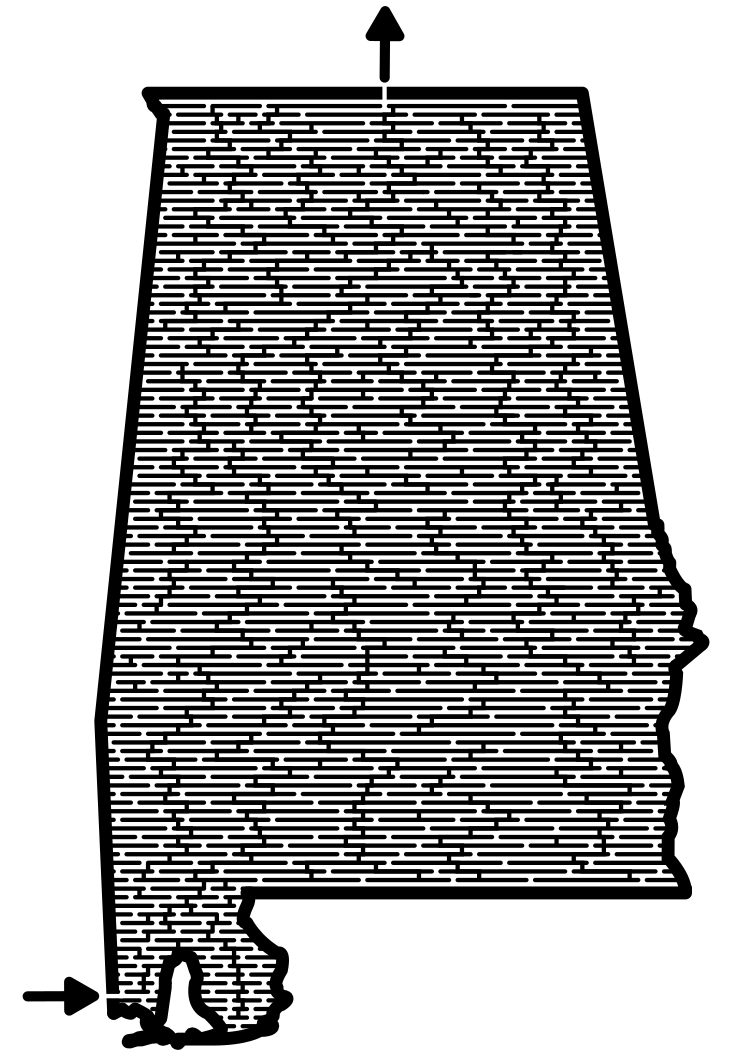
For our fourth example, let’s look at a map maze, in this case the Alabama Maze. Map mazes are a great place to use a horizontal construction and you will find many of my map mazes do. The reason for this particular mazes inclusion here is because it was made using different steps than I taught above. That first change comes in “Step 2- Draw the Horizontal lines”. For this maze I skipped that step and drew the maze line by line, which is probably 30X the work as each line must be placed and drawn individually. You can see this because the end of the horizontal lines is rounded. This also changes steps 3-5 above since you are drawing as designing as you go making sure you follow the cardinal rule - Never close off all pathways.

alabama map maze

The Making of a Horizontal Maze Video

A note that in this particular example I went rouge - I did not use guides to make the pathways , and this caused me to draw the maze in sections. I even did a backwards draw from the goal. An option, but much better and easier to construct using the step by steps above !

Interested in learning how to make or draw other types of digital mazes ? I have step by step instructions on how to make over 40 different maze types digitally.

If you prefer making labyrinths, you can find step by step instructions for how to draw labyrinths.