
In a series of posts I will show you how to make a maze in a wide variety of design constructions. The 4th type of maze construction is the Horizontal maze. Let’s define what I mean, then get into the example. Every example will use the sample basic outline (the state of Ohio) to better illustrate the differences between each maze type. If you are more visual I have a video at the end of the post showing a horizontal maze being made.
Horizontal Maze - A maze whose main walls are constructed horizontally. Depending on the Start/Goal placement, the solver will be moving either back and forth while going up or back and forth while going down. The final maze will also look horizontal.
How to Make a Horizontal Maze
Step 1 - Draw the Outline
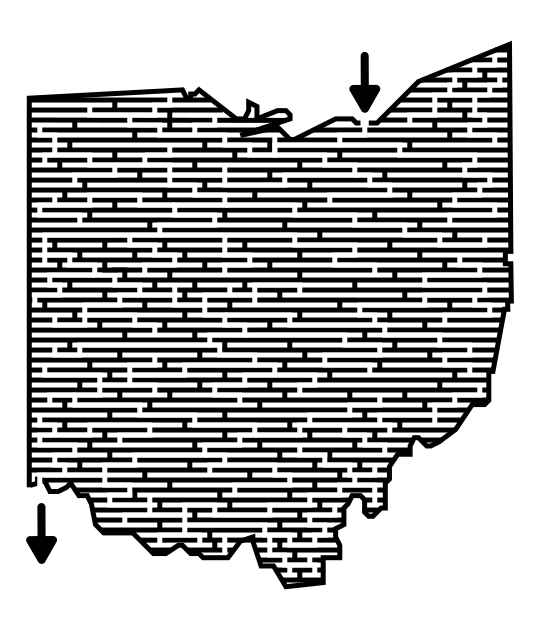
The outline of the maze makes the outer wall of the maze. It can be anything from a simple shape like a square, to a complex picture. The outline should be thicker than the internal lines to give the maze definition. In the example below I chose the state of Ohio.
Step 1.5 - Choose the Start and Goal
For the below example I chose the start of Cleveland and the goal of Cincinnati. I made an entrance in Cleveland but I usually wait until I am in the last stage of drawing maze lines to draw the exit point for the goal. This is in case I need to adjust the location slightly based off of my design. This works if drawing a maze digitally, but for a hand drawn maze the outline will need to have a pre-determined start and goal.

Step 2 - Draw the Horizontal Walls
Inside the entire outline draw horizontal walls at an equal distance apart. You will make paths through the walls in a later step. Obviously this step only works for a digitally made maze. In my example I used pathways and walls similar to standard equal construction - meaning they are equal widths. While they do NOT need to be equal widths, if the spacing between lines gets to too large you the construction will occupy a grey area between a standard maze and a horizontal maze.

Step 3 - Draw Vertical Walls
Split the horizontal lines into sections by drawing vertical lines into the current pathways. Two vertical lines between two horizontal lines would create 3 possible sections for a solution to move through. The more vertical lines, the more possible paths and the higher the difficulty. In the example below I also drew the first pathway in red. These vertical walls can be adjusted later, and most likely you will want to change a few !

Step 4 - Draw the Maze Solution
Draw the solution to the maze. If you want to be precise in your solution, set your guide grid to half of what it was when you drew the initial horizontal lines (or alternatively shift the entire picture up). This will align your solution pathway with the new grid. Full disclosure, I may a mistake on this….do you see it ? If you follow the red line as it moves left I drew a path right through a vertical wall (oops). I fix it in step 6, but thought I would keep it here to illustrate a possible mistake you could make.

Step 5 - Draw the Dead Ends
Make branches off the solution path to create dead end paths. The longer the paths, the more difficult the maze. In the example below the false paths are blue. A quick note - if any of these branches return back to another section of the maze with the red line you will have created an alternative solution by mistake !

Step 6 - Convert All Maze Paths to White
Completing the maze means converting all paths you made to white. I also fixed my vertical wall mistake from earlier. As you look at this final maze does it feel horizontal to you ? It should !
Step 7 (Optional) - Make the Maze Solution
You have two options here - Option 1 - Change the solution line back to red to draw the solution to the maze. Option 2 - Let the maze sit for a few days and try solving it yourself. Was it the difficulty you thought as you were designing it ? Did you enjoy it or did it frustrate you in any way ? Using option 2 means you are more likely to go back and make adjustments to improve the maze. Think of it as proofreading for mazes.

4 Additional Horizontal Maze examples
Here is another example of a Horizontal maze construction that works well, a maze of the number 4. It doesn’t require this construction, but I think it looks good.

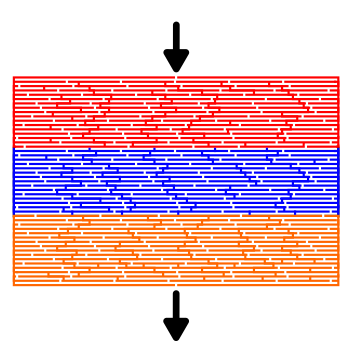
For my second and third examples I want to feature flag mazes. Because of their rectangular shape, most flags also look good with a horizontal construction, like the Armenian flag maze and Austria flag maze below. I wanted to show this maze for a second reason. Rather than use background colors with black walls I chose to color the walls and outline in the colors of the flag. If you want to explore pathway options like this more check out the highlighted post. For Austria, the white section would become saturated with the color of the maze walls (most likely black), so I needed to space light grey lines to allow the white to show through. I also considered leaving this section un-mazed - although this would mean only 1 entrance/exit on each side of the white section vs many as shown.

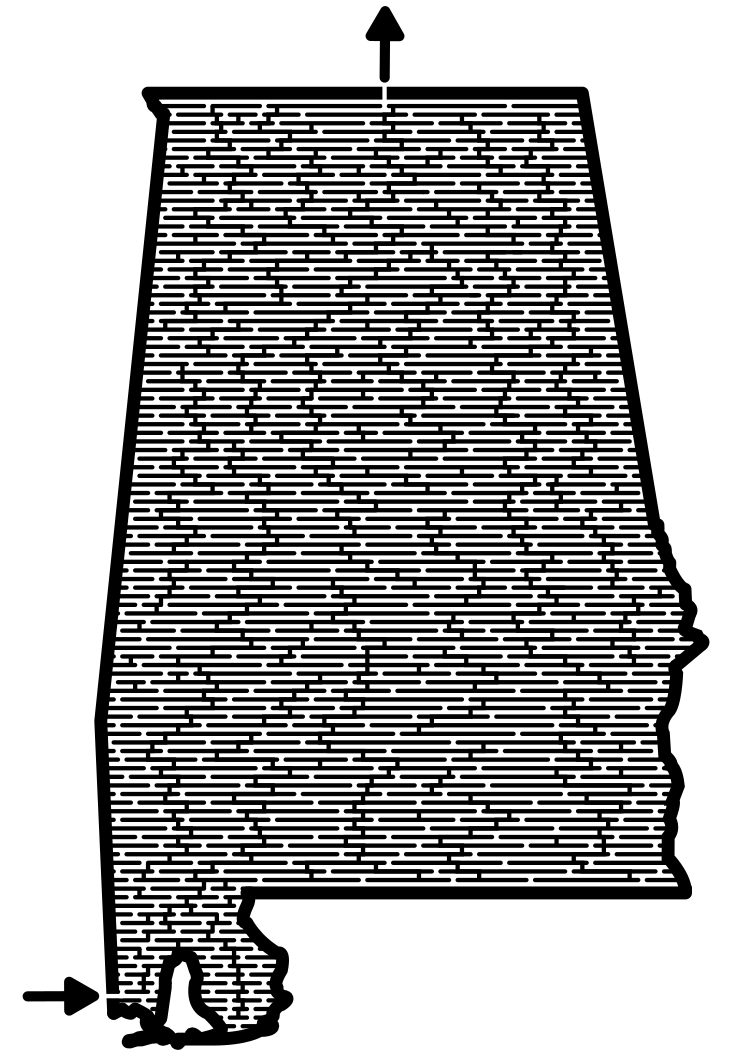
For our fourth example, let’s look at a map maze, in this case the Alabama Maze. Map mazes are a great place to use a horizontal construction and you will find many of my map mazes do. The reason for this particular mazes inclusion here is because it was made using different steps than I taught above. That first change comes in “Step 2- Draw the Horizontal lines”. For this maze I skipped that step and drew the maze line by line, which is probably 30X the work as each line must be placed and drawn individually. You can see this because the end of the horizontal lines is rounded. This also changes steps 3-5 above since you are drawing as designing as you go making sure you follow the cardinal rule - Never close off all pathways.
The Making of a Horizontal Maze Video
A note that in this particular example I went rouge - I did not use guides to make the pathways , and this caused me to draw the maze in sections. I even did a backwards draw from the goal. An option, but much better and easier to construct using the step by steps above !
Interested in learning how to make or draw other types of digital mazes ? I have step by step instructions on how to make over 40 different maze types digitally.
If you prefer making labyrinths, you can find step by step instructions for how to draw labyrinths.