Sometimes you need to talk about failure. Today I will do just that. I have done almost a dozen different step by step instructions on How to Draw a Labyrinth. And I set out to add some additional content by adding an octagonal version to add to the classical, square and circular versions.
My first step was making the labyrinth myself. I sat down and did it….slowly and with many starts and stops. Do you know how to draw an octagon with equal sides ? I looked into it. Once I drew the first labyrinth I knew the second would be easier, and it was…a little bit. Then I drew another, and another. And finally I figured out how to easily give you step by step instructions on how to make the octagonal labyrinth ! Except for me it has still not become easy. Maybe a few more designs and I’ll figure it out completely.
So why are we here ? Well I’m going to show you what I learned to help you make your own. Here is everything included in this post (with links to skip ahead if you choose)
PART 1 - HOW TO DRAW AN OCTAGON - METHOD 1
PART 2 - HOW TO DRAW AN OCTAGON - METHOD 2
PART 3 - HOW TO DRAW A 5 CIRCUIT OCTAGONAL LABYRINTH - METHOD 1
PART 4 - HOW TO DRAW A 5 CIRCUIT OCTAGONAL LABYRINTH - METHOD 2
PART 5 - HOW TO DRAW AN 11 CIRCUIT OCTAGONAL LABYRINTH - METHOD 1 &2
PART 6 - DISCUSSION OF TURNBACKS AND LABYRINTH ORIENTATION
PART 7 - REAL WORLD OCTAGONAL LABYRINTH EXAMPLES
PART 1 - HOW TO DRAW AN OCTAGON - METHOD 1
If you want to draw an octagon with equal lengths here is the method I would use.
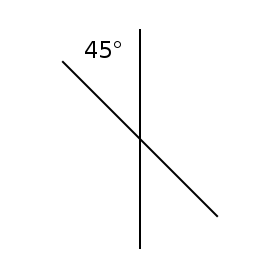
Step 1 Draw a straight line
Step 2 Rotate the line 45 degrees
Obviously this is a digital method where you can copy and paste then rotate, but it also works if you are hand drawing. Use a pencil and protractor/ruler and ensure you use the same length line.
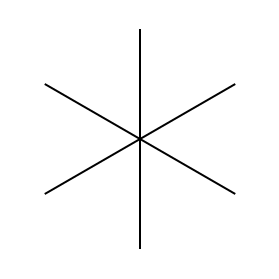
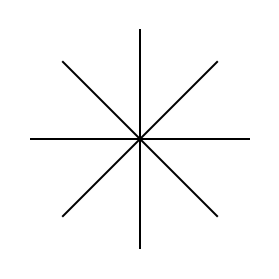
Step 3/4 Rotate the line twice more at 45 degrees
This will create what looks like an asterisk. Or a cut pizza that has no crust (maybe I’m hungry?)

Step 1 Draw a line
Step 2 Rotate 45 degrees
Step 3 & 4 Rotate 45 degrees again
Step 5 Connect the ends of the lines
This will create outer walls of the octagon that are the same length.
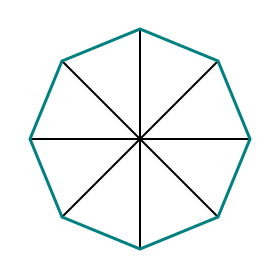
Connect the ends of the lines
Step 6 Delete the original lines & (optional) rotate
After deleting the guidelines, rotate the octagon 22.5 degrees so you have the bottom side flat on the page. I will mention that if you are drawing an octagonal labyrinth you may want to keep the lines to help guide you drawing that (explanation later in the post).

PART 2 - HOW TO DRAW AN OCTAGON - METHOD 2
Alternatively you can also use a grid to draw an octagon that is “eyeballed” and has sides that are not quite equal. I will help you some with the math of that and show you how to get your sides very close. We start with the Isosceles Right Angle Triangle. On the left we have the formulas to calculate the length of the long side of the triangle, or if you remember from your school days the hypotenuse (the square root of 2 multiplied times the length). On the example on the right if the length of the sides are 8 this means the hypotenuse of the triangle is 11.3 units in length.
Wait, why are we talking about this ? Because if you use a grid to make an octagon the distance between the diagonals should not be equal to the length of the sides.


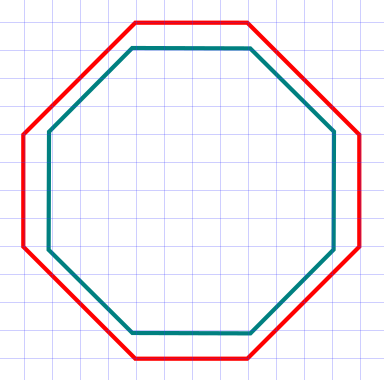
Check out this overlay of our blue original equal side octagon with the red drawn using a grid that uses 4 grid blocks to draw the sides. Each diagonal is too long. The length of 4 grids used is 4 DIAGONAL grids which are different than 4 vertical / horizontal grid lengths (because of the math). So you need to calculate the estimated length of the diagonal.
I did the math for you to calculate what grid lengths work best. The chart is on the left. With walls of 5 unit length, the Isosceles Right Angle Triangle hypotenuse length is calculated as 7.07 units (close enough that I would use this to draw an octagon). I highlighted the 4 that would work best in yellow.
On the right I show how these calculations translate into drawing on a grid. You reverse the lengths from the chart to draw your sides. So a 7 unit grid length is paired with a 5 grid diagonal (which is actually a length of 7.07). Similarly a 10 unit length paired with a 7 grid diagonal (actually length 9.9) also works. So using this math you can draw your own octagonal using grids and 45 degree angles.


I had planned on showing a second example comparing an octagon draw using the first method with one drawn using the second and the 5/7 grid calculation. When I aligned them they were virtually exact overlaps. So it works. Now we have our basic shape.
So everything is smooth sailing from here then ? Right ? No. Aligning the internal pathways correctly can best be described as trial and error. Why ? Because once you have your octagon drawn the internal walls might not line up the way you want with the grid you are working on.
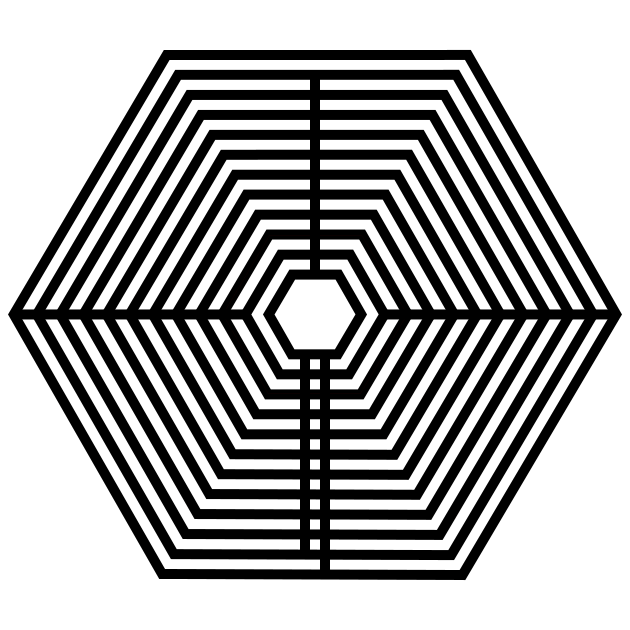
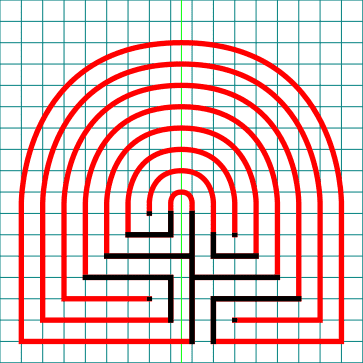
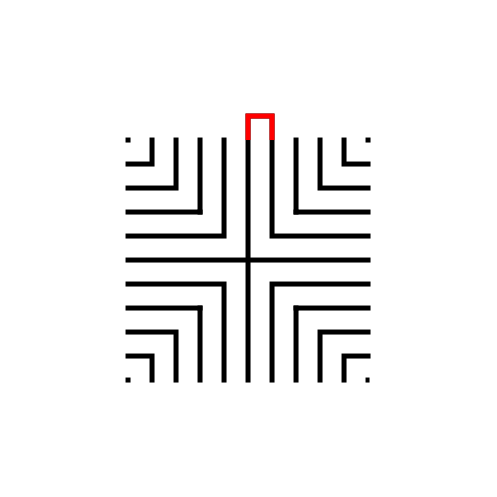
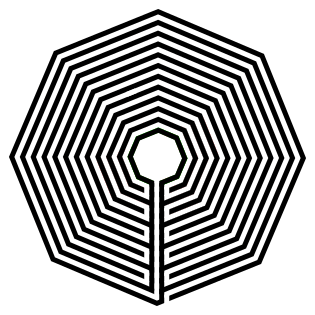
I wanted to draw an octagonal labyrinth with the walls and pathways of equal width at an equal width apart (similar to a standard equal maze if you are familiar with that construction). I think it looks best visually. If you are not concerned with that aesthetic you should be able to eyeball your labyrinth together much easier. Here is a standard equal labyrinth that I made that has 4 sections (4 internal turn-backs).

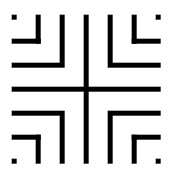
If you are eyeballing the drawing of this type of labyrinth, I suggest you start with the center goal portion and work your way out in layers. Could you design in the opposite direction, from the outside in ? Of course you can ! BUT, you may run out of room for your center goal ! If you go inside out, you only run out of room if you are using a piece of paper that is too small (and digitally you would never run out of room) !!
Also I want you to notice where the walls of the labyrinth make their turns. I have highlighted them below in red - If you made your Octagon using Method 1 above you will notice that the walls turn at the exact point it touches the line used to draw the octagon !! Keep this in mind as you draw your labyrinth ! You may also want to keep the original guides with this in mind.

Normally, when I give step by step instructions I give specific advice and directions that work to draw an object (relatively) easily. Today, I give you instructions that will work, but will take some trial and error on your part !
PART 3 - HOW TO DRAW A 5 CIRCUIT OCTAGONAL LABYRINTH - METHOD 1
This method can de done digitally or with a writing utensil. If you are drawing digitally and can “erase” I suggest you start with method 2.
Step 1 Draw a Center Octagon (The Goal)
Now that you know how to draw a good octagon let’s get started drawing our labyrinth with one that will create our goal. There is only 1 alteration that you need to make. In the bottom side of the labyrinth, leave a gap in the center for the final pathway. In my example that gap is equal to the width of the line I used to make my octagon.

Step 1 - Draw an octagon (with a gap)
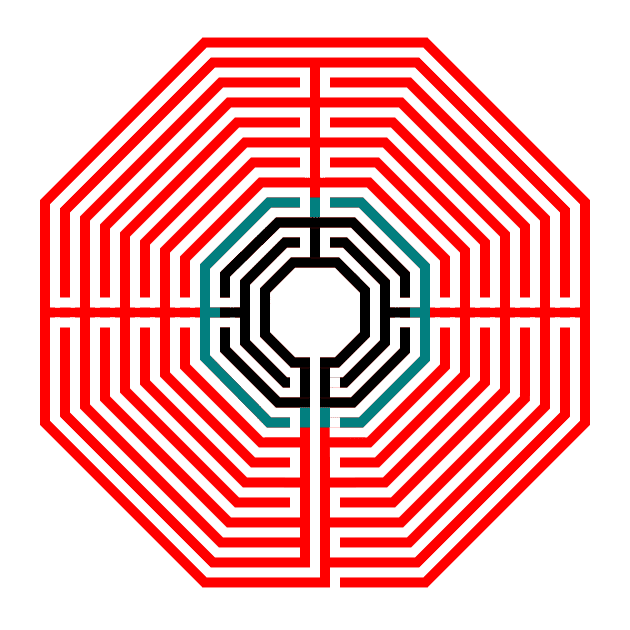
IMPORTANT: From now on the examples will be formed in the following way: Black - previously drawn sections. Blue - current section you are creating. Red - future sections.
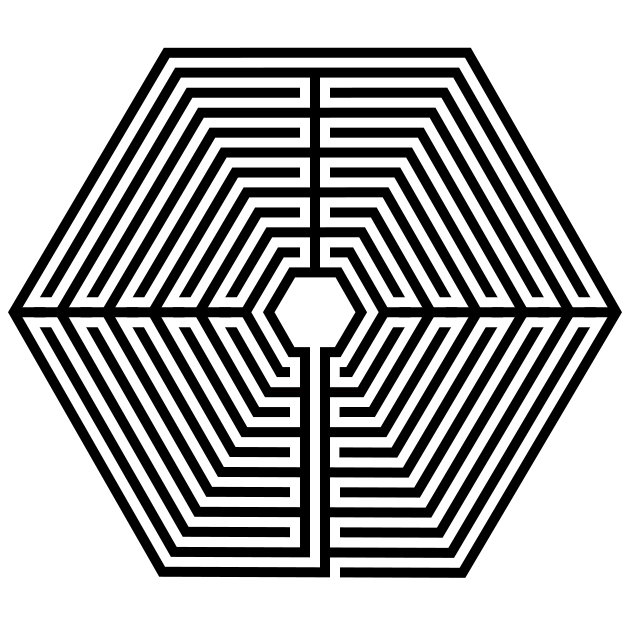
Step 2 Draw the first layer from the goal
This layer, shown in blue below consists of what look like brackets on each side of the center. Mine are an equal distance from the initial octagon. However you’ll notice that there are gaps at the top and bottom of the brackets. How do you know where these should start and stop ? For the top of the octagon, draw a centered line equal to 3X width of your walls. The brackets will end 1X width length away from that line (this creates your turnaround point). For the bottom section draw 2 lines down from the entrance to the goal also 3X width of the walls. Again your brackets will end 1X width away from them.

Step 3 Draw the second layer from the goal
This set of brackets is on a north south orientation. To determine where these end, draw a line centered on the right/left side of the previous bracket that measures 2X width. End brackets 1X width away from the these lines. Also, because of the pathway to the goal you will also need to leave a gap in the center of the bottom bracket !

Step 4 Draw the next layer
We return to the side brackets. We extend our north and south lines by 2X width. We extend and connect our left and right centered lines.

Step 5 Draw the next layer
North and south brackets. Extend the left and right centered lines.

Step 6 Draw the final outer edge
This final step has some changes to note. In the bottom section of the labyrinth, the the final pathway leading to the goal finally turns into the labyrinth. The only gap is the entrance, directly to the right of the final pathway goal wall. Also note that there is no extension of the wall at due north. This completes the drawing of the octagonal labyrinth.
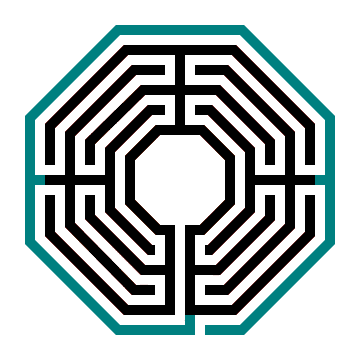
Here is the final version with all lines in black.

A note about size. You can add additional steps if you would like, just continually adding internal sections until you are ready to finish the labyrinth by adding a final edge with an entrance.
PART 4 - HOW TO DRAW A 5 CIRCUIT OCTAGONAL LABYRINTH - METHOD 2
The following method works for digital constructions. It uses a draw and cut construction. It is entirely written for brevity.
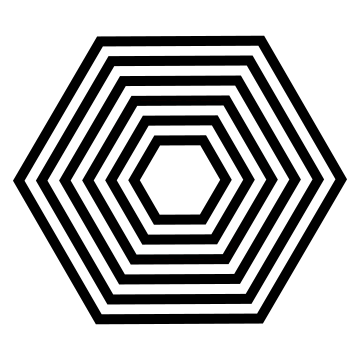
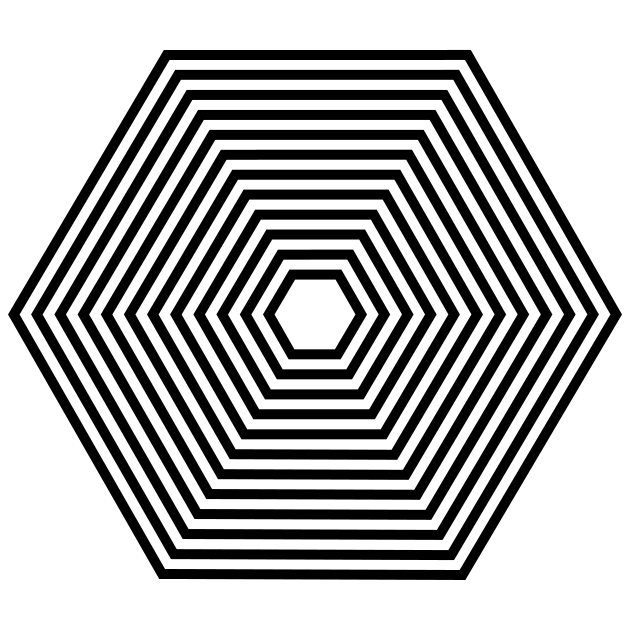
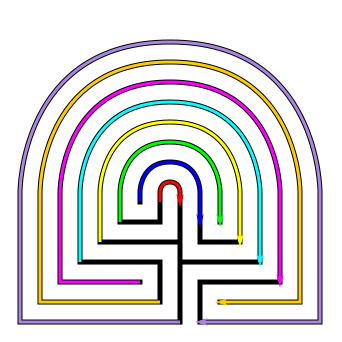
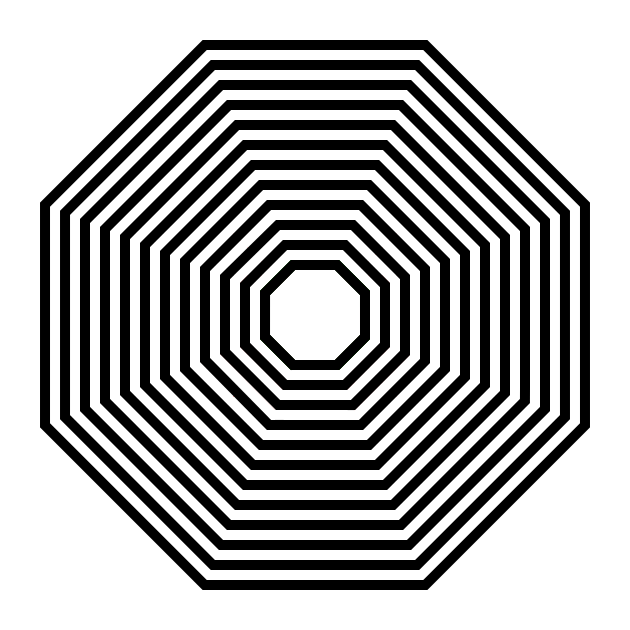
Step 1 - Draw 6 concentric octagons

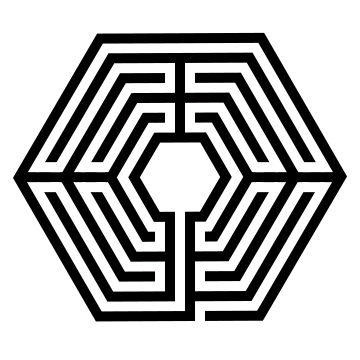
Step 2 - Add turnback sections
Once you select how many turn-backs you will have ( my above example has 4 ), draw them, which will typically need one additional line than the # you choose to account for the centered bottom pathway that leads to the goal. The exception is a 1 section labyrinth which needs only 1 turnback.
For a 4 section these will be drawn at 3, 6 , 9 and 12 o’clock. With the extra line occurring at 6 where you create a centered final pathway to the goal. Ensure the lines at 3 and 9 have the innermost pathway open, while 12 has the top pathway open.

Step 3 - Open pathways
At the location of the turn-backs you will need to create the appropriate pathways, along with the entrance and goal pathways. This will create the final labyrinth.

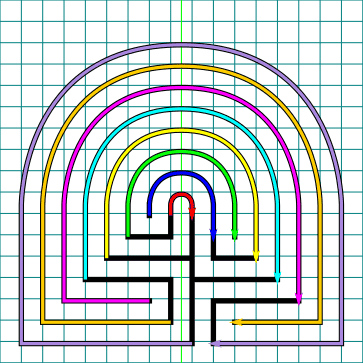
PART 5 - HOW TO DRAW AN 11 CIRCUIT OCTAGONAL LABYRINTH - METHOD 1 & 2
Every thing you just learned can be applied to larger circuit labyrinths. Just add more circuits until you reach the desired number. I have shown a few steps of each method to draw an 11 circuit version (shown in the gallery). Use the next controls to see the steps. I did not complete the steps as it is basically, draw the next layer…again and again until you are complete.


PART 6 - DISCUSSION OF TURNBACKS AND LABYRINTH ORIENTATION
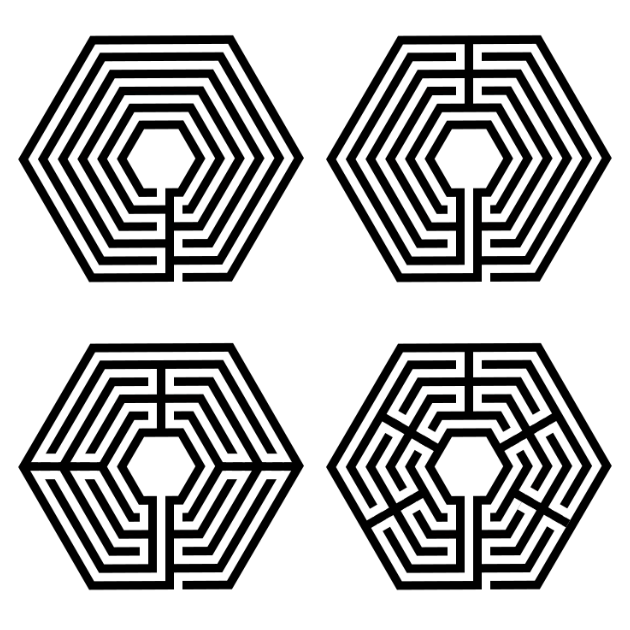
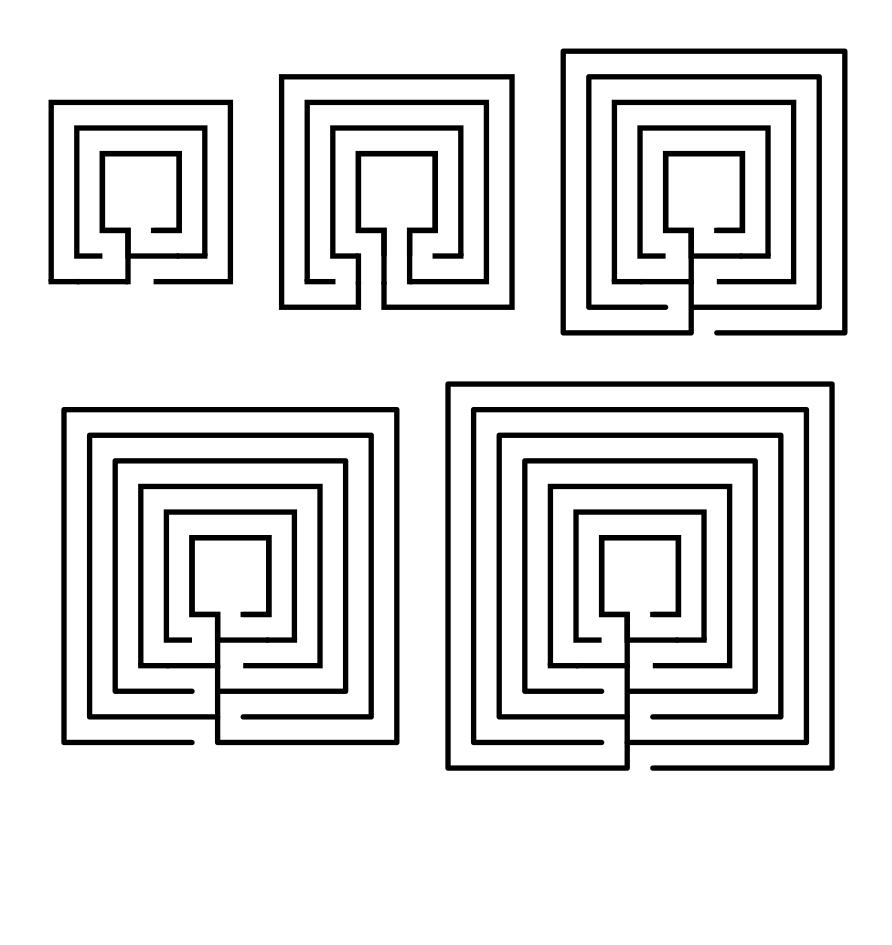
A note about turn-backs. My example above has 4 sections. But you can also draw the same labyrinth with more or less turn-backs (sections). Below I have a 1 section, 2 section, 4 section (the one we just made) and 8 section version. If you imagine walking these, the more sections, or turn-backs, the more back and forth walking you will do.

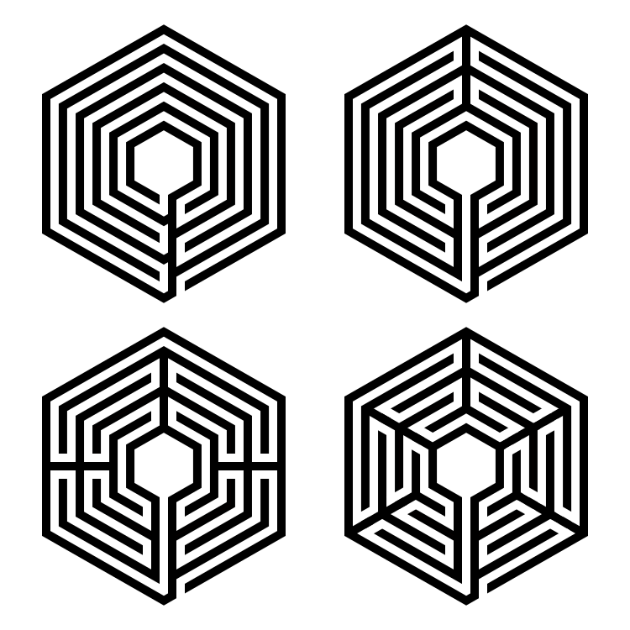
A note on labyrinth orientation. You also do not need to rotate the octagon you have made, and instead make the labyrinth entrance on a corner. Here is the 1 section version, which of course it could be done like the above in 2, 4, and 8 section versions. This is the 1 circuit with a corner entrance.
PART 7 - REAL WORLD OCTAGONAL LABYRINTH EXAMPLES
There are many octagonal labyrinths to choose form if you would like to visit them. Here are 4 in the US:
The Loganville First United Methodist Church Labyrinth is located in Loganville, GA. It is a 5 circuit octagonal labyrinth made from brick pavers and 40 feet in diameter.
The Cottonwood Presbyterian Church Labyrinth located in Salt Lake City, UT is a 5 circuit octagonal labyrinth.
The Oasis at Calvary Labyrinth in Ruskin, FL is an 11 circuit octagonal labyrinth. It has a 64 foot diameter.
The Eastminster Presbyterian Church Labyrinth in Marietta, GA is an 11 circuit octagonal labyrinth that features a Columbarium in the center.
And the famous international versions:
A also wanted to give you some information on the most famous octagonal labyrinth in the world, the Amiens Labyrinth in the cathedral in Amiens, France. You can find some great pictures and information about the labyrinth from Atlas Obscura. It has been around since 1288 !
And it has a cousin, as far as labyrinths have cousins I guess, an octagonal labyrinth located in the parish church of the Basilica of Saint-Quentin, in St Quentin, France. It was made sometime around 1495 which makes it both very old, and yet 200 years younger then Amiens !
Additional posts you might like:
10 of the Most Frequently asked Questions about Labyrinths, with Answers
The 8 best books about mazes, labyrinths and their history
If you prefer making labyrinths, you can find step by step labyrinth making instructions for over 20 different versions.