
In a series of posts I will show you how to make a maze in a wide variety of design constructions. The second example we’ll look at is a construction variation of the standard maze construction. I call it a Standard Equal Maze Path design. Let’s define what I mean, then get into the example. Every example will use the sample basic outline (the state of Ohio) to better illustrate the differences between each maze type. If you want to see this type of maze made in video form, that is added at the end of the post.
Standard Equal Maze Paths - the construction concept is the same with making a standard maze except the pathways and walls are of equal width. TO achieve this in practice the wall width should equal half the grid used (i.e. a 6x6 grid with wall widths of 3) This gives the maze a different look as everything becomes compacted.
These also tend to be longer and more difficult mazes to solve because of the additional pathways it creates. While a Standard Maze looks white, the Standard Equal Maze looks much more black from the thicker lines.
How to Make a Maze with Standard Equal Maze Paths
Step 1 - Draw the Outline
The outline of the maze makes the outer wall of the maze. It can be anything from a simple shape like a square, to a complex picture. The outline should be thicker than the internal lines to give the maze definition. In the example below I chose the state of Ohio.
Step 1.5 - Choose the Start and Goal
For the below example I chose the start of Cleveland and the goal of Cincinnati. I made an entrance in Cleveland but I usually wait until I am in the last stage of drawing maze lines to draw the exit point for the goal. This is in case I need to adjust the location slightly based off of my design. This works if drawing a maze digitally, but for a hand drawn maze the outline will need to have a pre-determined start and goal.

Step 2 - Start Drawing the Walls
Using a grid pattern, begin drawing the maze walls starting at the entrance of the maze. For a Standard Equal Maze the maze walls should be drawn to be equal width to the pathways in between them. In my example maze I am using a 4x4 grid with wall widths of 2. That is an easy to remember ratio when creating a standard equal maze - the wall width must be equal to half the grid size used. While drawing your walls make sure to never break the cardinal rule of maze design - never close all open paths so the maze can be solved. As you make the maze decide how difficult you want to make it. A low amount of path choices, and short dead end paths will make an easy maze. Longer dead ends and lots of path choices make a more difficult maze. The below example is starting off at an easy / medium difficulty.
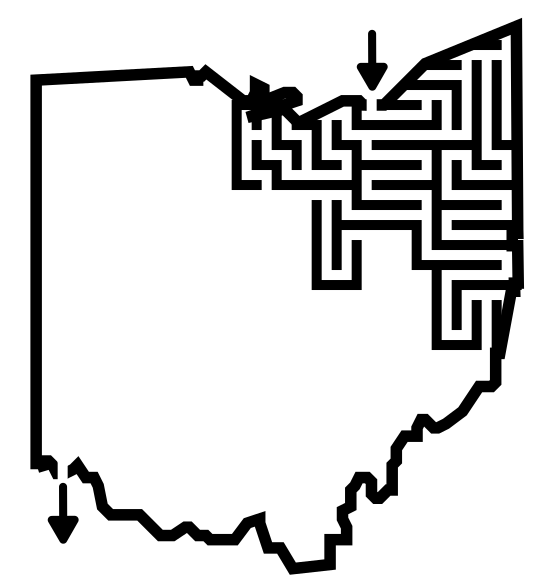
Step 3 - Keep Drawing the Maze Walls
Like most mazes the middle part of design is a lot of keep doing what you are doing and draw more walls. There is nothing too complicated in the below example. The dead ends are long in this maze and there are many choices to make, increasing the difficulty. At this point I also have 2 open pathways which could be used as solutions.

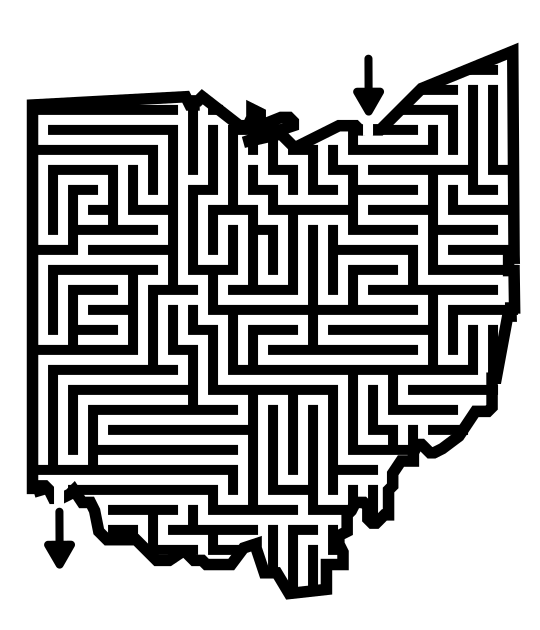
Step 4 - Complete the Maze
Draw the final walls and draw the exit. You have completed the drawing of a standard equal maze !

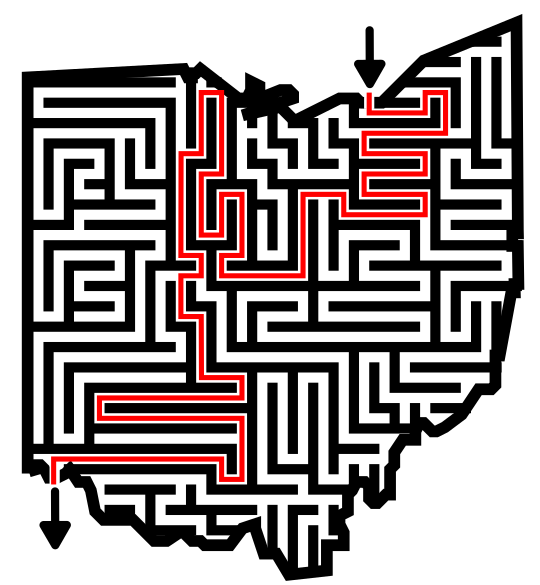
Step 5 (Optional) - Draw the Solution
You have two options here - Option 1 - While the correct pathway is fresh in your mind, draw the solution to the maze. This is especially important with more complex mazes. It can also be a check to make sure your maze has a solution. This example maze is easy. Option 2 - Let the maze sit for a few days and try solving it yourself. Was it the difficulty you thought as you were designing it ? Did you enjoy it or did it frustrate you in any way ? Using option 2 means you are more likely to go back and make adjustments to improve the maze. Think of it as proofreading for mazes.
Comparison of the 2 standard maze types:
Visually the Standard Equal Maze Paths design construction makes for a darker maze, and a more complex maze than the standard path maze. Although I did not measure the pathways, you can intuitively see that standard equal maze has much more pathway length.
Standard Equal Path maze
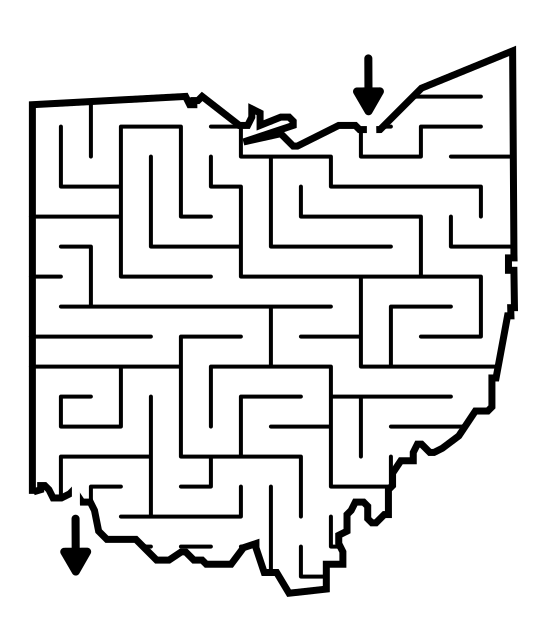
Standard Path Maze
4 Additional examples of Standard Equal Mazes
Below is an example of another standard equal paths maze of the state of New York. I wanted to show this example to mention that the outline is not the same width as the internal paths/walls. There is also a prominent Spiral maze pattern in the center of the state, although I would not consider this a spiral maze construction.

Our 2nd example shows what happens when we add some color to both standard maze variations, with the Rubber Ducky maze. While the background colors of yellow and orange are the same in each maze, the standard equal construction has a much darker look, with the thicker black walls holding back the colors underneath. The standard maze is bright and much easier to solve. Notice that because of the spacing of the orange beak compared to the wall spacing I decided not to maze the beak on the standard maze. Doing so would have only added a few meaningless lines on the beak.


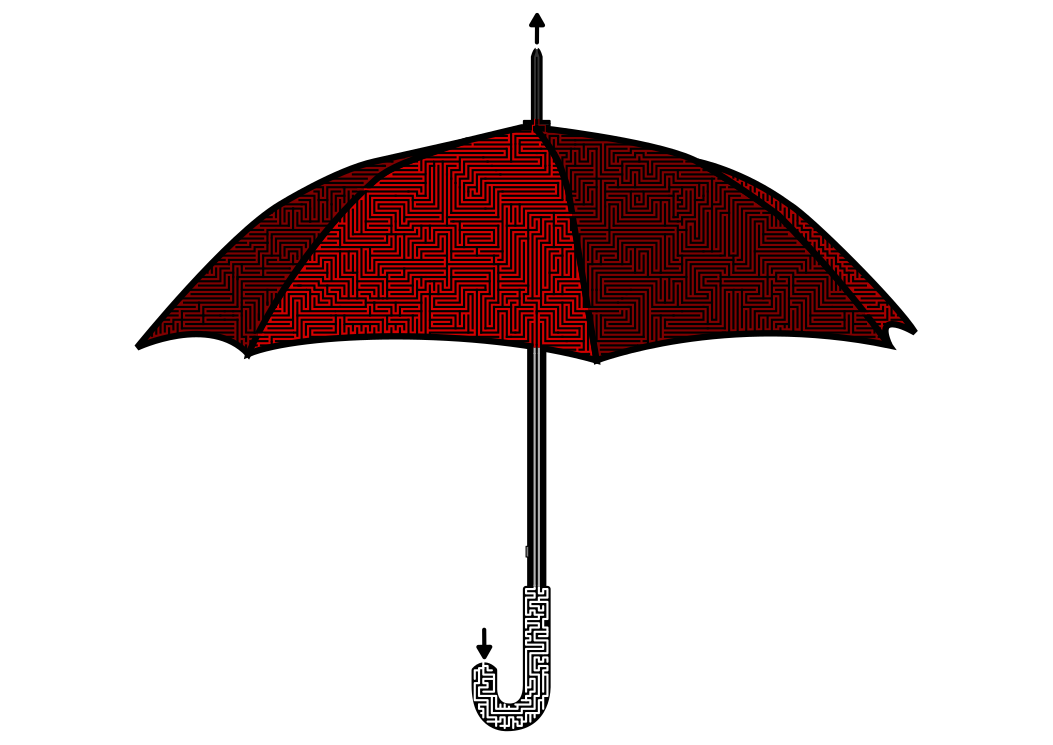
For my 3rd example I present the Umbrella maze. The size of this maze is larger than previous examples and I wanted to show you this so you think about scale when using a standard equal construction. This is all about a rule of thumb I have when deciding on my wall structure - when using a standard equal construction - the larger the space you are mazing, the more walls you will need and the more time it will take to construct. Without doing the math, I estimate standard equal constructions take 10X longer to make on average. In this particular example, while I like how the maze looks, I could have increased the scale to make the maze easier to solve on a screen. I do think that this construction is good for maze art. From across the room that looks like an umbrella…..and it is not until you get up close that you realize, wait, that’s a maze !!
For my 4th example I want to show you a time when this construction can be used to make a completely different type of maze, the Hidden Message maze. A hidden message maze is a maze where the correct solve of the maze creates a message for the solver. I use this to make greeting cards with hidden messages. Here is an example. If the below maze was made with a standard construction it would need to be a much tighter ratio of grid/wall so the message remains hidden at a glance.
Can you figure out what it says from looking at it ? Scroll down for the answer.


“Miss you”. If this were made with a much wider standard construction the pencil/pen/writing utensil used would not fill the pathways as well, making the message much harder to read (in addition to being easier to find). Want to learn how to make a hidden message maze ?
My fifth and final example is actually a mixed section maze, or a maze that uses multiple constructions. This particular Bishop Chess Piece maze uses a mixture of standard and standard equal constructions to differentiate the sections of the chess piece. Notice how the background color changes with the changes in the spacing of the walls. While this illustrates the point I want to make, imagine using this concept when creating your own mazes. Imagine a maze picture with shadows…illustrated with closer maze walls.

Making a Standard Equal Maze Video
Here is a quick 3:31 minute video of the making of a simple Standard Equal Maze.