
I have previously shown how to make a Square Hopi Tapu'at Labyrinth and today I will show you step by step how to make the circular version. Let’s look at the 2 side by side and compare them.

Circular Hopi Tapu'at Labyrinth
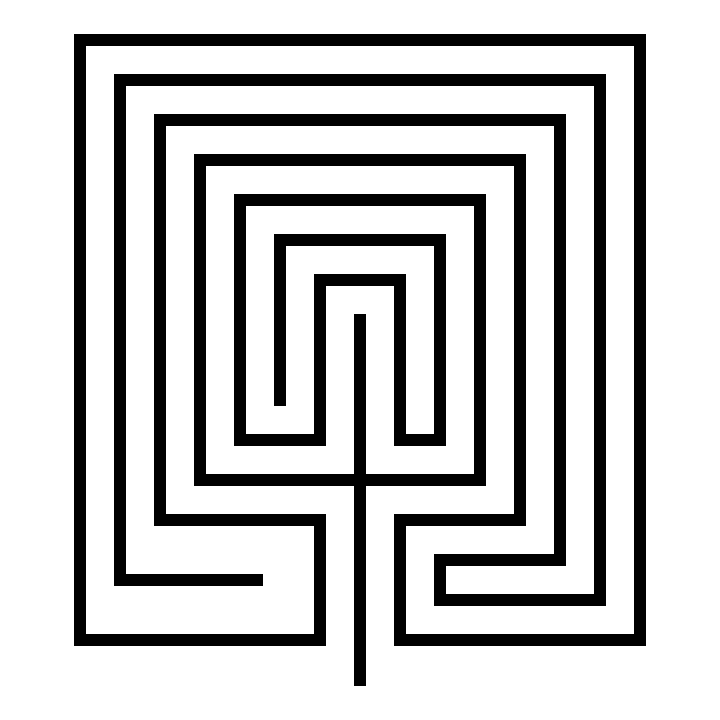
Square Hopi Tapu'at Labyrinth
The interesting thing about these is that they are so different. The square version has 2 entrances and 2 goals, while the circular has one of each. Obviously there is also the overall shape and corner shapes apparent in the individual names.
When I made my circular version I noticed that it did not fit into the typical labyrinth making process. I have a potential usable seed pattern, but each step is more complex than normal. I also noticed that the labyrinth is a series of (mostly) vertical straight lines and half and quarter circles. Let’s explore this with a diagram I made to show what makes up the labyrinth and compare it to the 7 circuit classical labyrinth:
Hopi Tapu'at Labyrinth: Everything in red is a straight line. Everything is black is either a half circle or a quarter circle. This is a right handed labyrinth (first turn is to the right).
Classical Labyrinth: Everything in red is a straight line (basically just the seed portion minus the dots). However the black portions are not perfect circles. When you make this labyrinth you are connecting points with curved lines. This is a left handed labyrinth (first turn is to the left). This can be made right handed, but left handed is typical.


I trial and errored the making of this labyrinth. It is complicated. So, while it is not ideal, I am going to use this very large seed pattern. Otherwise, each step is complicated. So the most difficult part of this is creating the seed pattern correctly. Smooth sailing from there !
For this labyrinth I will be drawing each step in red on top of a completed labyrinth with thin lines to show you where that step is located in relation to the completed labyrinth. After each step the previous steps lines change to black from red.
Step 1: Draw the starting seed pattern.
I included the grid in this example to show you how to draw this seed pattern. It is the most complicated I have ever used. Start with a plus sign. The horizontal is 8 units long, while the vertical line is 6.5 units long, 3 units below and 3.5 units above that line. At the end of each side of the horizontal line draw a 4 unit vertical line. Beside the left line you just made add 4 lines to the left, all 4 units long. Make sure they are equidistant apart. On the right side do the same thing but with only 3 additional lines instead of 4. Now you can fit 3 vertical lines on the right side, 2 grids long and aligned t the top of the just made 4 grid lines. Moving to the left side you will do the same thing with 1 exception, the line just to the left of the top of the plus sign should aligh with it at the top (1.5 grids instead of 2). Next under the horizontal line, aligned to each end you will draw three 2 unit long horizontal lines ( 6 total lines). And finally the last line of this complicated seed is a horizontal line on the left side, aligned with the previously 3 on the left but draw 3 grids long instead of 2.

Step 1 - Circular Hopi Tapu'at Labyrinth
Step 2: Draw the Goal
Between the two short lines in the center draw and arch to connect them. Teh top of the arch should align with the top of the vertical lines on its left and right.

Step 2 - Circular Hopi Tapu'at Labyrinth
Steps 3-9: Create the top arches
These are all the same maneuver and so they get bunched into 1 explanatory step. Create a semi circle to connect the top of the end of the next inner line on the left to the line on the right. The peak should align to the peak of the goal. Essentially you do this 7 times to create the top of the labyrinth ! Shown here as a rainbow; start with purple, then blue, etc.

Steps 3 - 9 - Circular Hopi Tapu'at Labyrinth
Steps 10/11: Connect the internal turns
You should have 2 empty spaces to fill in the center of the labyrinth on either side below the goal, each has 3 vertical lines. Take the end of the 2 outside lines on each side and connect them with an upside down arch. Shown in red and blue below.

Steps 10/11 - Circular Hopi Tapu'at Labyrinth
Steps 12-15: Draw the left corners
On the bottom left connect the end of each vertical line with the end of each horizontal line working you way from inside out. Each of these is a quarter of a circle, or arch. In order, red, blue, green, yellow below.

Step 12-15 - Circular Hopi Tapu'at Labyrinth
Steps 16-18: Draw the right corners
Same as above but on the right side, and only 3 times, shown as red, blue and green below.
Step 16-18 - Circular Hopi Tapu'at Labyrinth
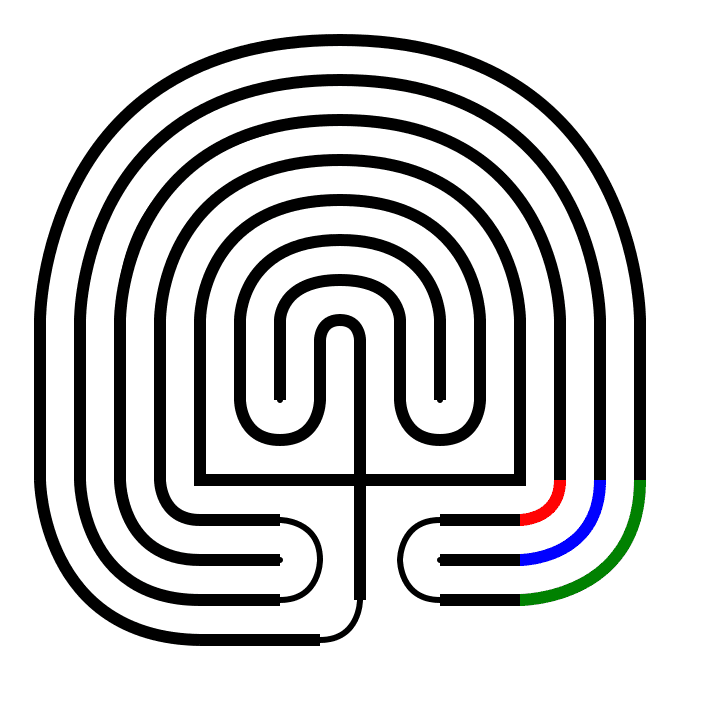
Steps 19 - 21: Close the outer pathways
On the bottom left you should have 3 horizontal lines of the same length (the southernmost line is slightly longer). Connect the 1st and third with a semi-circle to create a turnback pathway (shown below in red). Do the same thing on the right side opposite (in blue). And our final step is completing the labyrinth by connecting the bottom of the plus sign with the end of the horizontal line on the left with a quarter circle (shown in green).

Step 19-21 - Circular Hopi Tapu'at Labyrinth
That completes the labyrinth.

Circular Hopi Tapu'at Labyrinth
Thank you. Happy Labyrinth making !
Other posts you may like:
How to make many different kinds of labyrinths digitally