Arrow Maze Design Case Study - Part 11 All Ways Arrow

Welcome to Part 11 of our Arrow Maze Design Case study. In this section I will discuss a block option that is rarely used, but can added if you want to give the solver a high number of options. I call it the All Ways Arrow, and it is just what I described, an arrow that when you land on it allows you to move in every direction.

Here is an overview of what we will be covering in the 14 part series:

Arrow Maze Construction and Design:

Arrow Maze Components:

Extreme Arrow Maze examples:

Arrow Maze Design Case Study - Part 11 - All Ways Arrow

The All Ways Arrow for me is an idea that seems much better than it actually is in practice. The idea being that when you land on this type of arrow, you may move off of it in any direction. That makes it similar to a START block that is away from the edge of a maze. So, landing on this allows you move in 8 directions (although the true number is most likely 7 since you most likely got to the All Ways Arrow from an adjacent move).

Let’s speak about 3 things you need to know about using this type of arrow:

  • The placement of the Arrow must be away from the edge of the maze to utilize every direction that may be moved in.

  • The All Ways Arrow has some “gravity” to it. I do not know a better way to describe this, maybe a black hole ? When this arrow type is used a large section of the maze will be dedicated to either reaching or leaving this point,

  • Because it needs so many pathways to/from it’s location in the maze, it is best to use it in a large arrow maze, as the pathways will invariably take up a lot of space.

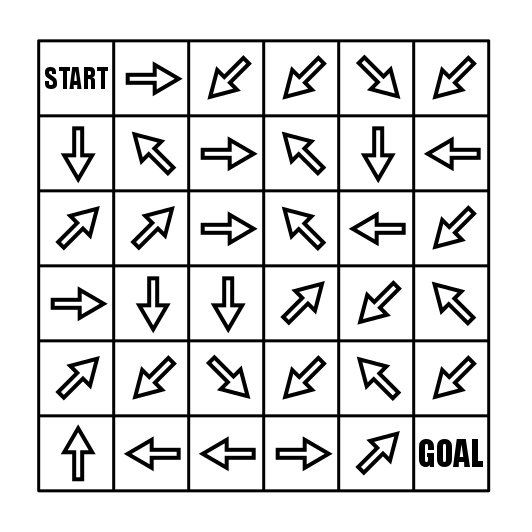
Here is a small maze that uses an All Ways Arrow:

9x9 Arrow Maze complex moves

Arrow Maze

My next example uses a total of 3 All Ways Arrows which adds a unique experience for the solver. After the initial choice from the START, the maze uses only regular arrows, so your only choices happen when you land on an All Ways Arrow. So you go from no choice to many choices (six, six and seven choices by my count). Try it and see what you think.

Arrow Maze #70

So add this arrow to your toolkit, but my guess is you will use it sparingly.

In Part 12 we will look at our final arrow maze component, the Long Arrow

Arrow Maze Design Case Study - Part 10 Slide Arrows

Welcome to Part 10 of our Arrow Maze Design Case study. In this section we will delve into the Slide Arrow, which can make up an entire type of maze…or can become simply a special move within a regular Arrow Maze.

Here is an overview of what we will be covering in the 14 part series:

Arrow Maze Construction and Design:

Arrow Maze Components:

Extreme Arrow Maze examples:

Arrow Maze Design Case Study - Part 10 - Slide Arrows

Yes, a Slide Arrow Maze is a completely separate type of maze IMO to an Arrow Maze. They use the same shapes…the same START and GOALS…and both are full of arrows in a block format. BUT. And, for me it is an important but. They are different types of mazes. A complete Slide Arrow Maze is MUCH MORE DIFFICULT to solve than an Arrow Maze. It is not even close. It is also much harder to design and create. I did the below comparison for my How To Draw a Maze posts:

Arrow Maze and Slide Arrow Maze solving instructions

Arrow Maze Comparisons

So landing on a Slide Arrow means you can slide to ANY block it is pointing to (but you can not jump gaps). So in an Arrow Maze you make choices at the START, and at intersections…but in a Slide Arrow Maze each move is a choice…and typically MANY choices. So the move possibilities get much higher, much faster. You can also solve a Slide Arrow Maze from a point very far away from the GOAL.

Here is a Slide Arrow Maze example. It is a simple 6x6 with no notches in the shape. Should be easy…right ?

6x6 Slide Arrow Maze

But that is not why we are here. If you are interested in trying a full book of Slide Arrow Mazes I made a free downloadable book you can find here. I like to use a slide arrow every once in awhile to give the solvers some options within a regular arrow maze. The first example below uses the slide in a very specific way. From the START you have a forced move onto a slide arrow. The move from the slide arrow gives the solver 8 possible blocks to move to. So, I have used the slide arrow to manufacture a very difficult start !!

Arrow Maze example with slide arrow start

Ok, let’s look at a maze with multiple slide arrows. Check out this hourglass shaped maze (page 65 in an upcoming book). Give it a try.

Arrow Maze #65

Did you notice that in order to cross from the top portion of the hourglass to the bottom part you must use the slide arrow - both regular arrows direct you back to the top portion of the maze ! A little bit of nuance that can make the design and solve more fun ! You can even imagine a maze where all the arrows are pointing one direction but a slide arrow cuts through them to the other side.

In Part 11 I will tell you about the use of the All Ways Arrow !

Arrow Maze Design Case Study - Part 9 Using Warp Zones

In Part 9 of our Arrow Maze Design Case study we will do a quick overview of the Warp block which can be used as a warp zone to jump across the arrow maze. Star Trek fans would be proud,

Here is an overview of what we will be covering in the 14 part series:

Arrow Maze Construction and Design:

Arrow Maze Components:

Extreme Arrow Maze examples:

Arrow Maze Design Case Study - Part 9 - Using Warp Zones

There is not much explanation needed for a Warp block used in an Arrow Maze despite it being an interesting twist to add to a maze. Basically, it allows you to Warp (or jump) to the same shaped Warp across the maze. There is one additional thing that must be explained. When you land on a Warp block you can warp across the maze OR you can choose not to warp. This leads to the explanation where leaving a Warp block can be moved off of just like a START block - in any direction.

In my example below I use a circular shape and a diamond shape for the Warp blocks. My third shape is typically a square. If you want to use color to differentiate Warp blocks that is also an option.

9x9 Arrow Maze with Warp Zones

Warp Arrow Maze

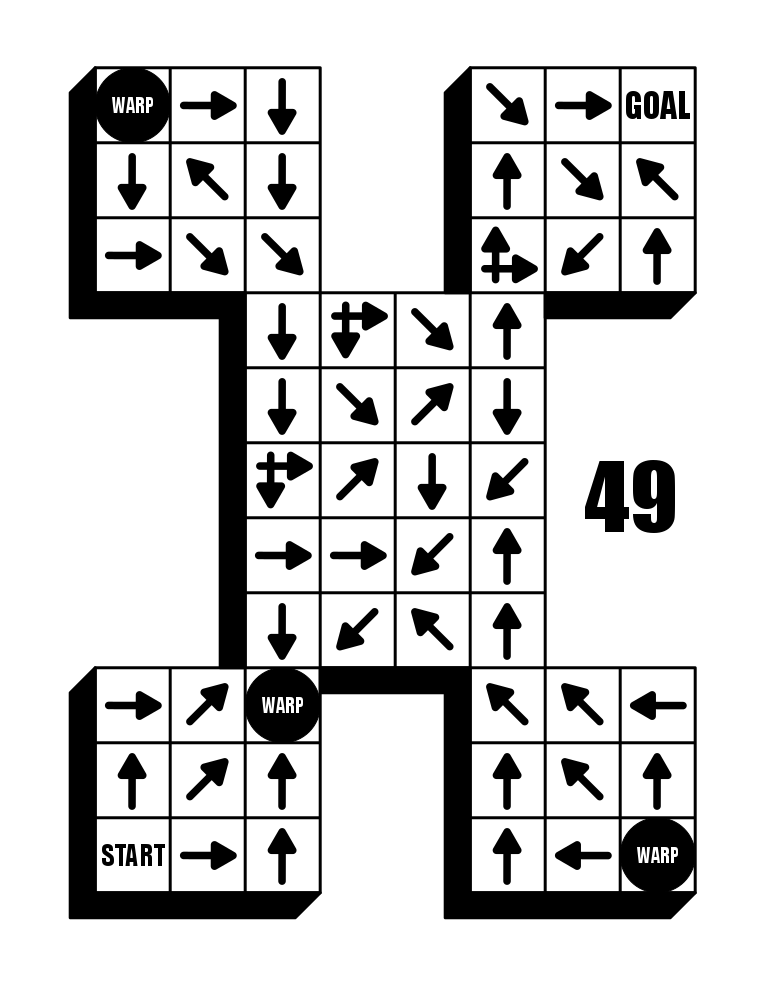
There is an additional twist I thought of that I put in this Arrow Maze for an upcoming book. With this Warp, when you land on it you may move to either of the other WARPs - 1 shape, 3 Warp choices. When you add in the fact that each of those Warps have choices leaving from them…well there are a lot of choices to make when you land on a Warp.

Arrow Maze #49

And it must be said that a great way to use Warp blocks is to travel between two disjointed sections like in the example below. Yes, I could have used double arrows to jump the gaps….but this version essentially creates an initial arrow maze (whose goal is the first Warp), and then a second Arrow Maze from the Warp to the Goal.

Arrow Maze #48

In Part 10 I will discuss the very useful Slide Arrow.

Arrow Maze Design Case Study - Part 8 Return to Start

Welcome to Part 8 of our Arrow Maze Design Case study. We will look at the Return to Start block in this section It is a block that is terrible to land on because it requires you do do exactly what it says, return to the start block of the maze.

Here is an overview of what we will be covering in the 14 part series:

Arrow Maze Construction and Design:

Arrow Maze Components:

Extreme Arrow Maze examples:

Arrow Maze Design Case Study - Part 8 - Return to Start block

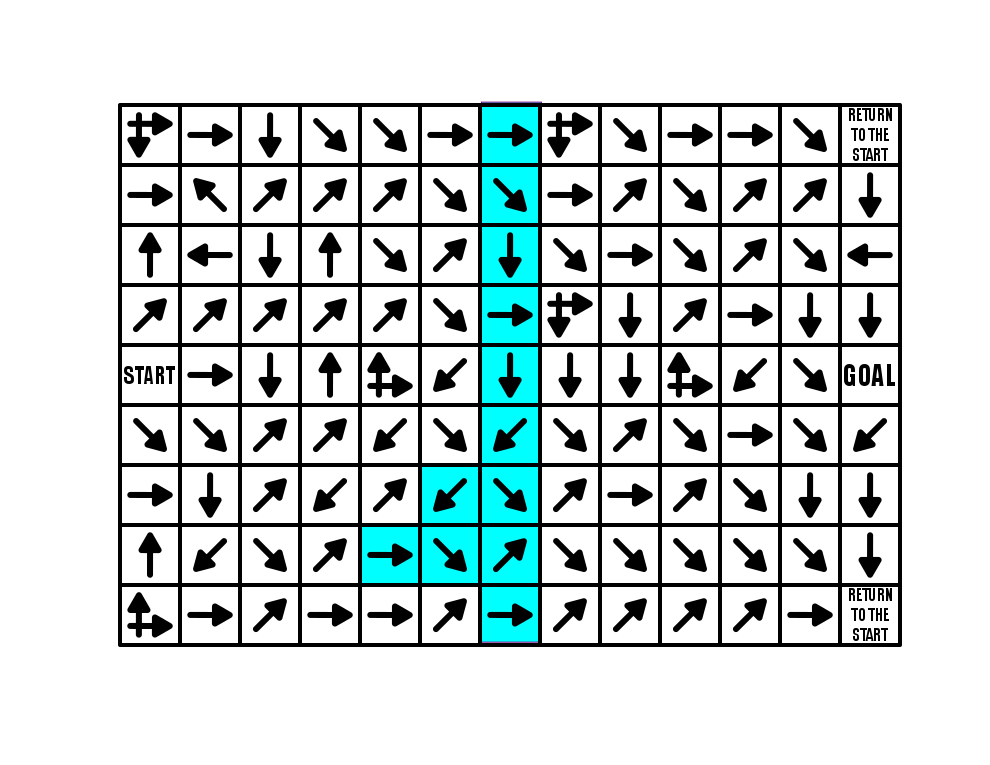
Again we will use a 9 x 13 landscape Arrow Maze, and add a few Return to Start blocks. While you can use as many of these blocks as you need…this example only uses 2. Take some time to solve the maze.

13x9 Arrow Maze

Return to START Maze

The use of this block gives the solver that feeling of dread. This is not a block you want to land on. For this maze I only used 2 and led all the incorrect pathways to those 2 points. One of the advantages of using this block is that as you design the maze you DO NOT NEED to leave a space for incorrect pathways to return to the start on their own. For this particular maze that means moving all pathways from left to right.

I highlighted the middle column of the maze to show this more clearly. Notice that ALL arrows in this column move to the right towards the GOAL of the maze…except ONE block that moves SE and returns back to the right just after…so really nothing is moving left back to the START.

13x9 Arrow Maze design explanation

So what happens when you get AGGRESSIVE with the use of Return to Start blocks ? Well here is another example from my upcoming book (page 99 of 100). It uses only regular arrows and decision arrows but a TON of RTS blocks to drive the solver crazy. There are SO MANY wrong pathways that can be taken and all of them return you back to the start of the maze !

Arrow Maze #99 - VERY HARD !

Now that was intense and annoying.

And although it should be obvious…a RETURN TO START block may not be used in an Arrow Maze with START GOAL blocks…because where do you go back to ?

In Part 9 we will deal with another block that moves you across the maze, the Warp Block !