
In a series of posts I will show you how to make a maze in a wide variety of design constructions. The 23rd type of maze construction is the Pipes maze. Let’s define what I mean, then get into the example. Every example will use the sample basic outline (the state of Ohio) to better illustrate the differences between each maze type.
Pipes Maze - A maze where the pathways are represented by pipes. The use of pipes allow the maze to take on an extra dimension beyond the paper as the pipes can weave around one another.
Before we get into the step by step process I want to note that this is one of the longer maze types to make. Even a short, easy maze takes a good amount of time to complete. It is also the maze type (along with it’s sister type the Weaving Maze) that is most likely to have design problems that are difficult to catch.
HOW TO MAKE A PIPES MAZE
Step 1 - Draw the Outline (optional)
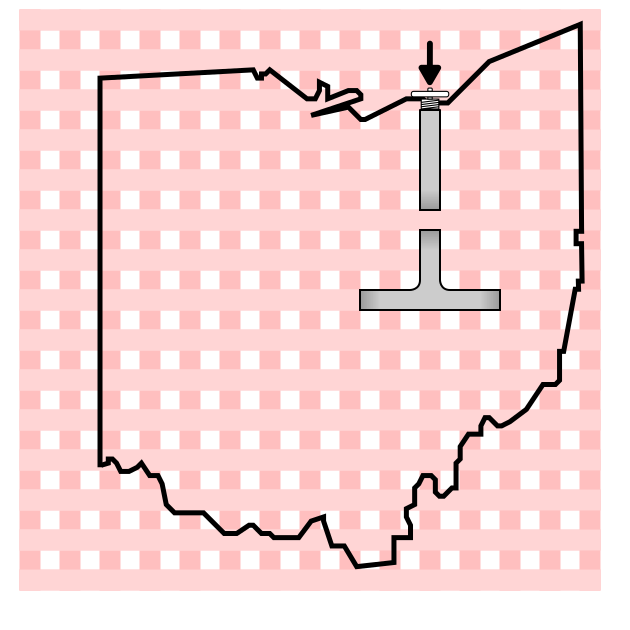
Because this is a Pipes maze there is no requirement to make any outline, in fact 99% of the time there will not be an outline as the pipes naturally make a self contained border. However, to be consistent with my project I have included my standard Ohio outline for comparison which I will use to guide the shape of my pipe maze (then delete).
Step 1.5 - Draw a Guide Grid
To help give your Pipe maze some structure add a picnic blanket grid to guide the drawing of your pipes. Add a start location on the edge of your outline with an arrow (optional) and a turning knob. This grid will guide where you can and can’t draw pipes. Do not draw any pipes in the white grid of the “picnic blanket”, while filling the colored portion (in this example pink) with piping.

Step 2 - Start Drawing Pipes
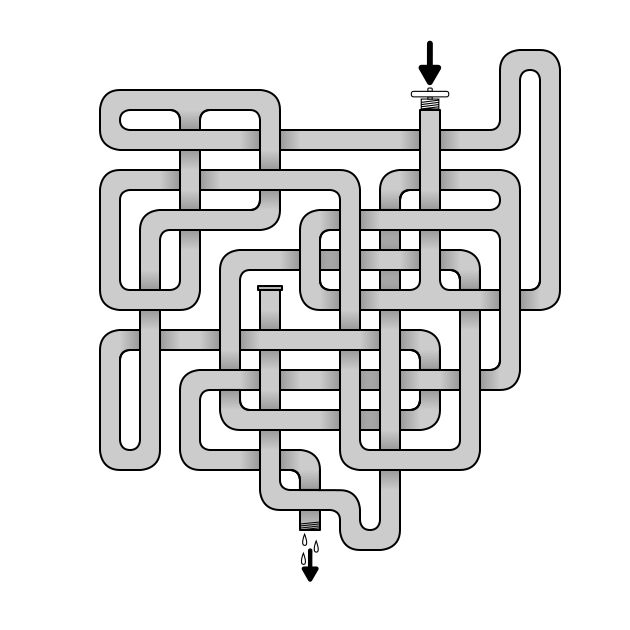
Starting from the entrance, begin drawing pipes. As you create the pipes remember you can loop and weave the pipes around one another. As you draw if you want to loop a pipe back you will need to stop a path (it will look like a dead end) and start it again leaving a gap for the future crossing. You can see an example the initial the gap will have a pipe thru it as the pipes continue to be drawn ! Also, I color the pipes grey as I go so they look like pipes !!
IMPORTANT RULES : Never end a pipe under another pipe. Never split a pipe under another pipe. Basically, anytime a pipe goes under another pipe it must come out the other side to avoid confusion !

Step 3 - Add Shadows to the Pipes (timing optional)
I add shadows to the end of any section of pipe that will go under another pipe in the maze. While you can do this at the end of the mazes construction also, I find it is easiest to do this as you draw the pipes (it is VERY easy to miss some!).
Step 4 - Keep Drawing the Pipes
Weave your pipes around one another, occasionally splitting the pipe into different sections. I believe that compared to other maze constructions this is the easiest one to lose track of your open pathways during the design. You also have the challenge of filling in all the gaps you have made along the way,


Step 5 - Finish the Pipes and add the Spigot
End the final pipe you have chosen as a solution with a spigot (with an additional arrow and water drips optional). Notice that the dead ends get capped just as a pipe would, although this maze has many loops versus dead ends ( see below for additional examples with more dead ends! )

Step 6 - Delete Your Guides
The Final Pipe Maze !
Step 7 - Make the Maze Solution
Highlight the correct path in the final version of the maze to create the final maze solution (shown here in red). One other thing I have noticed when creating this type of maze is that while the making of it has a lot of complexity, sometimes the solve does not. Just look at this example. It really is a bit of an easy maze, or at least a maze that if you take a wrong turn you can still solve quickly,

Additional Pipe Maze Examples
I start with a link to the largest pipe maze in the world (probably) if you want to challenge yourself. It has no dead ends (pipe caps) and uses loops throughout for the wrong pathways. Definately a challenge.
Below is a more typical version of a Pipes Maze, but with no outline used (notice the large gaps without the guide to help), and a start and goal that are befitting of a pipe maze ! Also, there are lots of dead ends in this version vs loops.

I made a second Ohio Pipes maze below. Without context you might not know it is Ohio, but you could easily add a title or similar to convey that. Anyway, instead of an outline I used dead end pipes to make a kind of outline of Ohio, just to see how it would turn out.

My fourth example is a large size poster version of a Pipes Maze. I did not use any shadows so this looks a bit more bland than the other examples. IMO this also makes it more difficult to solve, but not necessarily in a good way, only because it is more difficult to see the crossings.. This also features more false pathways and crossing pipes. I think this is a fun maze to solve. Try it !

Explore the 10 different types of weaving maze styes, including pipes mazes and see which you prefer:
What is Your Preferred Weaving Maze Style ?
I also created a method to help create a complicated weaving maze that I found very helpful when making this maze type for adults:
Interested in learning how to make or draw other types of digital mazes ? I have step by step instructions on how to make over 40 different maze types.
If you prefer making labyrinths, you can find step by step labyrinth making instructions.