
Today I will share with you how to make a variation on the popular Math maze construction that I call an Addition Trail Maze. While a math maze can use dozens of different calculations to solve it, the addition trail maze uses only one, addition. Let’s define what I mean, then get into the example. First, here is my definition of the 2 types of Math Mazes:
Math Maze - A type of number maze where moving from the Start to the Goal is done by correctly answering math problems to move in the correct direction.
Addition Trail Maze - A type of math maze where you move from Start to Goal by adding numbers along the way (the trail) to hit a specific goal number.
How to Make a Math Addition Trail Maze
Step 1 - Draw the Outline
This maze type is not conducive to outline or shapes so I will use a traditional grid-like pattern to illustrate the creation. The outline I use in the example and the most common is a simple square or rectangle, although it can be made in any gridded shape.
Step 1.5 - Choose the Start and Goal
I like using a START and GOAL within the maze placed inside the grid. I choose opposite side of the structure.

Step 2 - Add pathway walls
Next I add pathways to create trails that will become the framework for possible pathways. This choice will determine what possible outcomes at available to you. Notice that I limit the options with a bottleneck between the 3rd and 4th columns. Although the grid I was working with is not shown, this is a 5x5 grid.

As a creator the next few steps happen as part of the design process, but will not be part of the final maze. They are planning steps to create a workable maze.
Step 3 (Planning step 1) - Break the trails into sections
Create sections (mine are in bubbles) which are options that can be moved to. I labeled them with letters. From the START you have 2 options to move in, into section A or into section B. If you move in direction A you will move through 4 blocks before making another decision. If you move onto B you immediately have another decision to make, D or E. When you make your sections for the first time you will make a mistake or 2. The most common mistake is including a block into a section where it does not belong. For example: If you are in A, you MUST next move to C, but C is not part of A. If you move from B to D you also MUST move to C, but C is also not part of D. C must be independent.
Notice that the bottleneck I mentioned in Step 2 is now labeled F and must be used in any solution.

Step 4 (Planning step 2)- Create a decision tree
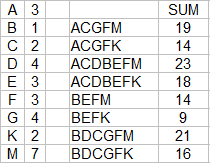
I made a decision tree to show the possible pathways that can be taken based on my maze construction. To make this easier to see I did not combine common branches i.e. each branch ends with it’s own FMK sequence instead of one common branch. This tells me that I have 8 possible trails to follow which are:
BEFM, BEFK
BDCGFM, BDCGFK
ACGFM, ACGFK
ACDBEFM, ACDBEFK

Step 5 (Planning Step 3) - Add numbers to the sections
Use the 8 possible solutions we found above and assign values to each letter which will create the 8 numbered solutions. Then convert those numbers into the appropriate section of the maze. If plug these into a spreadsheet I can write some formulas to calculate the possible answers. Here is what I used, and their answers:
I can adjust the numbers of each letter as needed to create different sums.
And here are those letters converted to numbers in the actual maze. I used all small numbers, but that is obviously not necessary:

Step 6 - Delete background items
Clean-up the trail maze and come to a final addition trail maze construction.

Step 7 - Add Directions
Add directions to explain to the solver how they can move through the maze. Because you have already made the solution tree in the planning process, this is the time you pick which solution will be the correct one. Because there are 2 possible solutions for 14 I did not pick that number !

Addition trail maze
Step 8 - Create a Final Solution
Highlight the correct path in the final version of the maze to create the final maze solution (shown here in gold).

Note that the final maze is a 5x5 grid, using 23 of the 25 blocks for possible solutions. Let’s look at an abbreviated example to see how a few changes effect things.
Additional Math Trail Maze Example
Here I am using a 6x6 grid and a different internal wall structure which is much more complicated. Going from 23 blocks to 34 blocks really gives us so many more options. We had 8 possible pathway solutions above, any guess how many solutions this maze will have? Here are the abbreviated steps to give you a sense of what I mean.
Steps 1, 2, and 3 Outline, walls, and section the pathways
I have combined the steps for brevity. The walls I used have more gaps and so this leads to more possible pathways. The number of possible sections in our first example was 9 (as shown by having 9 different letters) and here it is 18.

This can be seen in the decision tree below. I did the pathways for B before A. You see a full tree for B while A is abbreviated using those findings so we have a smaller tree to look at. The M, G and U that are colored on the B side of the tree is repeated for the A side, aligning to the colored m, g, and u. Circles reflect the goal. B has 12 ways to reach the goal, as does A, so 24 possible pathways. So that is our answer, 8 possible solutions become 24 with just a slightly larger maze size!

Here is the spreadsheet I made with possible solutions. With some formulas you can play with the #’s that correspond to each letter and see the possible answers change in real time.

Step 5 Add numbers to the sections
Yes I added some negative numbers into the mix. It adds a nice twist to the possible pathways and solutions. It gives the solver more strategy to use in how they move through the maze.

Steps 6, 7 - Delete guides and add directions
I chose 39 as my solution. But I should mention that choosing the largest number you calculate in your spreadsheet is also fun. The smallest number tends to be easier to solve and I do not suggest you use it unless you use many large negative numbers to hide the solution well. There is also some intelligent design you can use by making some sections look different than they may actually be (e.g. a large number followed by some small negative numbers to even everything out).

So that completes the instruction. I hope you enjoy making your own Math Addition Maze !
Here is an early example I made (still called a Math Maze at the time) I am including so you can practice breaking the maze into sections. Good Luck ! The answer is immediately below.

Let’s see how you did:

Other posts you may be interested in:
Mazes of all 50 US states for Kids, each maze includes the state capital, year of statehood, state motto and more.
A collection of free downloadable Kids Activity Books.
Step by step instructions on how to make over 40 different types of maze.
Instructions on how to make labyrinths.